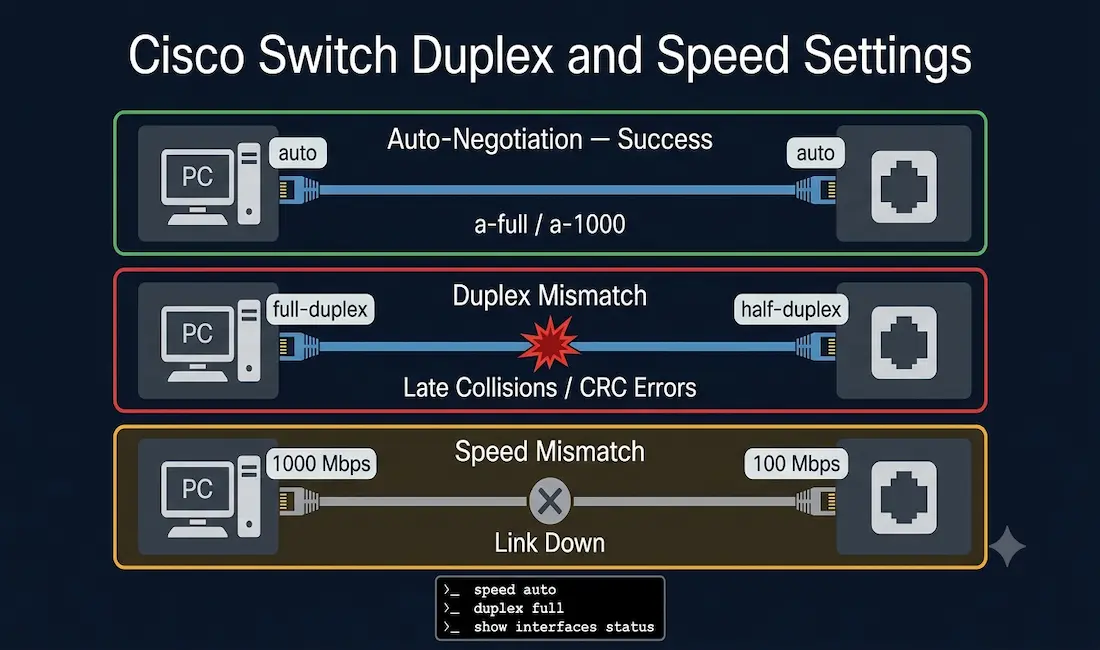
Duplex and speed settings are the most fundamental configuration parameters for each switch port. By default, Cisco switches auto-negotiate both speed and duplex with connected devices. When this negotiation works correctly, both ends of the link establish the highest common speed and the best available duplex mode without any manual intervention. When it fails — either through a misconfiguration or a hardware incompatibility — the result is a duplex mismatch, one of the most common and misdiagnosed performance problems in Ethernet networks.
This guide covers how auto-negotiation works, what causes duplex and speed mismatches, how to identify them from Cisco switch interface counters, how to configure duplex and speed manually on a Cisco IOS switch, and the best practices that apply whether you are studying for CCNA or troubleshooting a production network.
Half-Duplex vs Full-Duplex
Two modes of duplex operation exist on Ethernet links:
Half-duplex — data can flow in both directions between two devices, but only one direction at a time. The sending device must wait for the link to be idle before transmitting. Collisions are possible and handled by CSMA/CD (Carrier Sense Multiple Access with Collision Detection). Half-duplex is associated with older hub-based networks and legacy devices. Modern switched networks should never run at half-duplex on point-to-point links.
Full-duplex — data flows in both directions simultaneously. The sending and receiving channels are independent, so collisions cannot occur in a properly configured full-duplex environment. All modern Cisco switch ports and NICs support full-duplex. For any switched point-to-point link, full-duplex is the correct mode.
Auto-Negotiation
Most Cisco switches and Ethernet NICs default to auto-negotiation for speed and duplex. Auto-negotiation is defined in the IEEE 802.3u standard for Fast Ethernet and allows two link partners to exchange capability information and agree on the highest performance mode both support.
The process works as follows. Both ends advertise their supported speeds and duplex capabilities through a brief exchange at link establishment. The switch and the connected device then select the highest common speed and the best available duplex mode. If both ends support full-duplex, full-duplex is selected. The highest mutually supported speed is used.
For example, if PC-1 supports 10 and 100 Mb/s and a switch port supports 10, 100, and 1000 Mb/s, auto-negotiation sets both to 100 Mb/s — the highest speed both support. Because both sides also support full-duplex, auto-negotiation sets both to full-duplex. The result is a 100 Mb/s full-duplex link with no manual configuration.
Gigabit Ethernet (1000BASE-T) and auto-negotiation: The IEEE 802.3ab standard for 1000BASE-T makes auto-negotiation mandatory, not optional. On a GigabitEthernet port using copper (1000BASE-T), you cannot successfully hard-code speed to 1000 Mbps and expect the link to function unless both ends are hard-coded identically. Attempting to force speed on one side while the other runs auto-negotiation will typically result in a link-down or degraded connection. This is different from 10/100 Mbps ports, where hard-coding is more reliably supported by both ends.
10 Gbps and higher: Ports operating at 10 Gbps and above always run full-duplex. Half-duplex is not a valid mode at these speeds.
Duplex Mismatch: Causes and Symptoms
A duplex mismatch occurs when one end of an Ethernet link operates at full-duplex and the other operates at half-duplex. The link remains up — this is what makes duplex mismatch difficult to diagnose — but performance degrades severely and specific error counters climb on the affected interface.
How Duplex Mismatch Happens
The most common cause is a specific auto-negotiation failure scenario: one side of the link is hard-coded to full-duplex while the other side is left at auto-negotiation. Under IEEE 802.3u, when an auto-negotiating port cannot detect its partner’s speed and duplex settings (because the partner has disabled auto-negotiation), it falls back to a default — half-duplex at 10 and 100 Mbps. The result: one side at full-duplex, the other at half-duplex.
This also occurs when:
- A port is reset and auto-negotiation re-runs but fails due to a transient error
- One side of a link is manually reconfigured and the other side is not updated to match
- A legacy device that does not support auto-negotiation is connected to a port left in auto mode
What Happens During a Duplex Mismatch
The full-duplex side transmits whenever it has data — it does not listen for traffic on the wire before sending, because full-duplex links do not use CSMA/CD. The half-duplex side is running CSMA/CD. When the half-duplex side detects a transmission from the full-duplex side arriving while it is also transmitting, it interprets this as a collision. If this collision occurs after the first 64 bytes of the frame have been sent (a late collision), the half-duplex side logs it as a late collision error.
The symptoms are asymmetric and distinctive:
- Half-duplex side: late collisions, CRC errors, runts, rising input errors
- Full-duplex side: CRC errors, FCS errors, runts from the corrupted frames the half-duplex side aborted
Throughput drops dramatically — often to 50–60% of expected performance under sustained load — while show interfaces still reports the link as up/up with the correct speed.
Signature Diagnostic: Late Collisions
Late collisions on a switched point-to-point link are the definitive indicator of a duplex mismatch. On a properly configured full-duplex link, collisions should be zero. Any non-zero late collision counter on a port that connects to a single device (not a hub) is essentially conclusive for a duplex mismatch. Normal collisions on a half-duplex segment are expected, but late collisions — those occurring after byte 64 — indicate a problem.
How to Configure Duplex and Speed on a Cisco Switch
Step 1 — Check Current Settings
Enter privileged EXEC mode using the enable command and run the following commands to view current speed and duplex settings:
show interfaces status
show interfaces GigabitEthernet0/1
The show interfaces status output shows each port’s current speed and duplex in compact form. An a- prefix on the speed or duplex value (e.g., a-full, a-100) indicates the value was set by auto-negotiation. No prefix (e.g., full, 100) indicates a manually configured value.
Sample output:
Port      Name    Status       Vlan  Duplex Speed Type
Gi0/1             connected    1     a-full a-100  10/100/1000BaseTX
Gi0/2             connected    1     a-full a-1000 10/100/1000BaseTX
Gi0/3             connected    1     half   100    10/100/1000BaseTX
In the above example, Gi0/3 is hard-coded to 100 Mbps half-duplex. If the connected device is set to auto-negotiate or full-duplex, this port is configured for a mismatch.
Step 2 — Configure Speed and Duplex
Enter global configuration mode, navigate to the interface, and set speed and duplex:
Switch# configure terminal
Switch(config)# interface GigabitEthernet0/1
Switch(config-if)# speed 1000
Switch(config-if)# duplex full
Switch(config-if)# end
Speed options: 10, 100, 1000, auto Duplex options: half, full, auto
To revert to auto-negotiation (recommended for most deployments):
Switch(config-if)# speed auto
Switch(config-if)# duplex auto
Step 3 — Save Configuration
Switch# write memoryOr equivalently:
Switch# copy running-config startup-configStep 4 — Verify Configuration
Switch# show running-config interface GigabitEthernet0/1
Switch# show interfaces GigabitEthernet0/1
Switch# show interfaces status
Check that the interface shows the expected speed and duplex values. After correcting a duplex mismatch, monitor the interface error counters for several minutes under live traffic to confirm that late collisions and CRC errors are no longer incrementing.
Step 5 — Monitor Error Counters
The key counters to watch in show interfaces [interface-id] output after any duplex or speed change:
show interfaces GigabitEthernet0/1 | include error|collision|CRC|duplexHealthy full-duplex link counters that should remain at zero or near-zero:
- Late collisions — zero on a full-duplex link. Non-zero is a mismatch indicator.
- CRC errors — zero or near-zero on a clean link. Rising values indicate a duplex mismatch or cabling issue.
- Runts — frames smaller than 64 bytes. Often caused by collisions (half-duplex side aborting transmission).
- Input errors — the parent counter; drill into the sub-counters to find which is driving it.
Common Issues and Troubleshooting
Duplex Mismatch
Symptoms: Late collisions on show interfaces, rising CRC errors and runts, throughput much lower than the link speed suggests, link reports up/up but performance is poor.
Diagnostic command:
show interfaces GigabitEthernet0/1Look for non-zero values in late collision and CRC counters. The late collision counter is the most reliable indicator.
Fix: Set both ends of the link to the same duplex setting. The recommended approach is duplex auto on both ends. If one end is a legacy device that does not support auto-negotiation, hard-code both ends to duplex full and speed 100 (or the appropriate speed) explicitly. Never leave one side hard-coded and the other on auto at 10/100 Mbps.
Speed Mismatch
Symptoms: Link-down (not connected) shown in show interfaces status. Unlike a duplex mismatch, a speed mismatch typically prevents the link from establishing at all.
Fix: Ensure both ends are configured for the same speed, or set both to speed auto.
Exception: On 1000BASE-T (Gigabit copper), IEEE 802.3ab mandates auto-negotiation. Hard-coding speed to 1000 on one side while the other uses speed auto often results in a link-down condition. Set both ends to speed auto on copper Gigabit links.
Auto-Negotiation Failures
When they occur: Incompatible NIC firmware, non-IEEE-compliant auto-negotiation implementations, or a bad cable causing unreliable fast link pulses.
Diagnostic: Run show interfaces [id] and check for frequent link state changes in show logging. If the link fluctuates (up/down cycling), auto-negotiation is re-running repeatedly.
Fix: Disable auto-negotiation on both ends and hard-code matching values. Test with a known-good cable before changing software settings — many apparent auto-negotiation failures are actually physical-layer issues.
Duplex and Speed: Quick Reference Table
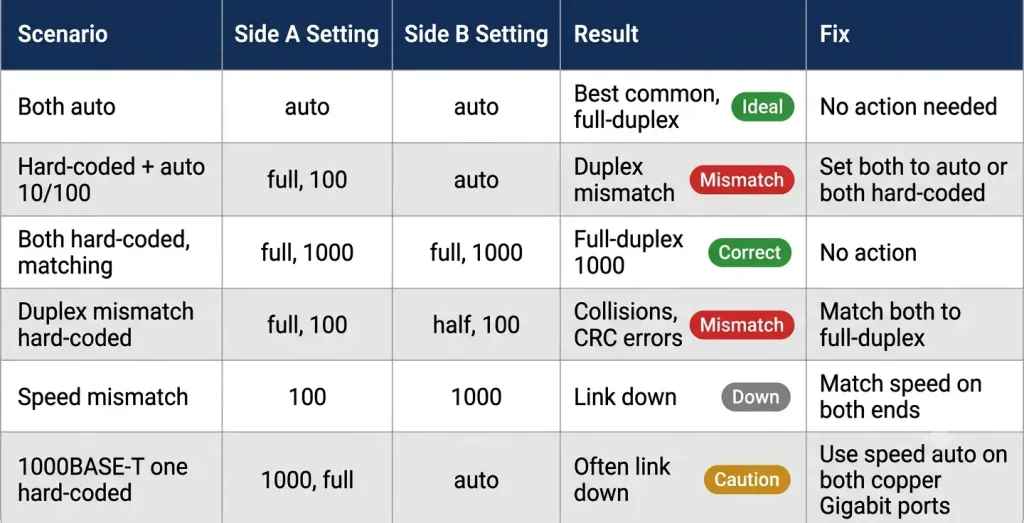
| Scenario | Side A | Side B | Result |
|---|---|---|---|
| Both auto | auto | auto | Best common speed, full-duplex (ideal) |
| One hard-coded, one auto (10/100 Mbps) | full-duplex, 100 | auto | Auto side falls back to half-duplex → mismatch |
| Both hard-coded, matching | full, 1000 | full, 1000 | Full-duplex, 1000 Mbps (correct) |
| Both hard-coded, duplex mismatch | full, 100 | half, 100 | Duplex mismatch → collisions, CRC errors |
| Speed mismatch | 100 | 1000 | Link down |
| 1000BASE-T, one hard-coded | 1000, full | auto | Often link down (IEEE 802.3ab violation) |
Best Practices
1. Use auto-negotiation for most links. On modern Cisco switches and NICs, auto-negotiation is reliable and eliminates the risk of misconfigured hard-coded settings. The IEEE 802.3ab standard requires it for Gigabit copper links anyway.
2. When hard-coding, always configure both ends. If a legacy device requires manual settings, explicitly configure both the device and the switch port. Configuring only one side is the primary cause of duplex mismatches.
3. Never mix hard-coded and auto on the same link (10/100 Mbps). One hard-coded, one auto is the textbook recipe for a duplex mismatch. Either both auto or both hard-coded.
4. Avoid half-duplex on modern switch-to-device links. Half-duplex is appropriate only for legacy hub segments. Every modern switch-to-device connection should operate at full-duplex.
5. Document all manual configurations. Hard-coded speed and duplex settings are invisible to anyone reading show interfaces status without the a- prefix context. Maintain a configuration record of any port with manual settings, especially before hardware replacements.
6. After changes, monitor error counters. A quick show interfaces check immediately after a configuration change does not confirm stability. Watch counters under live traffic for at least five minutes.
CCNA Exam Pointers
- Default Cisco switch port setting:
speed auto,duplex auto - Gigabit Ethernet (1000BASE-T) requires auto-negotiation per IEEE 802.3ab — hard-coding is not supported the same way as 10/100
- Gigabit and higher ports always run full-duplex — half-duplex is not a valid configuration
- Duplex mismatch signature: late collisions on the half-duplex side, CRC errors and runts on both sides, link up but performance severely degraded
- Speed mismatch signature: link-down (not connected)
show interfaces status—a-full/a-100means auto-negotiated;full/100without prefix means hard-codedshow interfaces [interface-id]— look forlate collision,CRC,input errors,runts- Commands:
speed {10|100|1000|auto},duplex {half|full|auto}, applied in interface configuration mode
Conclusion
Duplex and speed mismatches are among the most common performance problems in Ethernet networks, and among the easiest to introduce accidentally by configuring only one side of a link. The safest approach for modern networks is to leave both ends at speed auto and duplex auto, letting IEEE 802.3 auto-negotiation select the optimal settings. When legacy devices require manual configuration, hard-code both ends identically, verify with show interfaces status, and monitor error counters under live traffic to confirm the fix is holding.
Self-Assessment – Duplex and Speed Setting on Switch Self-Assessment – Switching Fundamentals
Frequently Asked Questions
What happens if duplex settings mismatch between a switch and a device?
A duplex mismatch causes the half-duplex side to detect collisions whenever both ends transmit simultaneously — because the full-duplex side does not listen before sending and does not back off. These collisions after byte 64 are logged as late collisions on the half-duplex interface. The half-duplex side also aborts and retransmits frames, producing runts and CRC errors on both sides. The link stays up but throughput drops severely — often to 50–60% of expected performance under sustained load. The link will appear healthy at low utilization and degrade only under traffic, making the root cause harder to identify without checking error counters.
How do I check duplex settings on a Cisco switch?
Use show interfaces status to view the speed and duplex of all ports at once. An a- prefix on the value (e.g., a-full, a-100) indicates auto-negotiated settings. No prefix (e.g., full, 100) indicates a manually configured value. For detailed error counters on a specific port, use show interfaces GigabitEthernet0/1 and look at the late collision, CRC, and input error counters. Use show interfaces GigabitEthernet0/1 | include error|collision|duplex to filter the output to the relevant counters.
How do I manually configure duplex and speed settings on a Cisco switch port?
Enter global configuration mode, navigate to the interface, and use the speed and duplex commands. For example: interface GigabitEthernet0/1, then speed 100, then duplex full. Save with write memory. Manual configuration is only recommended for legacy devices that do not support auto-negotiation, and only when both ends are configured to the same values. For Gigabit copper ports (1000BASE-T), always use speed auto and duplex auto — IEEE 802.3ab mandates auto-negotiation for this standard.
What should I do if a legacy device does not support auto-negotiation?
Manually configure matching speed and duplex on both the legacy device and the switch port. For example, if the legacy device is fixed at 100 Mbps half-duplex, set the switch port to speed 100 and duplex half (though duplex full is preferable if the device supports it — verify in the device documentation). Run show interfaces [interface-id] and monitor late collision and CRC counters under traffic to confirm the settings are working correctly. Never leave the switch port at speed auto / duplex auto when the connected device has auto-negotiation disabled on a 10/100 Mbps link — this will produce a duplex mismatch.
Why does auto-negotiation fail and result in a duplex mismatch?
The most common cause is a configuration asymmetry: one side of the link is manually set to full-duplex while the other is left on auto-negotiation. Under IEEE 802.3u, when an auto-negotiating port cannot detect its partner’s capabilities (because the partner disabled auto-negotiation), it falls back to half-duplex at 10 and 100 Mbps. This produces a mismatch even though only one side was manually configured. The fix is always to configure both ends the same way — either both auto, or both hard-coded to matching values.