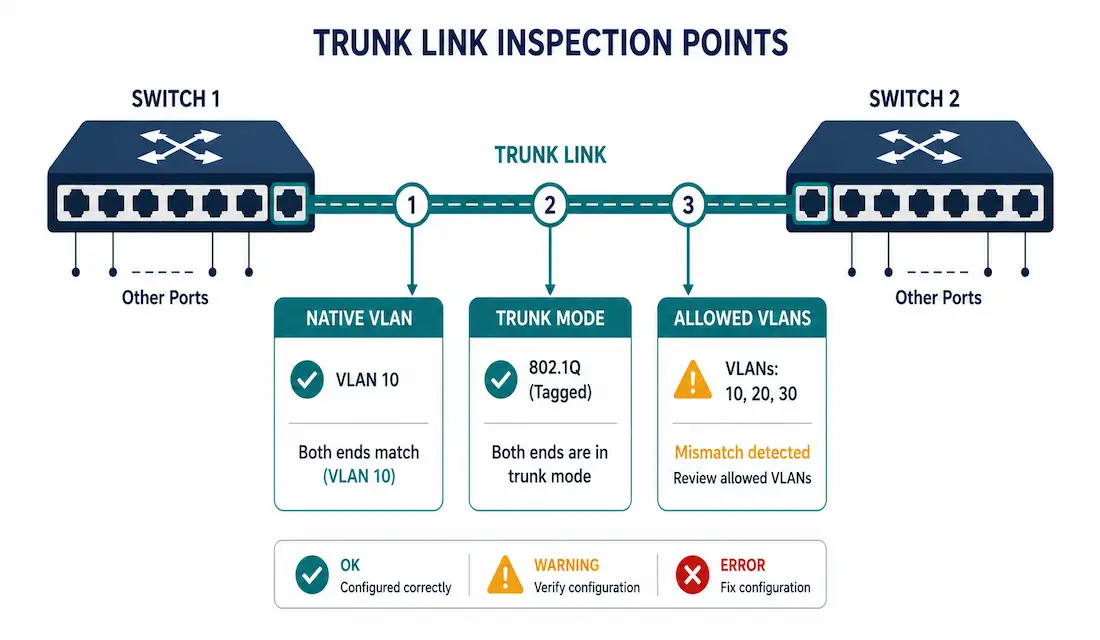
Trunk links carrying multiple VLANs between switches fail in a small number of well-known ways, and almost all of them come down to a mismatch between what’s configured on one end and what’s configured on the other. Knowing the standard troubleshooting order — native VLAN, then trunk mode, then allowed VLAN list — turns a vague “something’s wrong with connectivity between these switches” into a specific, fixable diagnosis.
This guide walks through each of the three most common trunk problems, how to recognize them, and exactly how to fix them.
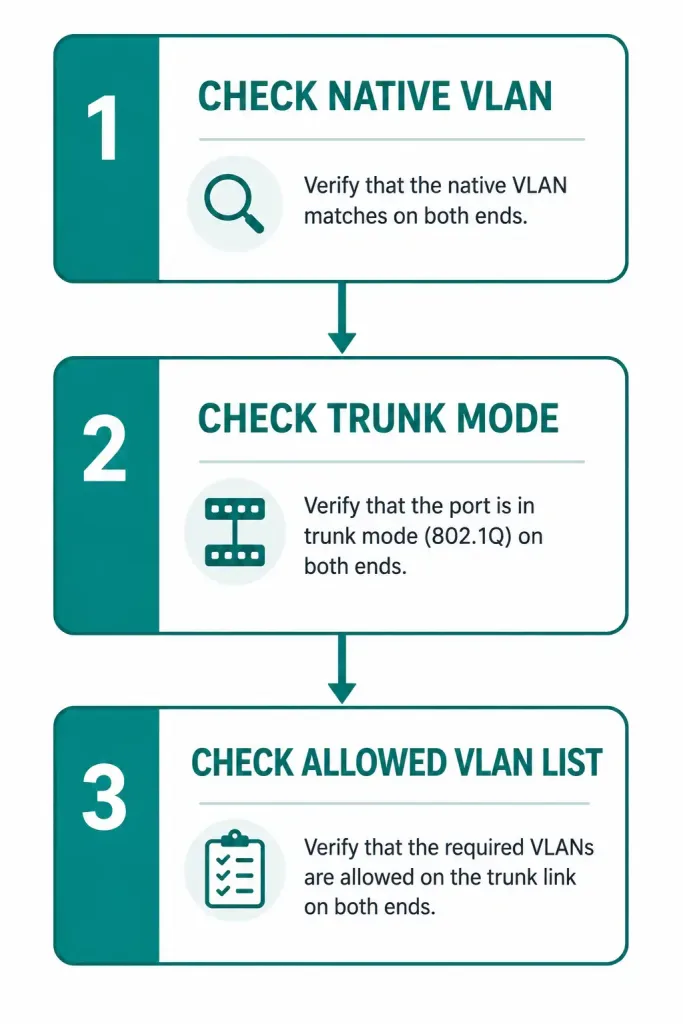
The Troubleshooting Order
When a trunk-related problem appears and the cause isn’t obvious, check things in this order:
- Native VLAN mismatch — check first, since it’s common and has a distinct symptom.
- Trunk mode mismatch — check next if native VLANs match but the trunk still isn’t working correctly.
- Allowed VLAN list — check last, confirming the specific VLANs you need are actually permitted across the trunk.
The command you’ll use throughout is one you should have memorized:
show interfaces trunkThis single command reveals the native VLAN, trunk mode, and allowed VLAN list — all three pieces of information the standard troubleshooting order asks you to check.
Native VLAN Mismatches
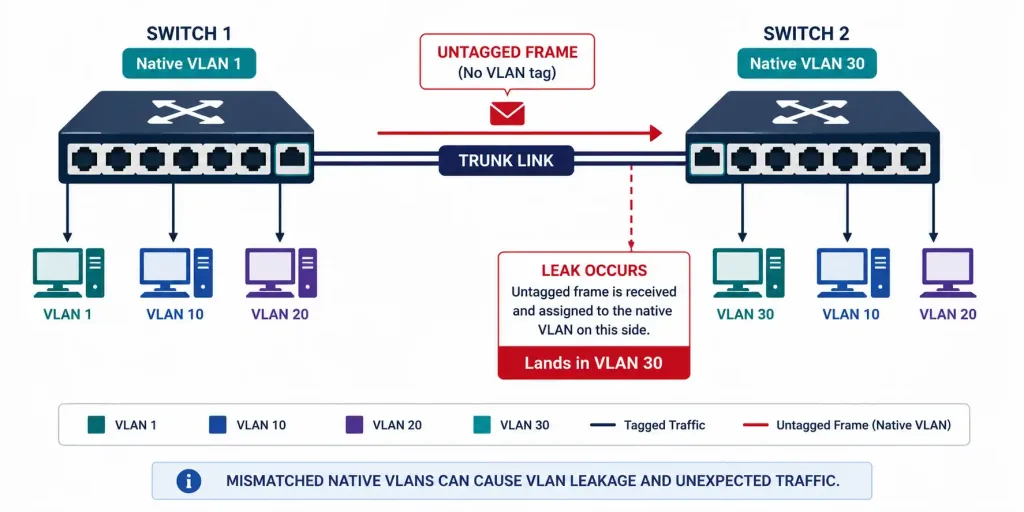
Sometimes a port behaves like it’s leaking traffic between VLANs even though it’s correctly configured as an access port on one specific VLAN — this happens when the native VLAN configured on a trunk doesn’t match on both ends of the link.
How it happens: trunk ports send native VLAN traffic untagged, unlike every other VLAN’s traffic, which carries an 802.1Q tag. If one side of the trunk considers VLAN 1 to be the native VLAN and the other side considers VLAN 30 to be the native VLAN, an untagged frame sent from VLAN 1 on one side arrives at the other side, gets interpreted as native VLAN traffic there too — but that side’s native VLAN is 30. The frame effectively crosses from VLAN 1 into VLAN 30, a real security risk since it bypasses normal VLAN isolation for exactly the traffic that isn’t tagged.
How to detect it: Cisco Discovery Protocol (CDP) actively watches for this and generates a console notification when it detects a native VLAN mismatch between two connected switches, which is often the first indication something’s wrong. Confirm directly with:
show interfaces trunkCompare the native VLAN reported on each end of the link — a mismatch here is unambiguous once you’re looking at the actual configuration rather than guessing from symptoms.
What it does and doesn’t break: a native VLAN mismatch does not prevent the trunk from forming at all — this is a subtle but important distinction from the other two problem types on this list. Tagged VLAN traffic continues moving correctly across the trunk; it’s specifically the untagged native VLAN traffic that leaks between the mismatched VLANs.
The fix: reconfigure both sides to use the same native VLAN.
Switch(config)# interface GigabitEthernet0/1
Switch(config-if)# switchport trunk native vlan 30
Apply the matching configuration on the connected switch’s corresponding interface, and confirm the mismatch notification clears.
Trunk Mode Mismatches
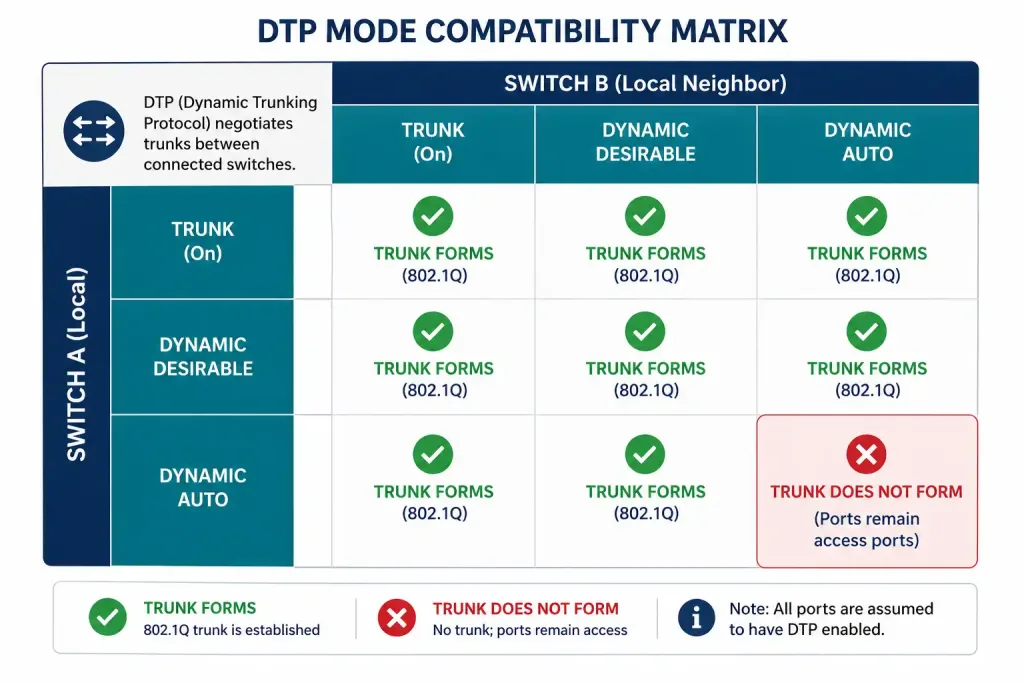
Cisco switches use Dynamic Trunking Protocol (DTP) by default to automatically negotiate whether a link becomes a trunk or stays an access link — convenient when it works, but a common source of confusing failures when it doesn’t.
A real scenario: suppose PC-2 and PC-3, both in VLAN 20, can communicate with each other but not with PC-4, also supposedly in VLAN 20 but connected through a different switch. The individual VLAN assignments all look correct. Checking the trunk status explains it:
show interfaces trunkThe output shows Sw-1’s Gig0/1 interface in dynamic auto mode, and the corresponding interface on Sw-2 is also in dynamic auto mode. This is the actual root cause, and it’s worth understanding precisely why: dynamic auto mode makes a port willing to become a trunk, but only if the connected port actively initiates trunk negotiation.
When both ends are set to dynamic auto, neither side ever actively initiates — both are passively waiting for the other. The result isn’t a trunk with a restricted VLAN list; it’s no trunk at all. The link falls back to behaving as a plain access link, carrying only its default VLAN, which is why PC-2 and PC-3’s VLAN 20 traffic never reaches PC-4 across that specific link.
The fix: manually configure trunk mode on both ends, rather than relying on DTP to negotiate it correctly:
Switch(config)# interface GigabitEthernet0/1
Switch(config-if)# switchport mode trunk
Apply the same command on the corresponding interface on the other switch. This is also why static trunk configuration is generally considered best practice over relying on DTP negotiation at all — a predictable, explicitly configured state is easier to troubleshoot than a link whose behavior depends on the specific interaction between two negotiation modes.
A related detail worth knowing: dynamic auto isn’t the only DTP mode. Dynamic desirable actively initiates negotiation rather than passively waiting, and will successfully form a trunk against a neighbor set to trunk, desirable, or even auto mode. Older Cisco switch platforms often defaulted to dynamic desirable, which is part of why trunks used to “just work” more often when plugging two switches together — newer platforms defaulting to the more conservative dynamic auto is a deliberate security-oriented change, since dynamic desirable’s willingness to actively negotiate a trunk with anything is itself a modest security exposure on a port that shouldn’t become a trunk at all.
Verify the fix worked:
show interfaces GigabitEthernet0/1 switchportConfirm the Operational Mode now shows “trunk,” not “static access.”
Wrong Allowed VLAN List
Even with a correctly negotiated (or statically configured) trunk and matching native VLANs, a trunk still won’t carry a specific VLAN’s traffic if that VLAN isn’t included in the trunk’s allowed VLAN list.
How to check:
show interfaces trunkLook specifically at the “VLANs allowed on trunk” output — if a VLAN you expect to see isn’t listed, that’s the problem, even if every other aspect of the trunk configuration is correct.
The fix, allowing all VLANs:
Switch(config-if)# switchport trunk allowed vlan allOr, to allow only specific VLANs — generally the better practice, since it limits unnecessary traffic and reduces the trunk’s exposure to VLANs it doesn’t actually need to carry:
Switch(config-if)# switchport trunk allowed vlan 10,20,30To add a VLAN to an existing allowed list without replacing it entirely:
Switch(config-if)# switchport trunk allowed vlan add 40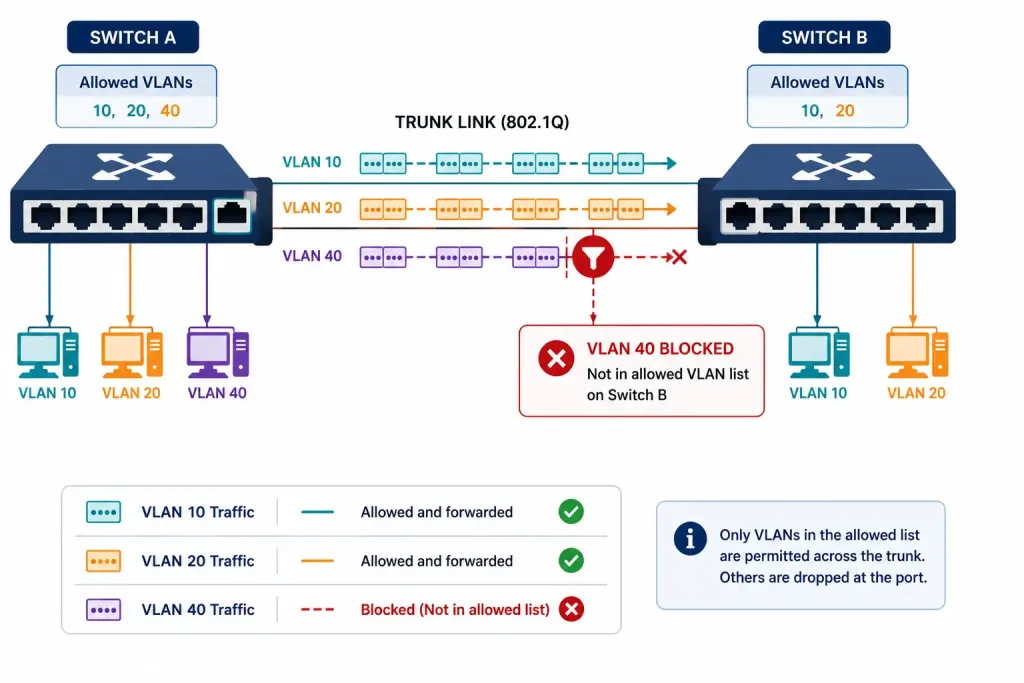
Telling the Three Problems Apart by Symptom
Since all three problems can produce vaguely similar “some things work, some don’t” symptoms, it helps to know what each one specifically looks like before you even open a terminal:
| Symptom | Likely Cause |
|---|---|
| CDP console warning about a native VLAN mismatch | Native VLAN mismatch — check first, since it announces itself |
| Devices in the same VLAN, connected through different switches, can’t reach each other at all | Trunk mode mismatch — the trunk likely isn’t forming in the first place |
| Most VLANs work fine, but one specific VLAN’s traffic never crosses a particular link | Wrong allowed VLAN list — that VLAN is being explicitly filtered out |
| Intermittent or hard-to-reproduce cross-VLAN traffic issues, no clear pattern | Possible native VLAN mismatch — leaking is often subtle rather than a hard failure |
This table isn’t a substitute for actually running show interfaces trunk and confirming — but recognizing which symptom you’re looking at tells you where to start looking first, which matters when you’re troubleshooting under time pressure and want to check the most likely cause before working through every possibility systematically.
Putting It Together: A Complete Diagnostic Walkthrough
Step 1 — Confirm there’s actually a problem crossing the trunk, not something else:
show vlan briefRule out a simple VLAN assignment error on the affected devices first, since it’s a faster check than diving into trunk-specific troubleshooting.
Step 2 — Check the trunk itself:
show interfaces trunkThis single command surfaces all three of the standard checks — native VLAN, trunk mode, and allowed VLAN list — in one output.
Step 3 — Compare both ends of the link. A mismatch only becomes obvious when you’re looking at both sides side by side; checking just one switch’s configuration in isolation can look completely correct while still being incompatible with what the other switch is configured to do.
Step 4 — Apply the specific fix for whichever mismatch you found, then re-verify:
show interfaces trunk
show interfaces <interface> switchport
Best Practices to Avoid These Problems
Configure trunk mode statically rather than relying on DTP. switchport mode trunk on both ends removes the entire category of dynamic-auto-versus-dynamic-auto failures described above.
Disable DTP negotiation entirely on links where it isn’t needed, particularly toward end devices or non-Cisco equipment that doesn’t support DTP at all:
Switch(config-if)# switchport nonegotiateKeep native VLAN consistent across your entire network, not just matched pairwise on individual links — a single organization-wide standard (commonly an unused VLAN dedicated specifically to native traffic, rather than the default VLAN 1) avoids this class of mismatch entirely.
Explicitly list allowed VLANs rather than defaulting to “all.” This is both a security practice and a troubleshooting aid — a trunk that only carries the VLANs it’s actually supposed to is easier to reason about than one carrying everything by default.
FAQs
What causes a native VLAN mismatch on a trunk link?
A native VLAN mismatch happens when the two ends of a trunk are configured with different native VLANs — one side sends untagged traffic expecting it to belong to one VLAN, while the other side interprets that same untagged traffic as belonging to a different VLAN. CDP typically detects and reports this automatically, generating a console notification that’s often the first sign of the problem.
Does a native VLAN mismatch stop a trunk from working entirely?
No — this is a common point of confusion. A native VLAN mismatch doesn’t prevent the trunk from forming or block tagged VLAN traffic at all; it specifically causes untagged native VLAN traffic to leak between the two mismatched VLANs, which is a real security concern but not a complete connectivity failure.
Why does a trunk fail to form when both ends are set to dynamic auto?
Dynamic auto mode makes a port willing to become a trunk, but only in response to the other side actively initiating negotiation. If both ends are set to dynamic auto, neither side ever initiates, so no trunk negotiation happens at all, and the link falls back to behaving as a plain access link instead.
How do I check which VLANs are allowed on a trunk?
Run show interfaces trunk and look at the “VLANs allowed on trunk” section of the output. If a VLAN you expect isn’t listed, add it explicitly with switchport trunk allowed vlan add <vlan-id> rather than replacing the entire list and risking removing VLANs that are supposed to stay.
What’s the best practice for configuring trunk links?
Manually configuring switchport mode trunk on both ends, rather than relying on DTP to negotiate it, avoids an entire category of unpredictable failures, including the dynamic-auto-on-both-sides scenario covered in this guide. Explicitly listing allowed VLANs, rather than defaulting to “all,” adds a further layer of both security and troubleshooting clarity.
How do I disable DTP on a trunk port?
Use switchport nonegotiate on the interface, which stops it from sending or responding to DTP negotiation messages entirely. This is particularly useful on links to non-Cisco equipment, since DTP is a Cisco-proprietary protocol that other vendors’ switches don’t support or understand.