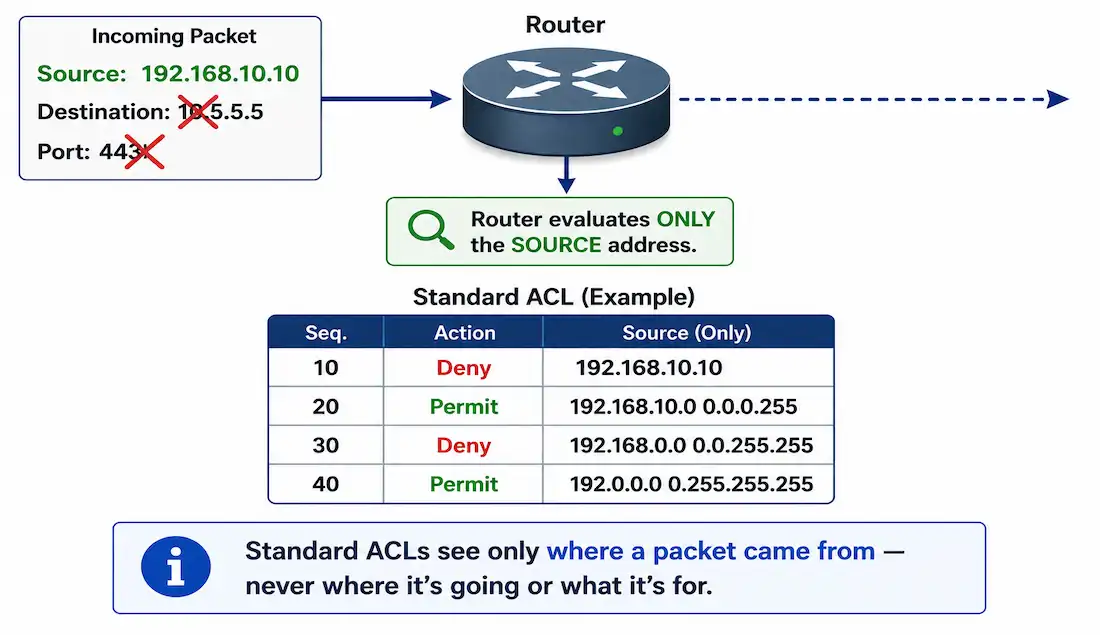
Standard ACLs permit or deny traffic based on source addresses only. They match a packet’s source IP address against a list of address ranges and a corresponding permit-or-deny statement — nothing else. The port and destination of the packet are never evaluated, which is the single most important thing to understand about standard ACLs before configuring one: whatever a standard ACL appears to “control” beyond source address is really just a consequence of where you apply it, not something the ACL statement itself matches.
For traffic control that does need to match destination, port, or protocol, extended ACLs are the right tool — covered alongside TCP flag matching and the established keyword in the TCP three-way handshake guide.
ACL Number Ranges
Standard ACLs originally used numbers 1 to 99. Cisco IOS Release 12.0(1) extended this range by adding 1300 to 1999, specifically reserved for standard ACLs. Counting both ranges: 1 to 99 is 99 numbers, and 1300 to 1999 is 700 numbers (1999 − 1300 + 1). That’s a combined total of 799 usable standard ACL numbers, not a round number, since the two ranges don’t align on a clean boundary.
Standard ACL Syntax
Configure and use a numbered standard ACL in two stages: create the ACL, then activate it on a specific interface. The access-list global configuration command defines the ACL:
Router(config)# access-list access-list-number { deny | permit | remark } source [ source-wildcard ] [ log ]Breaking down each part:
- access-list-number. A decimal number from 1 to 99 or 1300 to 1999 for a standard ACL.
- deny. Denies traffic if the condition matches.
- permit. Permits traffic if the condition matches.
- remark. Adds a comment about entries in the ACL, purely for documentation — it has no effect on traffic.
- source. Specified one of two ways: a 32-bit IP address in dotted-decimal format, or the keyword
any, which is shorthand for a source and wildcard of0.0.0.0 255.255.255.255— matching every possible address. - wildcard. An optional 32-bit value applied to the source address. A bit set to
1means “ignore this bit” (don’t care); a bit set to0means “this bit must match.” - log. Optional. Sends a logging message to the console about packets matching the entry. The first matching packet generates an immediate log entry; after that, matches are summarized at five-minute intervals rather than logged individually, to avoid flooding the console with repeated entries for high-volume traffic.
Host and Network Statements
An Access Control Entry (ACE) can permit or deny a single host or a full range of addresses. To permit a single host, 192.168.1.10, in ACL 1:
Router(config)# access-list 1 permit host 192.168.1.10To permit an entire range — every address in the 192.168.1.0/24 network — using ACL 2:
Router(config)# access-list 2 permit 192.168.1.0 0.0.0.255Remove an ACL entirely with no access-list <access-list-number> in global configuration mode, and verify it with show access-lists.
Include remarks to document what each statement is for — this matters more than it might seem once an ACL grows past two or three entries, since the logic isn’t self-explanatory from the addresses alone. Each remark is limited to 100 characters.
How Standard ACLs Process Traffic
Packets entering the router on any interface are checked against the ACL’s entries in order:
access-list 1 deny 192.168.10.10
access-list 1 permit 192.168.10.0 0.0.0.255
access-list 1 deny 192.168.0.0 0.0.255.255
access-list 1 permit 192.0.0.0 0.255.255.255
If a packet is permitted, it’s routed to an output interface. If denied, it’s dropped at the incoming interface. Cisco IOS processes ACEs strictly in the order they were entered, checking each one top-down until it finds a match — which is exactly why the order matters, sometimes in ways that aren’t obvious until you trace through a specific example.
Why Order Matters: A Shadowed Statement
Consider ACL 2 with two entries, added in this order:
R1(config)#access-list 2 deny 192.168.11.0 0.0.0.255
R1(config)#access-list 2 permit 192.168.11.10
The first entry denies the entire 192.168.11.0/24 range. The second entry attempts to permit a specific host within that same range, 192.168.11.10. IOS accepts both statements without any warning or error — it doesn’t check whether a later statement is logically reachable when you enter it. But at runtime, every packet from 192.168.11.10 matches the first (broader) deny statement first, since IOS stops checking as soon as it finds a match. The second statement is never actually reached; it’s accepted configuration that has no practical effect, sometimes called a shadowed or unreachable statement.
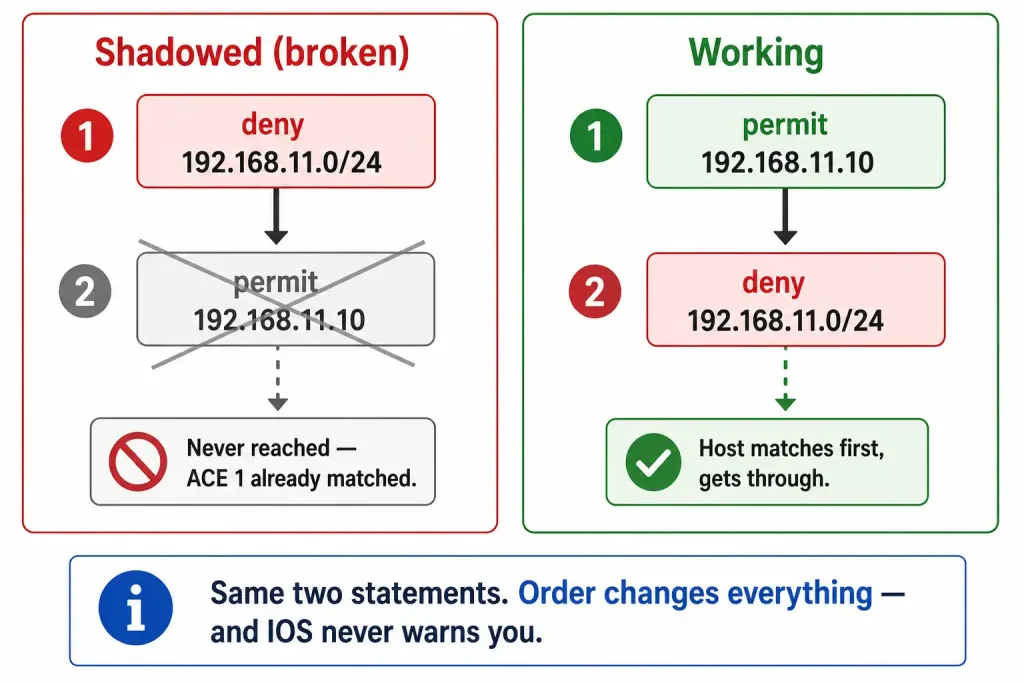
Reverse the order, and the outcome changes completely:
R1(config)#access-list 2 permit 192.168.11.10
R1(config)#access-list 2 deny 192.168.11.0 0.0.0.255
Now the specific host statement is checked first. Traffic from 192.168.11.10 matches the permit and is allowed, before the router ever reaches the broader deny statement covering the rest of the subnet.
A third case avoids the conflict entirely, because the two addresses don’t overlap:
R1(config)#access-list 2 deny 192.168.11.0 0.0.0.255
R1(config)#access-list 2 permit 192.168.30.10
192.168.30.10 isn’t part of the 192.168.11.0/24 network at all, so there’s no shadowing regardless of order — both statements are independently reachable.
Applying Standard ACLs to Interfaces
Once configured, link an ACL to an interface with the ip access-group command in interface configuration mode:
Router(config-if)# ip access-group <access-list-number | access-list-name> <in | out>To remove an ACL from an interface, use no ip access-group on the interface first, then no access-list to delete the ACL itself.
Example 1: Permitting One Source Network
This ACL allows only traffic sourced from network 192.168.2.0/24 to exit interface FastEthernet0/1; traffic from every other source is blocked by the implicit deny.
R2(config)#access-list 2 permit 192.168.2.0 0.0.0.255
R2(config)#interface FastEthernet0/1
R2(config-if)#ip access-group 2 out
The single explicit statement permits the 192.168.2.0/24 source range. Every ACL carries an implicit deny at the end, equivalent to adding access-list 2 deny any as a final, unwritten line — so any source not matching the explicit permit is dropped. ip access-group 2 out ties ACL 2 to FastEthernet0/1 as an outbound filter, meaning it’s evaluated as traffic leaves the router through that interface, headed toward whatever network sits beyond it.
Example 2: Permitting a Subnet Except One Host
This ACL permits an entire subnet except for one specific host within it.
R2(config)#access-list 3 deny 192.168.2.2
R2(config)#access-list 3 permit 192.168.2.0 0.0.0.255
R2(config)#interface FastEthernet0/1
R2(config-if)#ip access-group 3 out
The first ACE denies the single host 192.168.2.2. The second permits every other address in 192.168.2.0/24. Because the specific host statement comes first, it’s checked before the broader permit — the opposite ordering problem from the shadowing example above, but here it’s intentional and correct: the narrower, more specific statement needs to come before the broader one it’s carving an exception out of. The ACL is applied outbound on FastEthernet0/1.
Example 3: Denying One Host, Permitting Everything Else
This ACL blocks a single host while permitting all other traffic:
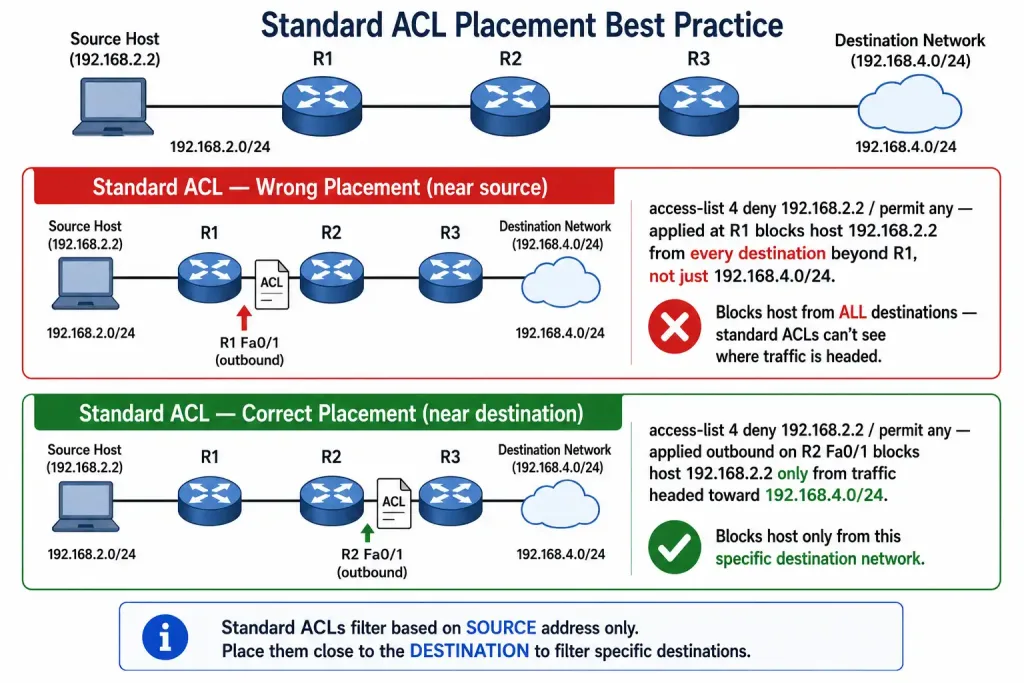
R2(config)#access-list 4 deny 192.168.2.2
R2(config)#access-list 4 permit any
R2(config)#interface FastEthernet0/1
R2(config-if)#ip access-group 4 out
Host 192.168.2.2 is denied first; permit any then allows every other source. Applied outbound on FastEthernet0/1, this ACL only affects traffic sourced from the 192.168.2.0/24 network reachable through that interface — traffic originating elsewhere on the router never passes through this filter at all.
This raises a genuinely useful design question: is FastEthernet0/1 on R2 actually the best place for this ACL? Cisco’s general placement guidance is that standard ACLs — since they can only match source, never destination — work best placed as close to the destination as possible. Placing this ACL further upstream, closer to the source, risks accidentally blocking 192.168.2.2 from reaching networks it should still be allowed to reach, since a standard ACL can’t distinguish “block this host from network A” from “block this host from everywhere.” Extended ACLs, which can match destination directly, are the better fit when that kind of precision matters and are typically placed close to the source instead.
Creating Named Standard ACLs
Naming an ACL is best practice, since a descriptive name is easier to recognize than a bare number — an ACL that blocks Telnet, for instance, is far more legible as NO_TELNET than as access-list 15.
Create a named ACL with ip access-list standard <name> in global configuration mode (or ip access-list extended <name> for extended ACLs). Names are alphanumeric, case-sensitive, and must be unique. This enters a distinct configuration mode with its own prompt, (config-std-nacl), as opposed to the plain global configuration prompt numbered ACLs use directly.
Example: Named Standard ACL
This named ACL, NO_ACCESS_PC0, denies host 192.168.2.2 while permitting everything else, applied outbound on R2’s FastEthernet0/0:
R2(config)#ip access-list standard NO_ACCESS_PC0
R2(config-std-nacl)#deny host 192.168.2.2
R2(config-std-nacl)#permit any
R2(config-std-nacl)#exit
R2(config)#interface fastethernet 0/0
R2(config-if)#ip access-group NO_ACCESS_PC0 out
The core difference from numbered ACLs: numbered ACLs use the global access-list command directly, while named ACLs enter a dedicated sub-mode with ip access-list standard <name> and then use bare permit/deny statements inside that mode, without repeating the ACL identifier on every line.
Commenting ACLs with Remarks
The remark keyword documents an ACE in either a standard or extended ACL, making the logic behind a rule set easier to recall later. Each remark is limited to 100 characters and can be placed before or after the permit or deny statement it describes.
For numbered ACLs, the syntax is:
access-list <access-list-number> remark <remark text>Remove a remark with no access-list <access-list-number> remark <remark text>.
Example: Remarks in a Numbered ACL
R2(config)#access-list 5 remark PC0 not Allowed
R2(config)#access-list 5 deny 192.168.2.2
R2(config)#access-list 5 permit any
R2(config)#interface fastethernet 0/0
R2(config-if)#ip access-group 5 out
The remark documents the intent — denying host 192.168.2.2 while permitting everything else — directly above the statements it explains.
Example: Remarks in a Named ACL
Named ACLs support remarks inside the same sub-mode as the permit/deny statements, using the bare remark keyword without repeating the ACL name:
R2(config)#ip access-list standard NO_ACCESS_PC0
R2(config-std-nacl)#remark PC1 not authorized to access PC0
R2(config-std-nacl)#deny host 192.168.2.2
R2(config-std-nacl)#permit any
R2(config-std-nacl)#exit
R2(config)#interface fastethernet 0/0
R2(config-if)#ip access-group NO_ACCESS_PC0 out
The remark here explains why the rule exists — that PC1 (the source applying this ACL from) isn’t authorized to reach PC0 — which is exactly the kind of context a bare address-and-action pair doesn’t convey on its own.
Verifying ACLs
Use show ip interface to confirm which ACL, by number or name, is applied to a given interface and in which direction. Use show access-lists to see every configured ACL and its entries, or follow it with a specific ACL number or name to view just that one. The configuration can also be checked directly against show startup-config, useful for confirming an ACL was actually saved and will survive a reload.
Troubleshooting Standard ACLs
[See Infographic: Standard ACL Troubleshooting Decision Flow]
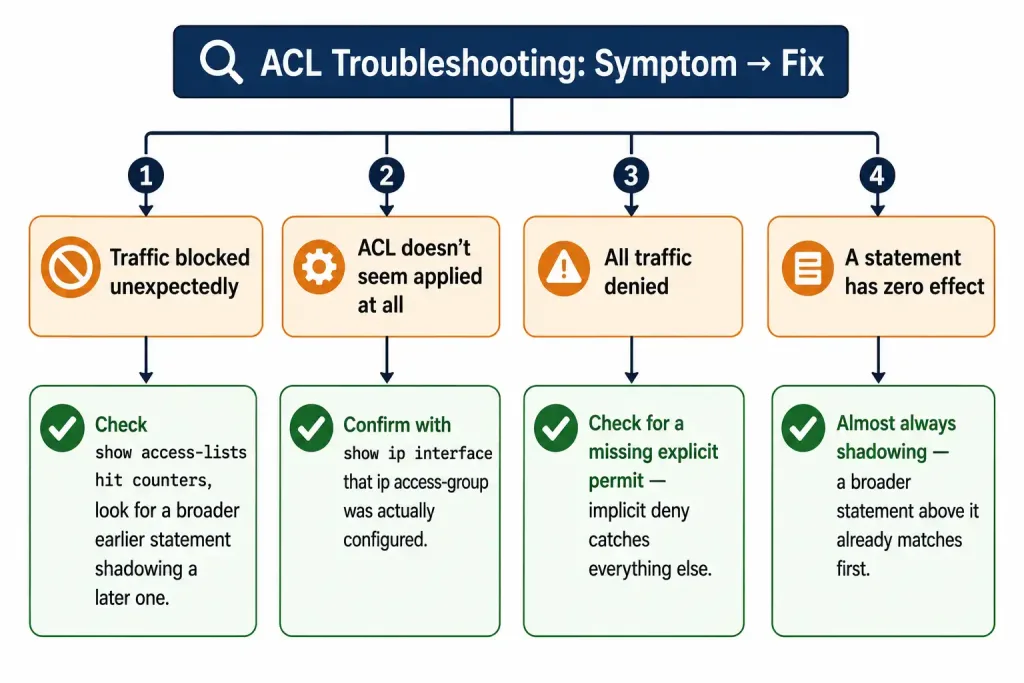
- Traffic is being blocked unexpectedly. Check
show access-listsfor hit counters on each ACE, and confirm statement order — a broader statement earlier in the list may be shadowing a more specific one further down, exactly as in the shadowing example above. - An ACL doesn’t seem to be applied at all. Confirm with
show ip interfacethat the ACL is actually linked to the interface, in the direction you expect. It’s easy to configure the ACL correctly and forget theip access-groupstep entirely. - All traffic is being denied. Remember the implicit deny at the end of every ACL — if there’s no explicit
permitstatement anywhere in the list, everything not matched by a deny is still dropped by that trailing implicit rule. - A statement appears to have no effect. This is almost always the shadowing problem: a broader earlier statement already matches the traffic in question before the router ever reaches the newer, more specific one.
Illustrative Scenario: A Rule That Was Never Actually Working
Here’s a common scenario, meant to show the troubleshooting logic in action rather than describe a specific real event.
A network administrator adds a rule intending to permit one specific host, 10.10.5.50, an exception to an otherwise broad deny already in place for its subnet. The new statement is appended to the end of the existing ACL, since that’s simply where new entries go by default. Weeks later, someone notices the host still can’t reach the network it was supposed to be granted access to.
Checking show access-lists reveals the ACL’s actual order: the broad deny for the host’s subnet was configured first, months earlier, and the newer specific permit for 10.10.5.50 sits after it. Every packet from that host has been matching the earlier, broader deny statement the entire time — the specific permit was accepted by IOS without complaint when it was added, but it’s been unreachable dead code since the moment it was entered.
Removing the ACL and re-adding both statements with the specific permit listed first resolves it immediately. The broader lesson: appending a new statement to an existing ACL is not the same as making it effective — where the new line lands relative to existing broader statements determines whether it does anything at all, and IOS will never warn you when it doesn’t.
FAQs
What is the purpose of standard ACLs on Cisco routers?
Standard ACLs control traffic based on source IP address only, permitting or denying without ever evaluating destination, port, or protocol. They use number ranges 1–99 and 1300–1999, giving 799 usable standard ACL numbers total. Because they can’t match destination, Cisco’s placement guidance recommends applying standard ACLs as close to the destination as possible, to avoid unintentionally blocking a source from reaching networks it should still access.
How do you configure a numbered standard ACL on a Cisco router?
Define the ACL with the access-list command in global configuration mode — for example, access-list 1 deny host 192.168.2.2 — then apply it to an interface with ip access-group 1 out (or in) in interface configuration mode. Both steps are required; an ACL that’s configured but never linked to an interface has no effect on traffic at all.
What is the difference between numbered and named ACLs?
Numbered ACLs are configured directly with the global access-list command, referencing a number from 1–99 or 1300–1999 on every line. Named ACLs use ip access-list standard <name> to enter a dedicated configuration sub-mode, after which bare permit and deny statements are entered without repeating an identifier each time. Named ACLs are generally easier to read and maintain, since a descriptive name like NO_ACCESS_PC0 conveys intent that a bare number like access-list 5 doesn’t.
How can remarks improve standard ACL configuration?
Remarks, added with the remark keyword and limited to 100 characters each, document the intent behind an ACE directly in the configuration, rather than relying on someone remembering why a particular address was denied months later. They’re purely cosmetic and have zero effect on how traffic is actually filtered, but they make a multi-line ACL genuinely legible to whoever has to modify it next, which matters more as an ACL grows past a couple of entries.
How do you verify a standard ACL on a Cisco router?
Use show ip interface to confirm which ACL is applied to a specific interface and in which direction, and show access-lists to see every ACE in every configured ACL, including hit counters showing how often each statement has actually matched traffic. Checking hit counters is especially useful for catching a shadowed statement — an entry that’s been configured correctly but never actually matches anything because a broader statement earlier in the list always catches the traffic first.