Master VLAN Configuration in Cisco Switches – Updated 2025
Virtual Local Area Networks (VLANs) are a fundamental concept in network engineering, allowing network administrators to segment a physical network into multiple logical networks. This segmentation enhances security, optimizes traffic flow, and simplifies network management. For CCNA and CCNP students, mastering VLAN configuration on Cisco switches is critical, as it forms the backbone of many enterprise network designs.
In this article, we’ll explore how to configure, verify, and manage VLANs on Cisco switches using Cisco IOS commands. We’ll cover normal and extended-range VLANs, port assignments, verification techniques, and best practices to ensure a robust network setup. Whether you’re preparing for your CCNA/CCNP exams or managing real-world networks, this guide provides practical, step-by-step instructions to enhance your skills.
Step-by-Step Guide to Configuring VLANs on Cisco Switches
Follow these steps to configure VLANs and assign ports on a Cisco switch (e.g., Sw-2). This example creates VLANs 10, 20, 30, 40, and 50–60, and assigns ports to VLAN 10 and VLAN 20.
Enter Global Configuration Mode
Sw-2> enable
Sw-2# configure terminal
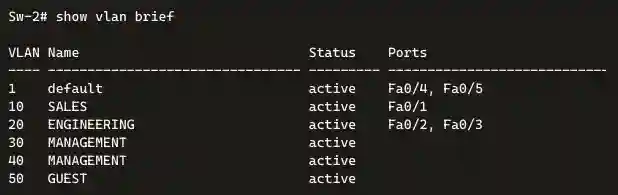
Create VLANs Individually or in a Range
Sw-2(config)# vlan 10
Sw-2(config-vlan)# name SALES
Sw-2(config-vlan)# exit
Sw-2(config)# vlan 20
Sw-2(config-vlan)# name ENGINEERING
Sw-2(config-vlan)# exit
Sw-2(config)# vlan 30,40
Sw-2(config-vlan)# name MANAGEMENT
Sw-2(config-vlan)# exit
Sw-2(config)# vlan 50-60
Sw-2(config-vlan)# name GUEST
Sw-2(config-vlan)# exit
Assign Ports to VLANs
Once the VLAN configuration is done, the next step is assigning ports to the VLAN. A port in access mode can belong to only one VLAN at a time. Only in one case, when the access port is connected to an IP phone, two VLANs are associated with this port, one for voice and one for data. The following is the syntax for defining a port as an access port and assigning it to a VLAN.
Configure FastEthernet 0/1 for VLAN 10 and FastEthernet 0/2–0/3 for VLAN 20.
Sw-2(config)# interface fastEthernet 0/1
Sw-2(config-if)# switchport mode access
Sw-2(config-if)# switchport access vlan 10
Sw-2(config-if)# exit
Sw-2(config)# interface range fastEthernet 0/2 – 3
Sw-2(config-if-range)# switchport mode access
Sw-2(config-if-range)# switchport access vlan 20
Sw-2(config-if-range)# exit
Save the Configuration
Sw-2(config)# exit
Sw-2# write memory
This configuration ensures VLANs are created, named, and assigned to the appropriate ports, with changes saved to the startup configuration.
Changing VLAN Port Membership
There are several ways to change the VLAN port association. The table below shows the syntax for changing a switch port membership to VLAN 1 with the no switchport access vlaninterface configuration mode command.
VLAN 10 has been assigned to interface Fa0/1. The no switchport access vlan command is entered for interface Fa0/1 in interface configuration mode, now check the output in the show vlan brief command that instantly follows as shown in the Figure.
VLAN 10 is still active, but there are no ports in it. The command show interfaces f0/1 switchport verifies that the access VLAN for the Fa0/1 interface has been reset to VLAN 1. First, removing a port from a VLAN is not required to change its membership. Now, we can assign these ports to any VLAN again.
Verifying VLAN Information
After configuring VLANs, use Cisco IOS show commands to validate the setup. Below are the key commands, their purposes, and example outputs:
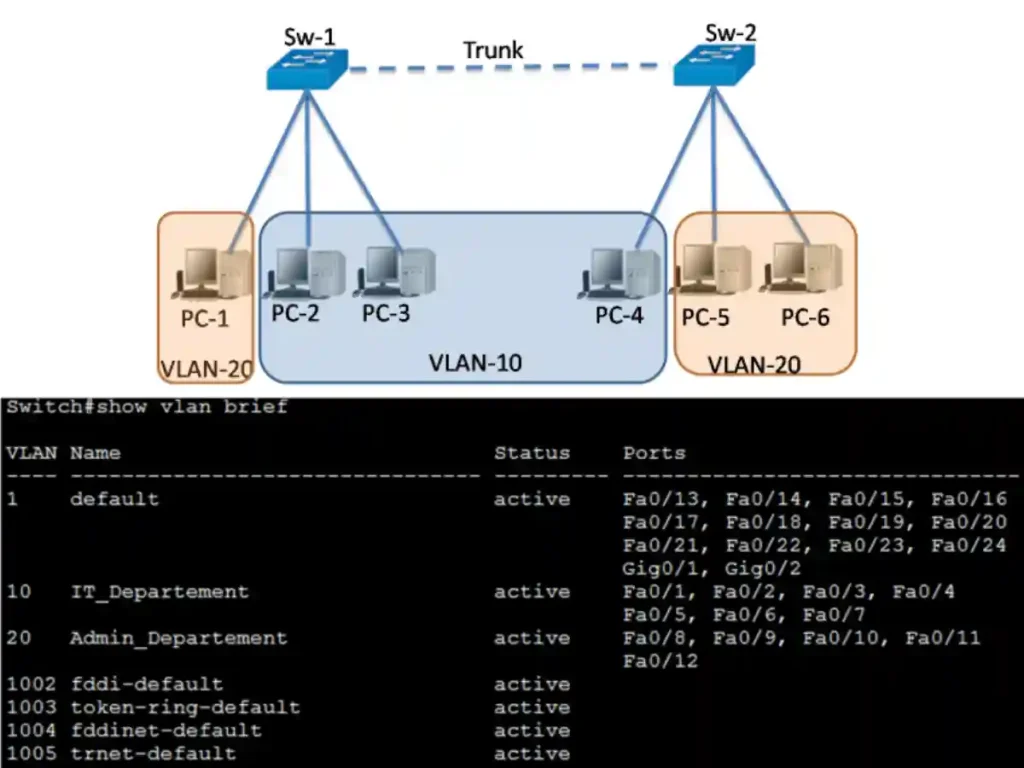
show vlan brief
- Purpose: Displays a summary of all VLANs, including VLAN ID, name, status, and assigned ports.
- Example:
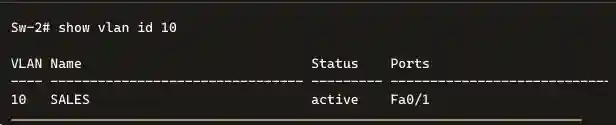
show vlan id
- Purpose: Displays detailed information about a specific VLAN by ID.
- Example:
show vlan name
- Purpose: Displays information about a VLAN by its name.
- Example:

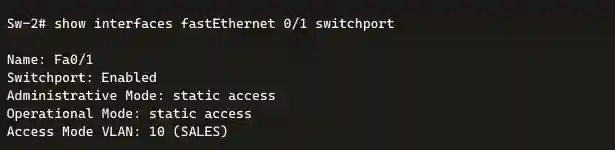
show interfaces switchport
- Purpose: Verifies the VLAN assignment and mode of a specific port.
- Example:
show interfaces vlan
- Purpose: Displays IP address and status information for a VLAN interface.
- Example:

Best Practice: Use the show vlan brief and show vlan summary for quick verification. For detailed port analysis, use show interfaces <interface-id> switchport.
Deleting VLAN
We can delete VLANs with the “no vlan vlan-id” command in global configuration mode. For example, “ no vlan 10 “ in global configuration mode will delete VLAN 10 from the switch Sw-2 database. The ports of VLAN 10 are not members of any VLAN now. You can verify it with the “show vlan brief” command that VLAN 10 is no longer present in the vlan.dat file after using the no vlan 10 command.
Best practice before deleting a VLAN is reassigning all member ports to a different VLAN because any port that is not moved to an active VLAN is unable to communicate with other hosts after the deletion VLAN and until it is assigned to an active VLAN.
We can delete the entire vlan.dat file using the “delete flash:vlan.dat” command in privileged EXEC, which is abbreviated “delete vlan.dat.” We can also delete a vlan.dat file if it is stored in its default location.
After executing this command and restarting the switch, the formerly configured VLANs are no longer present. This places the switch into its factory default condition for VLAN configurations.
Troubleshooting VLAN Configuration Issues
Here are common VLAN configuration issues and their solutions:
VLAN Not Appearing in <show vlan brief>
- Cause: The VLAN may not have been created, or no ports are assigned to it.
- Solution: Verify VLAN creation with <show vlan brief>. If missing, create the VLAN using vlan <vlan-id> in global configuration mode. Ensure ports are assigned using switchport access vlan <vlan-id>.
Ports Not Communicating in the Same VLAN
- Cause: Ports may be in the wrong VLAN or not in access mode.
- Solution: Use show interfaces <interface-id> switchport command to verify the VLAN assignment and mode. Correct with switchport mode access and switchport access vlan <vlan-id>.
VLAN Configuration Lost After Reboot
- Cause: The running configuration was not saved to the startup configuration.
- Solution: Save changes with write memory or copy running-config startup-config after configuring VLANs.
Error: “Access VLAN does not exist. Creating VLAN”
- Cause: The VLAN was not preconfigured before assigning a port.
- Solution: This is expected behavior. Verify the VLAN with show vlan brief and ensure it’s correctly configured.
Sw-2# show vlan brief
Sw-2# show interfaces switchport
Sw-2# show running-config
VLAN Security Best Practices
Securing VLANs is critical to prevent unauthorized access and network attacks. Here are key practices:
Disable Unused Ports: Disable all unused switch ports to prevent unauthorized devices from connecting.
Sw-2(config)# interface range fastEthernet 0/4 - 24 Sw-2(config-if-range)# shutdownUse VLAN 1 as a Black Hole: Assign unused ports to VLAN 1 and ensure VLAN 1 is not used for user traffic.
Sw-2(config)# interface range fastEthernet 0/4 - 24 Sw-2(config-if-range)# switchport access vlan 1Implement Private VLANs (PVLANs). PVLANs restrict communication within a VLAN. For example, configure VLAN 10 as a primary VLAN with isolated secondary VLANs:
Sw-2(config)# vlan 10 Sw-2(config-vlan)# private-vlan primary Sw-2(config-vlan)# exit Sw-2(config)# vlan 11 Sw-2(config-vlan)# private-vlan isolated Sw-2(config-vlan)# exitVerify Security Settings: Use show running-config and show vlan brief to ensure unused ports are disabled and assigned to VLAN 1.
Conclusion
Configuring VLANs on Cisco switches is an essential aspect of network management. Proper naming, port assignment, and verification of VLAN configurations are crucial steps. Regularly using show commands helps ensure the correct setup of VLANs, and caution should be exercised when deleting VLANs to avoid network disruptions. Following best practices and utilizing recommended commands contributes to a secure and well-organized network infrastructure.
FAQs
Normal-range VLANs (1–1005) are stored in the vlan.dat file in flash memory and don’t require saving the running configuration. Extended-range VLANs (1006–4094) are stored in the running configuration and require write memory to persist after a reboot.
")