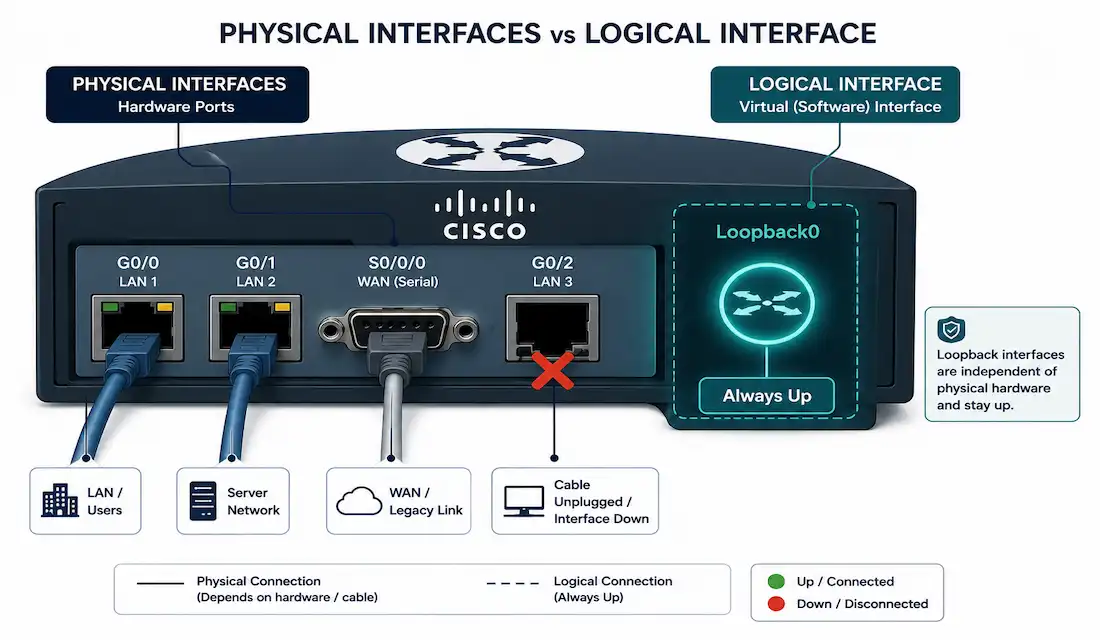
A loopback interface is one of the simplest things you can configure on a Cisco router, and one of the most quietly important. It has no physical hardware behind it, can’t be unplugged, and stays up as long as the router itself is running — which is exactly why it’s the standard choice for a router ID, a management address, and a stable endpoint for protocols like BGP and MPLS.
This guide covers what loopback interfaces are actually used for, how to configure and secure one, and how it compares to the physical interfaces covered in Cisco router interface configuration.
What a Loopback Interface Is
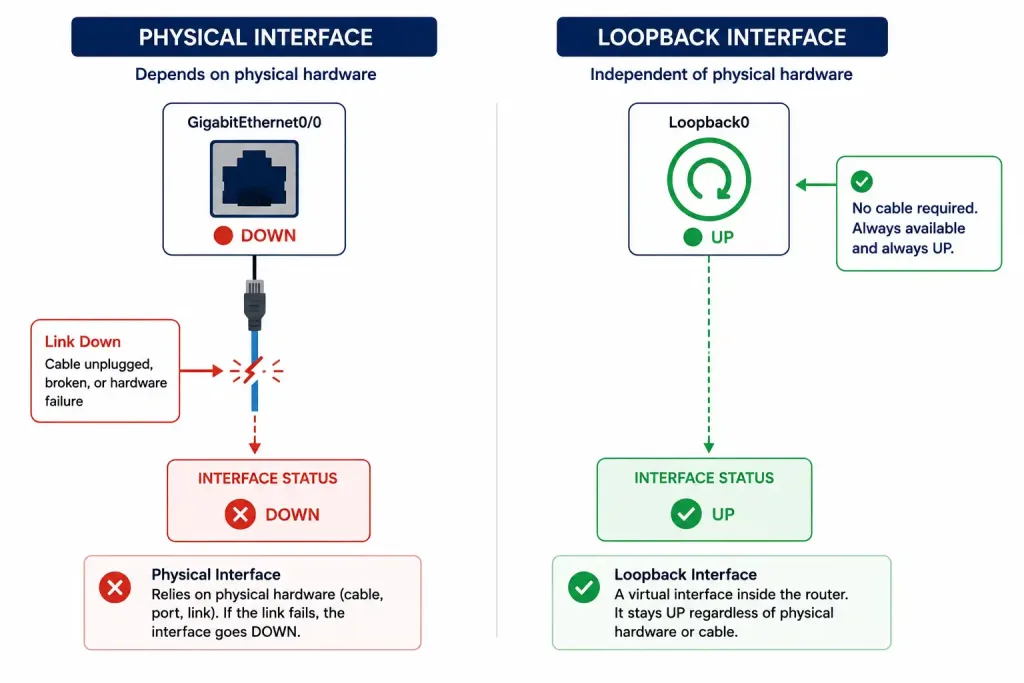
A loopback interface is logical, not physical — it exists purely in the router’s software configuration and has no corresponding port, cable, or connector. Because it isn’t tied to any physical hardware, it can never go down due to a cable fault, a bad transceiver, or any other physical-layer problem. As long as the router itself is powered on and running, the loopback interface is up.
This single property is what makes loopbacks so useful: they provide a management and identification address that’s genuinely stable, unlike a physical interface’s address, which is only reachable while that specific interface and link stay up. It’s a small design detail with an outsized practical benefit — the kind of thing that’s easy to skip when a network is small and simple, but that saves real troubleshooting time the first time a physical link failure would otherwise have taken down a router’s only reachable management address along with it.
Uses of a Loopback Interface
Router identification: because a loopback’s address never changes and never goes down, it’s the preferred way to identify a router — for management access, monitoring, and logging, using one consistent address regardless of which physical path is actually used to reach it.
BGP peering: BGP sessions configured to use loopback addresses instead of physical interface addresses stay up even if one of the physical links between the two routers fails, as long as an alternate path to the loopback still exists. This is standard practice in any network with redundant paths between BGP neighbors.
OSPF router ID: OSPF needs a unique router ID for every router in the area, and it selects one using a defined priority order: a manually configured router ID first, then the highest IP address among any configured loopback interfaces, and only then the highest IP address among active physical interfaces. Configuring a loopback specifically guarantees a stable, predictable router ID rather than leaving it to whichever physical interface happens to have the highest address at boot time.
MPLS: MPLS LDP commonly uses a loopback interface as its stable identifier, for the same reason OSPF and BGP do. Loopback addresses are also frequently used as ping targets when testing reachability across an MPLS network specifically, since testing against a stable loopback address confirms end-to-end LSP reachability without depending on which physical interface actually carries the traffic at any given moment. This matters in practice because MPLS traffic can legitimately take different physical paths at different times depending on the label-switched path in use — pinging a physical interface address would only confirm reachability to that one specific interface, while pinging a loopback confirms the router itself is reachable regardless of path.
Legacy bridging protocols: loopback interfaces historically served as termination points for Remote Source-Route Bridging (RSRB) and Data-Link Switching Plus (DLSw+) — technologies for bridging legacy SNA and Token Ring traffic over IP networks. These are largely obsolete today; this is worth knowing as historical context rather than something you’re likely to configure on a current network.
Loopback vs. Physical Interfaces
| Feature | Loopback Interface | Physical Interface |
|---|---|---|
| Nature | Logical, virtual | Physical, hardware-based |
| State | Always up (if the router is running) | Can go down (cable fault, hardware failure) |
| Connectivity | No physical connection | Connects to other devices |
| Use case | Management, routing IDs, testing | Actual data transfer |
| IP address stability | Fixed, effectively never changes | May change with reconfiguration or fail with the link |
Configuring a Loopback Interface
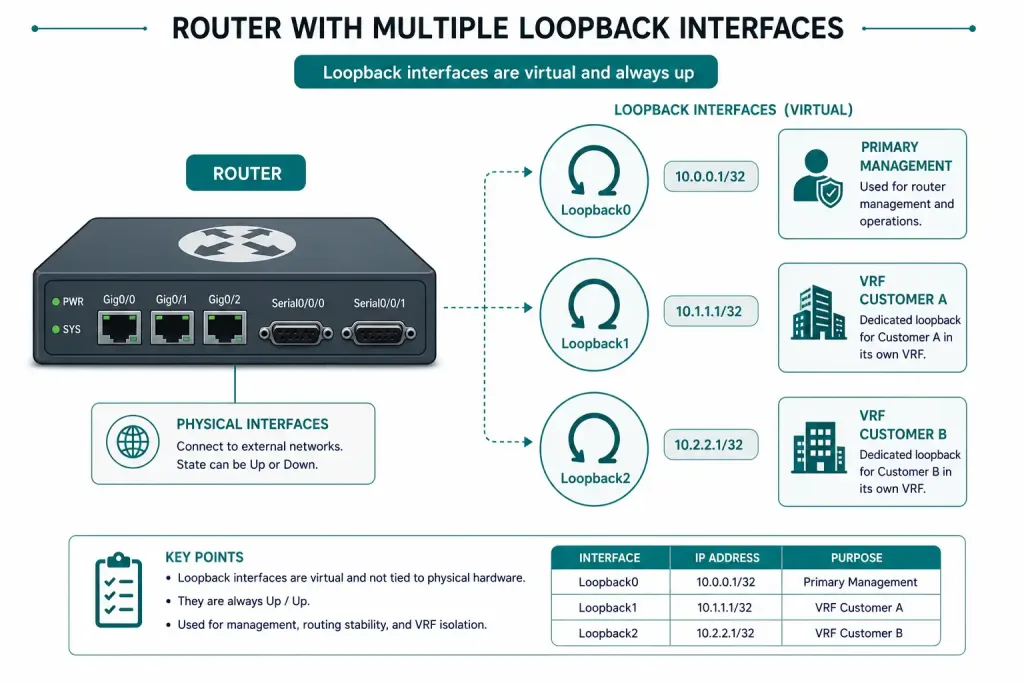
Cisco routers support multiple loopback interfaces simultaneously, each requiring its own unique IPv4 address. Loopback numbers range from 0 up to 2,147,483,647 depending on the platform and IOS version, though in practice most deployments only ever need a handful — one for management, and perhaps one per VRF in a more complex environment.
Router> enable
Router# configure terminal
Router(config)# interface loopback 0
Router(config-if)# ip address 192.168.1.1 255.255.255.255
Router(config-if)# description Management Loopback
Router(config-if)# no shutdown
Router(config-if)# exit
The 255.255.255.255 mask (a /32) is standard practice for a loopback — it represents exactly one address, which fits the loopback’s purpose as a single, stable identifier rather than an actual subnet with multiple hosts.
Verify the configuration:
Router# show ip interface brief
Router# show running-config | section interface Loopback
Expected output:
Interface              IP-Address      OK? Method Status                Protocol
Loopback0              192.168.1.1     YES manual up                    up
Both Status and Protocol should read “up” — and for a loopback specifically, they essentially always will, provided the interface is correctly configured and not administratively shut down, since there’s no physical layer to fail.
Securing a Loopback Interface
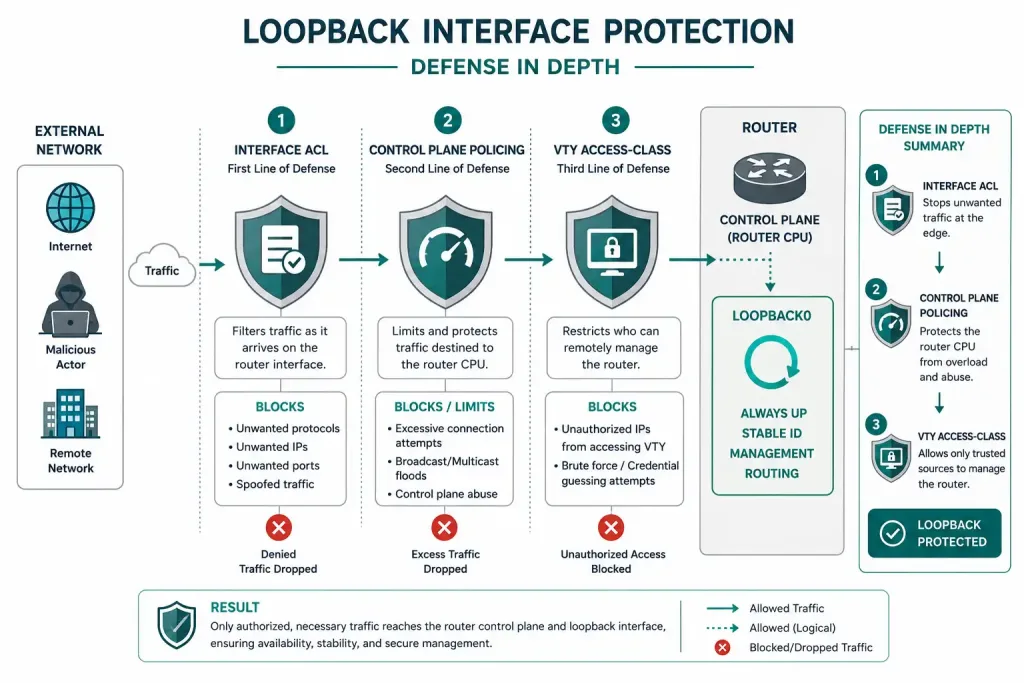
Loopback interfaces frequently carry sensitive management traffic — SSH sessions, SNMP, routing protocol control traffic — which makes securing them genuinely important, not optional.
Restrict access with an ACL:
Router(config)# access-list 10 permit 192.168.0.0 0.0.255.255
Router(config)# interface loopback 0
Router(config-if)# ip access-group 10 in
Protect the control plane with Control Plane Policing (CoPP), which limits the rate of traffic reaching the router’s own processing engine — this is the correct Cisco mechanism for protecting management and control-plane traffic, distinct from data-plane ACLs applied to regular transit traffic.
Bind SSH and Telnet access to the loopback specifically, restricting which source addresses are permitted to reach the VTY lines at all:
Router(config)# line vty 0 4
Router(config-line)# access-class 10 in
Combining an interface-level ACL on the loopback itself with an access-class restriction on the VTY lines gives two independent layers of filtering, rather than relying on just one.
Using Multiple Loopback Interfaces
A single management loopback covers most basic needs, but larger deployments often configure several — one per VRF instance, for example, since each VRF needs its own logically separate router identifier:
Router(config)# interface loopback 1
Router(config-if)# vrf forwarding CUSTOMER_A
Router(config-if)# ip address 10.1.1.1 255.255.255.255
Router(config-if)# no shutdown
Each additional loopback needs its own unique address, and keeping a clear numbering and naming convention (via the description command) matters more as the number of loopbacks on a device grows — a router with half a dozen loopbacks and no documentation of what each one is for becomes genuinely confusing to manage.
A Practical Naming Convention for Loopbacks
As loopback usage grows on a device — one for management, one per VRF, perhaps one dedicated specifically to a routing protocol’s router ID — a consistent naming and numbering convention pays off quickly. A reasonable pattern many organizations use:
- Loopback0: primary management address, used for SSH/monitoring access and often doubling as the OSPF/BGP router ID.
- Loopback1 and up: VRF-specific or protocol-specific loopbacks, each with a
descriptionclearly stating its purpose.
Router(config)# interface loopback 0
Router(config-if)# description PRIMARY-MGMT-AND-ROUTER-ID
This matters more than it might seem for a feature that takes seconds to configure — a router with several undocumented loopbacks is a genuine source of confusion during troubleshooting or handoff to a new administrator, since there’s nothing about a bare Loopback3 with no description to indicate what it’s actually for or whether it’s safe to remove.
Loopback Interfaces in IPv6
The same concept applies in IPv6, worth knowing since dual-stack deployments are increasingly common. An IPv6 loopback is configured similarly, though the addressing convention differs slightly:
Router(config)# interface loopback 0
Router(config-if)# ipv6 address 2001:db8::1/128
The /128 mask is IPv6’s equivalent of IPv4’s /32 — representing a single address rather than a subnet, for exactly the same reason. OSPFv3 and BGP for IPv6 both benefit from a stable loopback-based router identifier the same way their IPv4 counterparts do, and a dual-stack router commonly configures both an IPv4 and IPv6 address on the same loopback interface simultaneously, giving it a stable identifier in both address families at once rather than needing entirely separate logical interfaces.
Troubleshooting
Interface won’t come up: this is rare for a loopback specifically, since there’s no physical layer involved — check for a missing no shutdown first, as that’s the most common cause.
Router(config)# interface loopback 0
Router(config-if)# no shutdown
Address conflict: confirm the loopback’s address doesn’t overlap with any physical interface or another loopback on the same device or elsewhere on the network. An overlapping address can produce subtle, intermittent routing issues that are harder to trace back to their root cause than a more obvious hard failure would be.
Router# show ip interface briefTest reachability directly:
Router# ping 192.168.1.1Check detailed interface statistics:
Router# show interfaces loopback 0BGP or OSPF session not forming as expected when using loopback addressing: confirm the loopback address is actually reachable from the neighboring router — using a loopback for peering doesn’t automatically make it reachable; there still needs to be a valid route to that loopback’s /32 address through the network, typically via the underlying IGP. This is a common gotcha for anyone new to loopback-based peering: configuring the loopback and pointing BGP or OSPF at it is only half the work, and forgetting to actually advertise that /32 into the IGP is an easy step to miss.
FAQs
What is an IPv4 loopback interface on a Cisco router?
A loopback interface is a virtual, always-up interface used for management, routing protocol stability, and troubleshooting. It has no physical hardware behind it, which is exactly what makes it reliably reachable regardless of which physical interfaces or links are currently up.
How do I verify a loopback interface configuration?
Use show ip interface brief to confirm the interface’s IP address and status, and show running-config | section interface Loopback to review its full configuration. Confirming the address is unique and successfully pingable is the fastest way to validate the configuration actually works as intended.
Why is a loopback interface used for BGP peering?
A loopback provides a stable IP address for BGP sessions that stays reachable even if a specific physical interface between the two routers fails, as long as an alternate path to the loopback still exists. This keeps BGP neighbor relationships up through individual link failures, rather than tearing down and rebuilding every time a single physical path has an issue.
Can I configure multiple loopback interfaces on a Cisco router?
Yes — Cisco routers support loopback numbers from 0 up to 2,147,483,647, each requiring its own unique IPv4 address. Multiple loopbacks are commonly used in environments with multiple VRFs, where each VRF needs its own logically distinct router identifier.
How do I secure a loopback interface?
Apply an ACL directly to the loopback interface to restrict which sources can reach it, use Control Plane Policing to protect the router’s own processing engine from excessive traffic, and bind SSH/Telnet access specifically to the loopback with an access-class restriction on the VTY lines. Layering these together is more effective than relying on any single control alone.
Does OSPF actually require a loopback interface to function?
No — OSPF works without one, but configuring a loopback guarantees a stable, predictable router ID rather than leaving the selection to whichever physical interface happens to have the highest IP address at boot time. Since OSPF’s router ID selection prioritizes loopback addresses over physical interface addresses, adding a loopback is a simple, low-effort way to avoid the router ID unexpectedly changing after a reboot or interface reconfiguration.