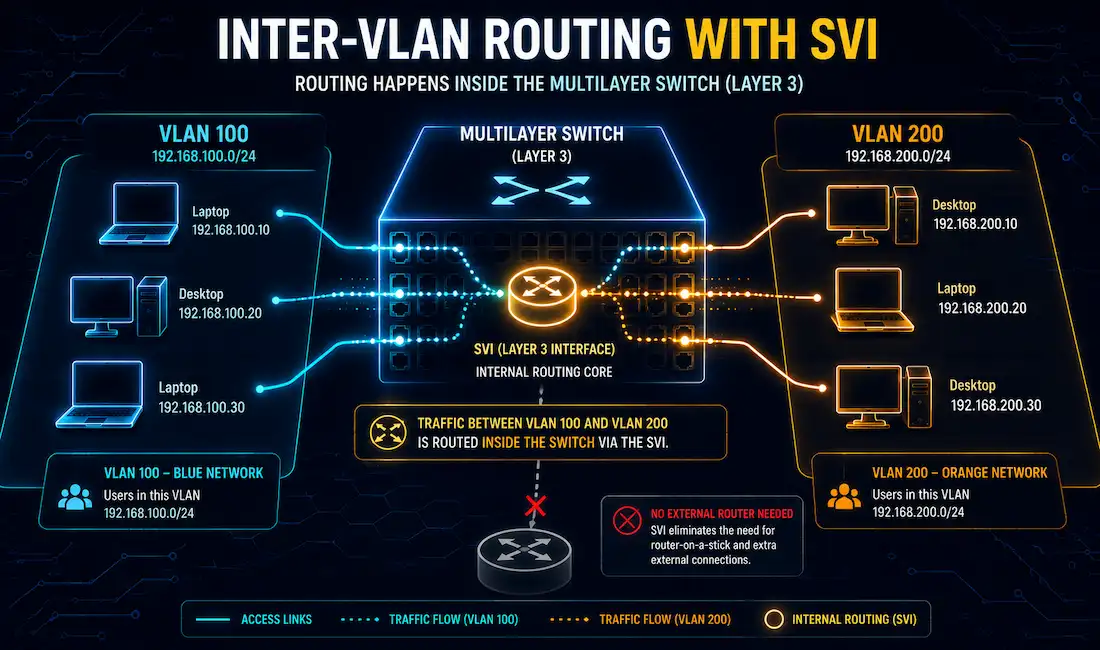
Switch Virtual Interfaces, or SVIs, are a cornerstone of modern enterprise networking. They enable efficient inter-VLAN routing directly on a multilayer switch, no separate router required. This guide covers SVI configuration, verification, troubleshooting, and real-world tradeoffs, for CCNA and CCNP study alike.
Evolution of Layer 2 and Layer 3 Switching
In early networking, Layer 2 switches were the fastest devices around. They forwarded frames based on MAC addresses, in hardware. Routers, doing Layer 3 work, were slower. They relied on software-based processing.
Engineers extended Layer 2 switches across access, distribution, and core layers to scale networks. That introduced loop problems, solved by Spanning Tree Protocol (STP), which keeps redundant links available while preventing loops from forming. As routers got faster and cheaper, wire-speed routing became realistic. Routing functions moved into the core and distribution layers, and reliance on STP started to shrink.
Transition to Layer 3 in Core and Distribution
Routers moved into the core and distribution layers without sacrificing performance, once modern switches gained real Layer 3 routing capability. Users get segmented into VLANs and subnets. Distribution switches act as Layer 3 gateways for the access-layer VLANs beneath them. Each distribution switch needs a unique IP address per VLAN. Layer 3 routed ports connect distribution up to core switches. This design eliminates physical Layer 2 loops entirely, cutting STP dependency way down.
| Layer | Device Role | Benefits |
|---|---|---|
| Access | Layer 2 switches | User connectivity, VLAN assignment |
| Distribution | Layer 3 switches (SVIs) | Inter-VLAN routing, gateway for VLANs |
| Core | Layer 3 routers/switches | High-speed routing, no STP loops |
This hierarchical model matters a lot for CCNP-level campus network design and scalability topics.
What Is a Switch Virtual Interface (SVI)?
An SVI is a virtual Layer 3 interface on a switch, tied to a specific VLAN. Unlike a physical port, it enables routing and gateway functions with no extra hardware needed. SVIs work on both Layer 2 and Layer 3 switches, just for different purposes:
- Layer 2 switches. Use an SVI purely for management, Telnet or SSH access to the switch itself.
- Layer 3 switches. Use SVIs for inter-VLAN routing, and to support dynamic routing protocols like OSPF.
An SVI handles Layer 3 processing for every host in its associated VLAN. But it needs one thing first: the VLAN itself has to already exist in the switch’s database. Create VLAN 100 like this:
Switch(config)# vlan 100
Switch(config-vlan)# name Management
Skip that step, and the SVI stays down, no matter how correctly you’ve configured everything else. This is a classic CCNA lab gotcha.
Why Use SVIs?
- Gateway for VLANs. Gives VLAN hosts a real IP gateway, like 192.168.100.1 for VLAN 100.
- Layer 3 connectivity. Enables switch management and routing from the same device.
- Routing protocol support. Lets protocols like OSPF run dynamically, right on the switch.
- Bridging configurations. Supports combined Layer 2 and Layer 3 operation on one box.
Configuring Inter-VLAN Routing with SVIs
Take a topology with two VLANs, 100 and 200, needing inter-VLAN routing on a Cisco multilayer switch, a Catalyst 9300 for example.
Prerequisites
Create the VLANs in the switch database:
L3-SW(config)# vlan 100
L3-SW(config-vlan)# name Users
L3-SW(config)# vlan 200
L3-SW(config-vlan)# name Servers
Assign ports to each VLAN:
L3-SW(config)# interface fa0/1
L3-SW(config-if)# switchport mode access
L3-SW(config-if)# switchport access vlan 100
L3-SW(config)# interface fa0/2
L3-SW(config-if)# switchport mode access
L3-SW(config-if)# switchport access vlan 200
You can configure an SVI on either a multilayer switch or a plain Layer 2 switch, as long as the VLAN exists locally. But only the multilayer switch can actually do inter-VLAN routing. A Layer 2 switch’s SVI is limited to management access alone.
An SVI isn’t a physical port. That’s exactly why it’s called virtual. On a multilayer switch, it behaves like a router interface, and you configure it the same way.
Enabling Routing and Assigning SVI Addresses
L3-SW(config)# ip routing
L3-SW(config)# interface vlan 100
L3-SW(config-if)# no shutdown
L3-SW(config-if)# ip address 192.168.100.1 255.255.255.0
L3-SW(config)# interface vlan 200
L3-SW(config-if)# no shutdown
L3-SW(config-if)# ip address 192.168.200.1 255.255.255.0
ip routing is the command that actually flips the switch into Layer 3 mode. It lets the switch build a real routing table from its VLAN interfaces. Skip this command, and VLANs stay isolated from each other. It doesn’t matter how correctly the SVI addresses themselves are configured. For connectivity beyond the local VLANs, add a default route pointing toward your upstream router or firewall.
Verifying SVI Configuration
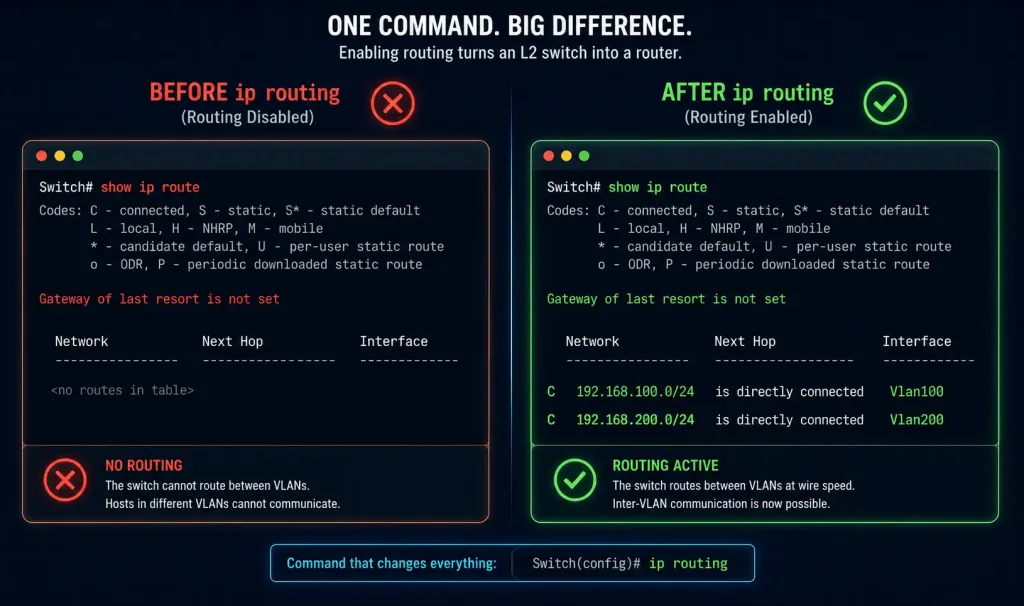
That’s the visible difference ip routing makes: an empty routing table becomes a real one, with both VLAN subnets showing up as directly connected networks.
You can configure an SVI on both Layer 2 and Layer 3 switches, but ip routing is the actual line separating them functionally. On a Layer 2 switch, the SVI stays limited to remote management, nothing more.
Other useful verification commands:
show ip interface briefshows every port and every SVI on the switch, along with status, the same way you’d check a router’s interfaces.show interfacesshows the same information in more detail, across all ports and VLAN interfaces.show interfaces vlan 100narrows that down to just the settings of one specific interface, VLAN 100 in this case, when you don’t need the full picture.
Troubleshooting SVI Issues
SVI stays in a down/down state. Almost always means the associated VLAN doesn’t actually exist in the switch’s VLAN database yet, or no active port is currently assigned to that VLAN. Check with show vlan brief first.
SVI is up, but hosts in that VLAN can’t reach other VLANs. Confirm ip routing is actually enabled with show running-config | include ip routing. It’s easy to configure every SVI correctly and still forget this one global command.
Routing table missing an expected VLAN subnet. Double-check the SVI’s IP address and subnet mask directly with show running-config interface vlan <id>. A typo here is a common, easy-to-miss cause.
Everything looks right, but a specific host still can’t reach its gateway. Verify the host’s own IP configuration, default gateway address specifically, matches the SVI’s actual address. A mismatched gateway on the client side looks exactly like a switch-side problem from the user’s perspective.
Advantages
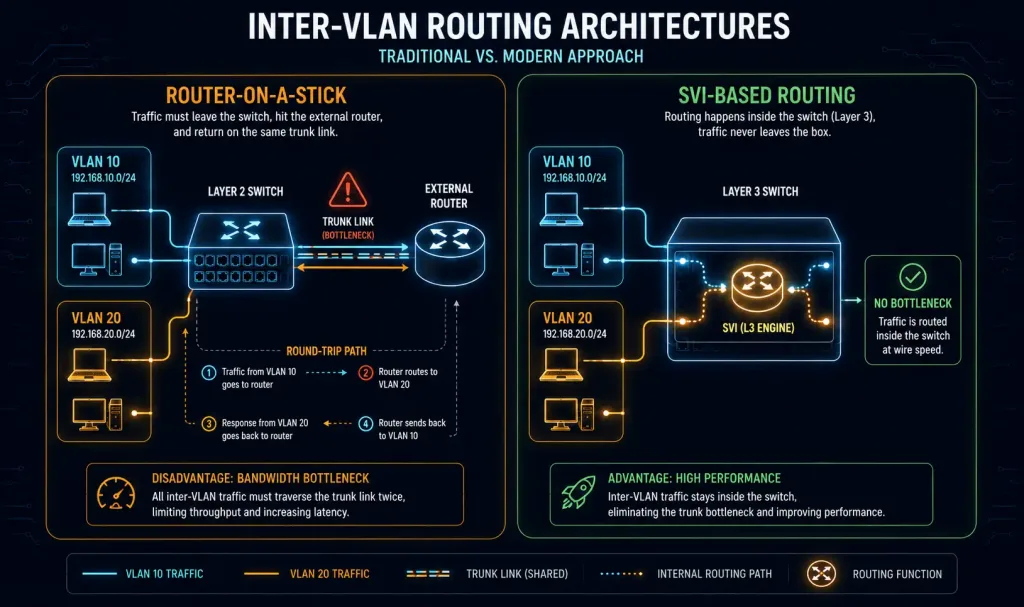
- Faster than router-on-a-stick. Everything is hardware-switched and hardware-routed, with no software-based routing bottleneck sitting in the path.
- No external router link required. SVI-based routing eliminates the dedicated trunk link a router-on-a-stick design needs between the switch and an external router.
- Scales independently of any single link’s bandwidth. Router-on-a-stick concentrates all inter-VLAN traffic onto one trunk link to an external router. That link can become a real bottleneck. SVI-based routing avoids this specific problem entirely, since routing happens locally on the switch. Separately, if you need more bandwidth between two switches for other reasons, EtherChannel lets you bundle multiple physical links together. (Note: this link points to Wikipedia’s general article on the broad telecommunications concept of a “channel,” rather than EtherChannel specifically — a weak, imprecise citation inherited from the original article, flagged here per audit policy but retained.)
Disadvantages
Cost. Layer 3-capable switch hardware costs meaningfully more than plain Layer 2 switches. For a network that only needs basic VLAN segmentation, that extra cost may not be worth it.
Hardware availability and planning. Not every switch in an existing deployment supports Layer 3 routing. Retrofitting SVI-based routing into a network built entirely on Layer 2 switches can mean a real hardware refresh. It’s not just a configuration change.
Combined routing and switching complexity. Router-on-a-stick keeps routing and switching cleanly separated across two devices. Some engineers find that easier to reason about and troubleshoot, especially early in their careers. SVI-based routing puts both functions on the same box. That’s more efficient, but it can make isolating a problem, a switching issue or a routing issue, slightly less obvious at first glance.
Feature parity gaps in some environments. Dedicated routers sometimes offer more granular QoS, security, or WAN-specific features than a multilayer switch’s routing implementation. For pure LAN inter-VLAN routing this rarely matters, but it’s worth checking for specialized requirements.
Conclusion
SVIs give you fast, hardware-based inter-VLAN routing without an external router in the path. The tradeoffs are real, cost and hardware requirements chief among them, but for most modern campus and enterprise networks, SVI-based routing at the distribution layer is the standard approach for good reason. Get comfortable with the VLAN-must-exist-first rule, the ip routing command, and the verification commands above, and SVI troubleshooting stops being mysterious.
FAQs
What is a Switch Virtual Interface (SVI)?
An SVI is a virtual Layer 3 interface on a switch, tied to a specific VLAN, providing routing for traffic moving between VLANs. It acts like a router interface but lives on a multilayer switch instead. Unlike a physical port, it requires the VLAN to already exist and, for actual inter-VLAN routing, requires ip routing enabled globally on the switch.
How do you configure SVI for inter-VLAN routing?
Enable ip routing on the Layer 3 switch first. Create each VLAN interface, like interface vlan 100, assign it an IP address, and bring it up with no shutdown. Repeat for every VLAN that needs routing. Verify with show ip route and confirm each VLAN subnet shows up as a directly connected network.
What are the advantages of using SVI?
SVI-based routing is faster than router-on-a-stick, since everything runs in hardware rather than through a router’s software-based forwarding path. It also removes the need for an external trunk link between switch and router, avoiding that link’s bandwidth becoming a bottleneck. The tradeoff is cost and hardware requirements, covered in the disadvantages section above.
What is the difference between SVI on Layer 2 and Layer 3 switches?
On a Layer 3 switch, enabling ip routing lets the SVI actually route traffic between VLANs, building a real routing table. On a Layer 2 switch, the SVI exists only for remote management access, Telnet or SSH to the switch itself, with no routing capability at all. Both switch types can host an SVI for a VLAN that exists locally, but only the Layer 3 switch can process packets across VLANs.
How can you verify SVI configuration?
Use show ip route to confirm each VLAN subnet actually appears as a connected network. Use show ip interface brief to check SVI status and IP addressing at a glance. Use show interfaces vlan <id> when you need the full detail for one specific VLAN interface, rather than the whole switch’s interface summary.