Routing Information Protocol (RIP) is a dynamic routing protocol that lets routers running IP share information about how to reach other networks. It’s rarely used in production networks today, but it remains the standard starting point for learning dynamic routing, and it’s directly tested on the CCNA exam. This guide covers how RIP works, how to configure it, how to secure and optimize it with passive interfaces, and how to propagate a default route through it.
How Routing Information Protocol (RIP) Works
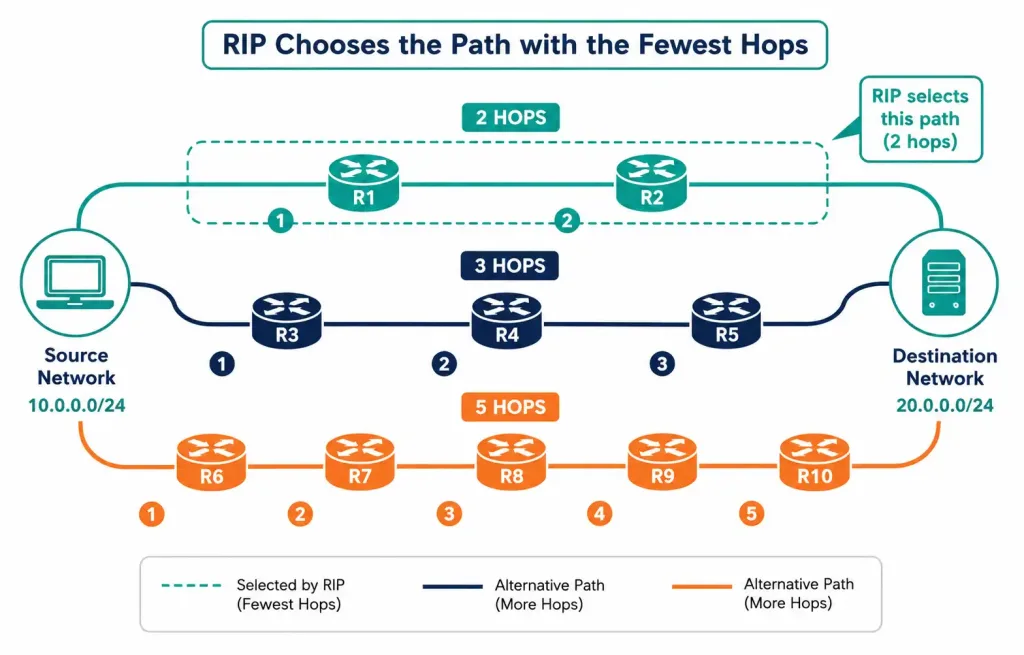
RIP uses hop count as its routing metric — the number of routers a packet must cross between source and destination. The path with the lowest hop count is considered best and installed in the routing table. RIP is a distance-vector protocol with a default administrative distance of 120, running over UDP port 520 — which places it at the application layer of the OSI model, alongside other protocols that use a transport-layer protocol like UDP to carry their own messages.
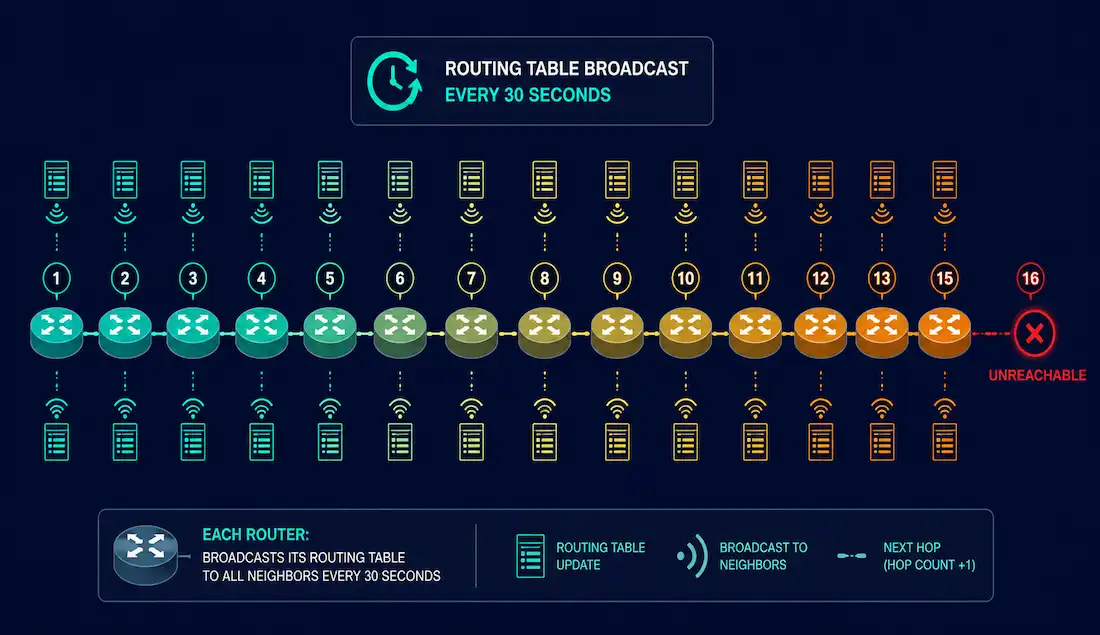
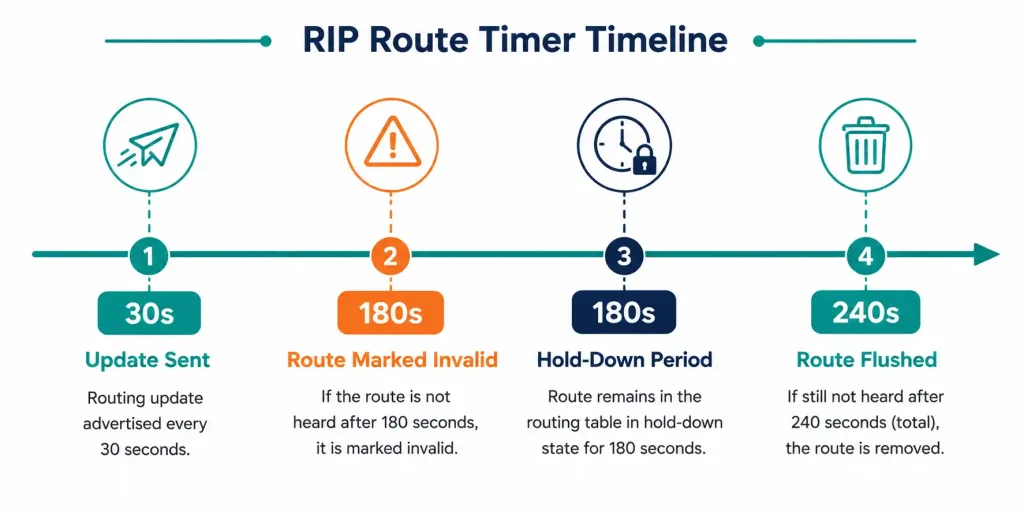
RIP exchanges routing updates by broadcasting (or multicasting, in RIPv2) its entire routing table to directly connected neighbor routers every 30 seconds. Those neighbors pass the same information on to their own neighbors, and so on across the network. Routers trust this neighbor-supplied information without independently verifying it — sometimes described informally as “routing on rumors.”
If a router stops sending updates — due to a crash or a link failure — neighboring routers detect the silence and, after 180 seconds with no update, mark that route invalid. The route is held down for a further period and fully removed from the table after 240 seconds total if no new update arrives.
To prevent routing loops, RIP caps the maximum usable path length at 15 hops — a hop count of 16 is treated as network-unreachable, effectively RIP’s way of saying “no path exists.”
There are three RIP versions: RIPv1, RIPv2, and RIPng (for IPv6). RIP’s core limitation is scale: because it broadcasts its full routing table every 30 seconds regardless of whether anything changed, and because hop count ignores bandwidth entirely, it doesn’t scale to large or fast-changing networks. It survives today mainly as a teaching tool — a foundation for understanding distance-vector routing before moving on to more capable protocols like OSPF and EIGRP.
Basic RIP Configuration
Enable RIP on a Cisco router with the router rip command from global configuration mode:
Router0(config)# router rip
Router0(config-router)#
This enters RIP’s own configuration mode, where routing-specific settings live. To remove RIP entirely, use no router rip from global configuration mode — this immediately stops the RIP process and erases the existing RIP configuration.
Advertising Networks
Once in RIP configuration mode, tell the router which locally connected networks to advertise, using the classful network address for each one:
Router0(config-router)# network 192.168.0.0
Router0(config-router)# network 10.10.10.0
This enables RIP on every interface belonging to the specified network, and those interfaces can now both send and receive RIP updates. If you enter a subnetted address instead of a classful one — for example, 192.168.1.32 — Cisco IOS automatically converts it to its classful equivalent (192.168.1.0) in the running configuration, without any error message. This is because RIPv1 is a strictly classful protocol.
A full worked example for a router with two advertised networks:
Router0> enable
Router0# configure terminal
Router0(config)# router rip
Router0(config-router)# network 192.168.0.0
Router0(config-router)# network 10.10.10.0
Router0(config-router)# exit
Router0(config)# exit
Router0# write memory
A router with more directly connected networks simply lists each one. Router1, connected to five networks, would be configured as:
Router1> enable
Router1# configure terminal
Router1(config)# router rip
Router1(config-router)# network 10.10.10.0
Router1(config-router)# network 172.16.0.0
Router1(config-router)# network 172.16.2.0
Router1(config-router)# network 172.16.3.0
Router1(config-router)# network 172.16.4.0
Router1(config-router)# exit
Router1(config)# exit
Router1# write memory
Verifying RIP Configuration
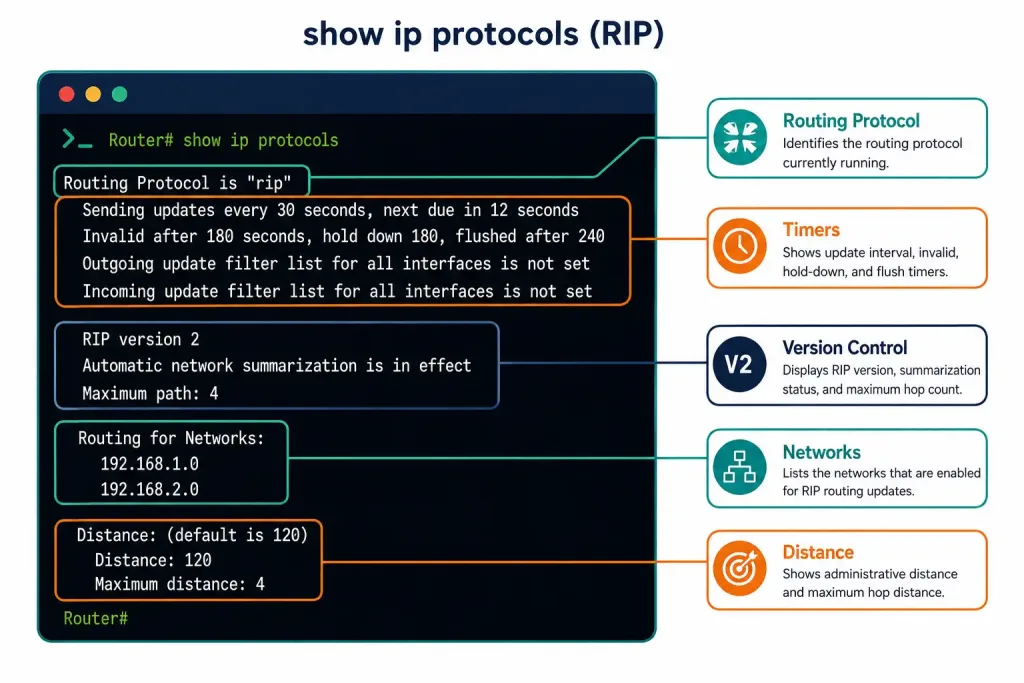
show ip protocols is the primary command for inspecting RIP’s current state:
Router# show ip protocols
Routing Protocol is "rip"
  Sending updates every 30 seconds, next due in 21 seconds
  Invalid after 180 seconds, hold down 180, flushed after 240
  Default version control: send version 1, receive any version
    Interface FastEthernet0/0
      Sending version 1, receiving version 1
  Automatic network summarization is in effect
  Routing for Networks:
    10.0.0.0
    192.168.0.0
Distance: (default is 120)| Output Line | What It Means |
|---|---|
Routing Protocol is "rip" | RIP is the active dynamic routing protocol. |
Sending updates every 30 seconds | Confirms the standard 30-second update timer. |
Invalid after 180... hold down 180... flushed after 240 | RIP’s route-aging timers, in seconds. |
Default version control: send version 1, receive any version | RIP is sending v1 updates but can still receive both v1 and v2. |
Automatic network summarization is in effect | Routes are being summarized to their classful boundary. |
Routing for Networks | Lists exactly which networks RIP is advertising. |
Distance: (default is 120) | Confirms RIP’s administrative distance. |
show ip route displays the actual RIP-learned routes in the routing table, and show running-config or show startup-config confirm what’s actually configured versus saved.
Enabling RIPv2 and Disabling Auto-Summarization
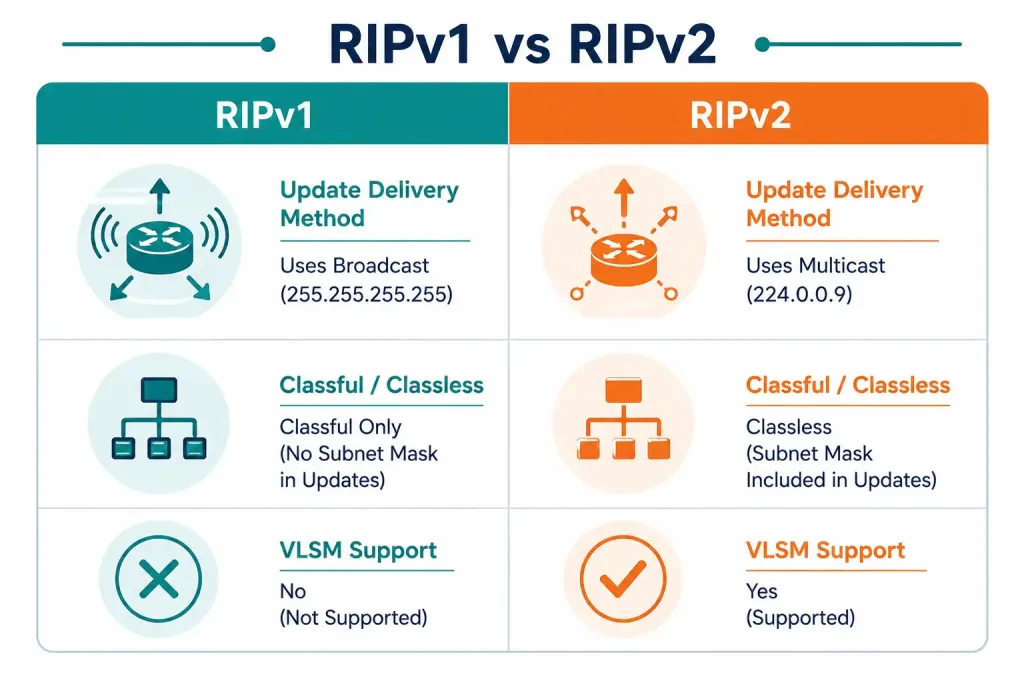
By default, a newly configured RIP process runs RIPv1 — it sends only version 1 updates, though it can receive both v1 and v2 messages (a RIPv1 router simply ignores any RIPv2-specific fields it receives). Enable RIPv2 explicitly with:
Router0(config-router)# version 2RIPv2 includes the subnet mask in every route advertisement, making it a classless routing protocol — unlike RIPv1, this means RIPv2 correctly supports VLSM. Revert to the default with no version 2.
Both RIPv1 and RIPv2 automatically summarize routes at classful network boundaries by default. For RIPv2 specifically, this default behavior can be turned off:
Router0(config-router)# no auto-summaryWith auto-summary disabled, RIPv2 advertises every subnet along with its actual mask, rather than collapsing routes to their classful boundary. This command has no effect on RIPv1, since RIPv1 has no way to carry subnet mask information regardless. show ip protocols will confirm the change, showing “Automatic network summarization is not in effect” once disabled.
RIPv1 vs. RIPv2 at a Glance
| Feature | RIPv1 | RIPv2 |
|---|---|---|
| Classful or classless | Classful | Classless (carries subnet mask) |
| Update delivery | Broadcast to 255.255.255.255 | Multicast to 224.0.0.9 |
| VLSM support | No | Yes |
| Authentication | Not supported | MD5 authentication supported |
| Auto-summary | Always on, cannot disable | On by default, can disable with no auto-summary |
Configuring RIP Passive Interfaces
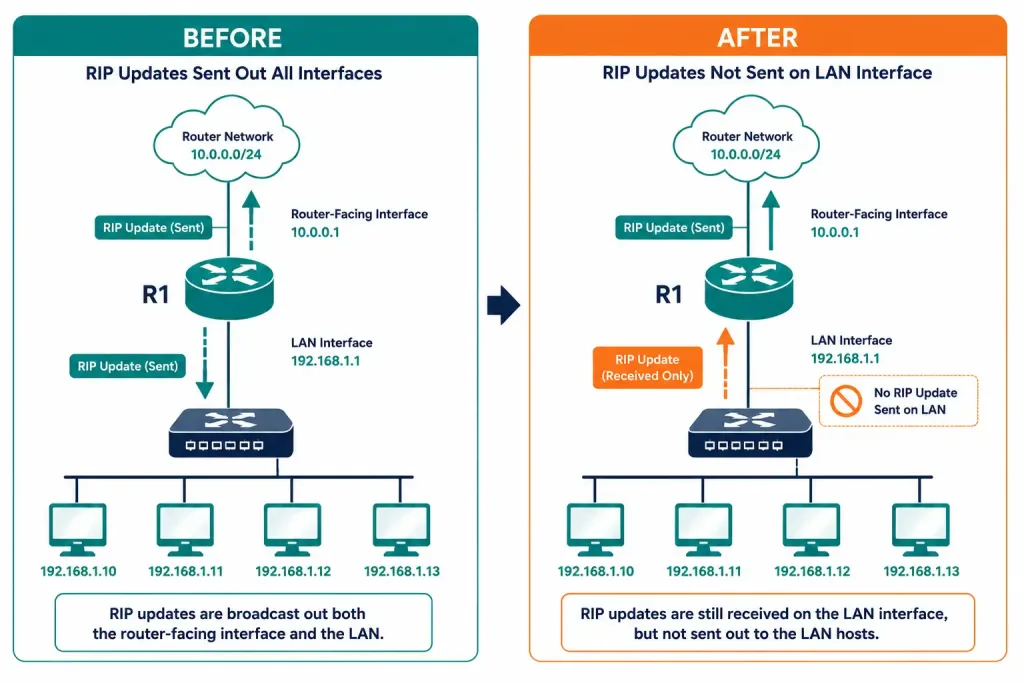
By default, RIP sends its full routing table update out every enabled interface every 30 seconds — including interfaces with no other RIP router on the other end, such as a LAN interface connected directly to end-user hosts. That’s wasted effort at best, and a real exposure at worst.
Why Passive Interfaces Matter
Security risk. RIP updates sent as broadcasts (RIPv1) or multicasts (RIPv2) can be intercepted by anyone with a packet sniffer like Wireshark on that segment. An attacker who captures these updates learns the network’s topology, and in some scenarios could attempt to inject false routes to cause routing loops or blackhole traffic. Restricting RIP updates to links that actually connect to other routers reduces this exposure. Pairing RIPv2 with MD5 authentication, configured via a key chain, adds a further layer of protection against forged updates.
Bandwidth and resource waste. Every device on a broadcast or multicast segment — switches, end-host NICs — has to process a RIP update it will never use, and a full routing table update can run 100–500 bytes per advertised route. Multiplied across a large LAN with many hosts, that’s real, unnecessary overhead for zero benefit.
The passive-interface command solves both problems directly: it stops RIP from sending updates out a specified interface, while the router still receives updates on that interface if any arrive, and still advertises any routes it learned elsewhere. This is exactly the right fit for a LAN interface with no other routers on it.
Configuring a Passive Interface
Router0> enable
Router0# configure terminal
Router0(config)# router rip
Router0(config-router)# passive-interface FastEthernet0/1
To reverse this on a specific interface, use no passive-interface FastEthernet0/1. To make every interface passive by default and then selectively re-enable the ones that actually need to send updates, use passive-interface default followed by no passive-interface on each interface that should remain active — often a cleaner approach on routers with many interfaces, since new interfaces default to passive rather than accidentally leaking updates.
Verify the configuration with show ip protocols, which lists any configured passive interfaces explicitly, or debug the live behavior with debug ip rip in privileged EXEC mode to directly observe whether updates are actually being suppressed on the intended interface (used cautiously, and briefly, given the volume of output it can generate).
The passive-interface concept isn’t unique to RIP — the same command, with the same underlying purpose, is available for other dynamic routing protocols including EIGRP and OSPF.
Propagating a Default Route in RIP
A default route (0.0.0.0/0), also called the gateway of last resort, directs traffic for any destination that isn’t otherwise in the routing table — most commonly, traffic headed toward the internet. Propagating a default route through RIP is especially useful in a network with a single exit point, such as an edge router connected to an ISP, since it lets that one router hold the actual internet-facing configuration while every other router in the RIP domain learns the default route automatically.
Prerequisites
- Cisco IOS with RIP support (most modern versions).
- RIPv2 enabled (
version 2) if classless routing or VLSM support is needed alongside the default route. - Interfaces configured with correct IP addresses and confirmed up/up with
no shutdown. - Correct
networkstatements already in place for every RIP-participating subnet.
Example Topology
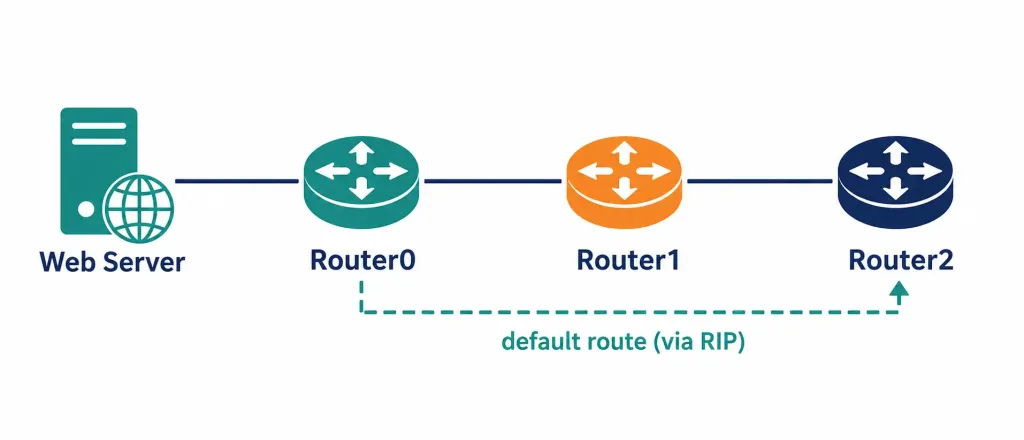
A linear three-router topology illustrates this well: Router0 is the edge router, connected to an external network (represented here by a web server) and to Router1; Router1 connects onward to Router2.
- Router0: FastEthernet0/0 — 192.168.0.1/24 (toward the web server at 192.168.0.2); FastEthernet0/1 — 10.10.10.1/24 (toward Router1)
- Router1: FastEthernet0/0 — 10.10.10.2/24 (toward Router0); FastEthernet0/1 — 172.16.0.1/24 (toward Router2)
- Router2: FastEthernet0/0 — 172.16.0.2/24 (toward Router1)
Router0 is the network’s single exit point, so it only needs a static default route pointing toward the web server’s next hop. Configuring that static default route once on Router0, then propagating it into RIP, is far simpler than configuring individual static or dynamic routes toward the internet on every router in the domain.
Configuration
Router0> enable
Router0# configure terminal
Router0(config)# ip route 0.0.0.0 0.0.0.0 192.168.0.2
Router0(config)# router rip
Router0(config-router)# network 192.168.0.0
Router0(config-router)# network 10.10.10.0
Router0(config-router)# default-information originate
Router0(config-router)# exit
Router0(config)# exit
Router0# write memory
The default-information originate command is what actually propagates the static default route into RIP updates — without it, the static default route would stay local to Router0 and never reach Router1 or Router2 at all. Once this is configured, Router0 has a genuine Gateway of Last Resort, and RIP carries that same default route onward to every other router in the domain.
Router1 and Router2 need ordinary RIP configuration for their own networks — no special command is required on their end, since they receive the default route automatically as part of standard RIP updates once Router0 originates it.
Verifying the Propagated Default Route
Run show ip route on Router1 and Router2 to confirm the default route has arrived:
Router1# show ip route
Gateway of last resort is 10.10.10.1 to network 0.0.0.0
R*   0.0.0.0/0 [120/1] via 10.10.10.1, 00:00:12, FastEthernet0/0
The R* code marks this as a RIP-learned route serving as the candidate default. Notably, this route will not appear in show startup-config on Router1 or Router2, since it was learned dynamically through RIP rather than configured as a local static entry — a useful detail to remember when troubleshooting, since the absence of a default route in the startup config on a downstream router doesn’t necessarily mean anything is wrong.
Frequently Asked Questions
What is the Routing Information Protocol (RIP)?
RIP is a dynamic distance-vector routing protocol that uses hop count as its metric to determine the best path between networks, broadcasting its full routing table to neighboring routers every 30 seconds. It caps paths at 15 hops to prevent routing loops, and carries an administrative distance of 120. While too limited in scale for most modern production networks, RIP remains a standard foundation for learning dynamic routing concepts in CCNA study.
How do you configure RIP on a Cisco router, including RIPv2?
Enter global configuration mode and use router rip to enable the process, then use network <classful-address> for each directly connected network you want RIP to advertise. Add version 2 to enable RIPv2, and no auto-summary if you want RIPv2 to advertise actual subnet masks instead of summarizing to classful boundaries. Verify the configuration with show ip protocols, and save it with write memory.
What are the key differences between RIPv1 and RIPv2?
RIPv1 is a classful protocol that broadcasts updates to 255.255.255.255 without any subnet mask information, while RIPv2 is classless, includes the subnet mask in every update, and multicasts to 224.0.0.9 instead of broadcasting. RIPv2 also supports MD5 authentication, which RIPv1 does not, and its ability to carry subnet masks is what makes it VLSM-capable where RIPv1 is not. Both versions otherwise share the same core mechanics — hop count metric, 30-second update interval, and 15-hop maximum path length.
Why should I configure a passive interface for RIP, and how do I do it?
A passive interface stops RIP from sending updates out a specific interface while still allowing it to receive updates and advertise routes learned elsewhere — ideal for LAN interfaces with no other routers present, since sending unnecessary broadcasts or multicasts there wastes bandwidth and exposes the network’s topology to anyone sniffing that segment. Configure it with passive-interface <interface> under router rip, or use passive-interface default to make every interface passive by default and selectively re-enable the ones that genuinely need to exchange updates.
How do I propagate a default route through RIP, and how do I verify it worked?
Configure a static default route on the network’s edge router pointing toward its actual external next hop, then add default-information originate under that router’s router rip configuration — this is the specific command that injects the static default route into RIP’s own updates for other routers to learn. Verify on downstream routers with show ip route, looking for an R* route to 0.0.0.0/0 confirming both the RIP origin and its status as the active gateway of last resort; note that this route won’t appear in show startup-config on those downstream routers, since it was learned dynamically rather than configured locally.