Connecting to a Cisco router for the first time is a foundational skill for anyone working toward CCNA or managing real network hardware. This guide covers the physical console connection every router needs for initial setup, the CLI basics you’ll use immediately after connecting, and how to move from insecure Telnet to properly configured SSH for ongoing remote access.
Physical Connection Methods to Access a Cisco Router
The Console Port
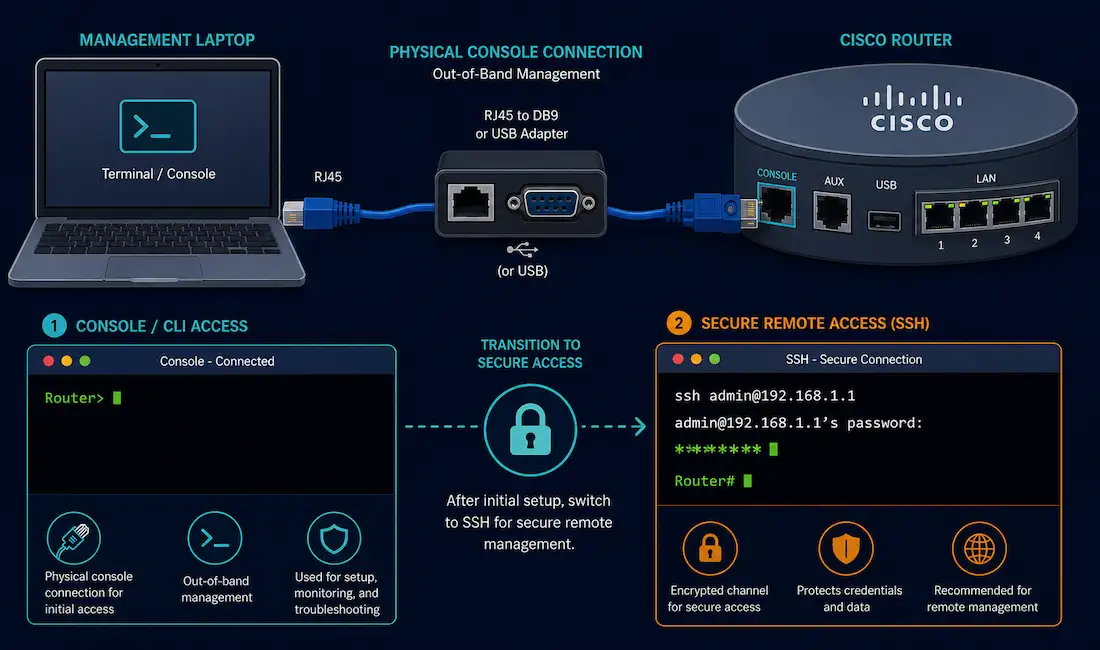
The console port provides out-of-band access to a Cisco router, meaning it works independently of the router’s actual network configuration. This is exactly why it’s required for initial setup: SSH, Telnet, HTTP, and HTTPS all require the router to already have networking configured and an active interface, none of which exists yet on a brand-new or factory-reset device. Think of the console port as a backdoor into the device that works even when the network itself is completely down or unconfigured.
What you’ll need:
- A Cisco router (a Cisco 2901 is a common lab example)
- A console cable, typically RJ45-to-DB9 for older PCs or USB-to-RJ45 for modern laptops
- Terminal emulator software, such as PuTTY, Tera Term, or SecureCRT
Connecting:
- Plug the RJ45 end into the router’s console port and the USB end into your computer.
- If your computer doesn’t recognize the connection, you likely need the CP210x USB-to-Serial drivers, since many Cisco USB console cables use that chipset.
- Configure your terminal emulator with the standard Cisco console settings: 9600 baud rate, 8 data bits, no parity, 1 stop bit, no flow control. These settings, often abbreviated 9600 8N1, are the universal default across virtually all Cisco IOS devices.
Saving these settings as a named profile in your terminal emulator saves real time if you’ll be connecting to console ports regularly.
Adapters for Modern Laptops
Many current laptops have dropped traditional USB-A ports entirely, which means you’ll likely need a USB-C to RJ45 adapter to connect a standard console cable. For wireless or remote scenarios where a physical console connection isn’t practical, Bluetooth serial adapters exist as an alternative, though they’re a less common setup than a direct cable connection.
CLI Access Basics
Once connected via console, you’re working directly in the Command-Line Interface. Here’s the basic flow to get oriented:
Router> enable
Router# configure terminal
Router(config)# hostname CCNA-Lab
CCNA-Lab(config)#enablemoves you from user EXEC mode into privileged EXEC mode.configure terminalmoves you into global configuration mode, where most device-wide settings live.hostnamesets the device’s name, which then appears in the CLI prompt itself.
A useful trick worth knowing early: the do keyword lets you run an EXEC-mode command while still in global configuration mode, without having to exit first. For example, do show running-config displays the running configuration without leaving config mode.
Setting Console and Enable Passwords
CCNA-Lab(config)# line console 0
CCNA-Lab(config-line)# password C1sco123
CCNA-Lab(config-line)# login
CCNA-Lab(config-line)# exit

CCNA-Lab(config)# enable secret C1sco456
Note that the passwords above are illustrative examples only, not something to reuse on an actual device; a real deployment should use a genuinely strong, unique password rather than a predictable pattern. enable secret specifically encrypts the password it protects, unlike the older enable password command, which is why enable secret is the version worth using. Password-protecting console access, and understanding the distinction between password/enable password and secret, is a CCNA exam staple worth knowing cold.
Remote Access: Telnet
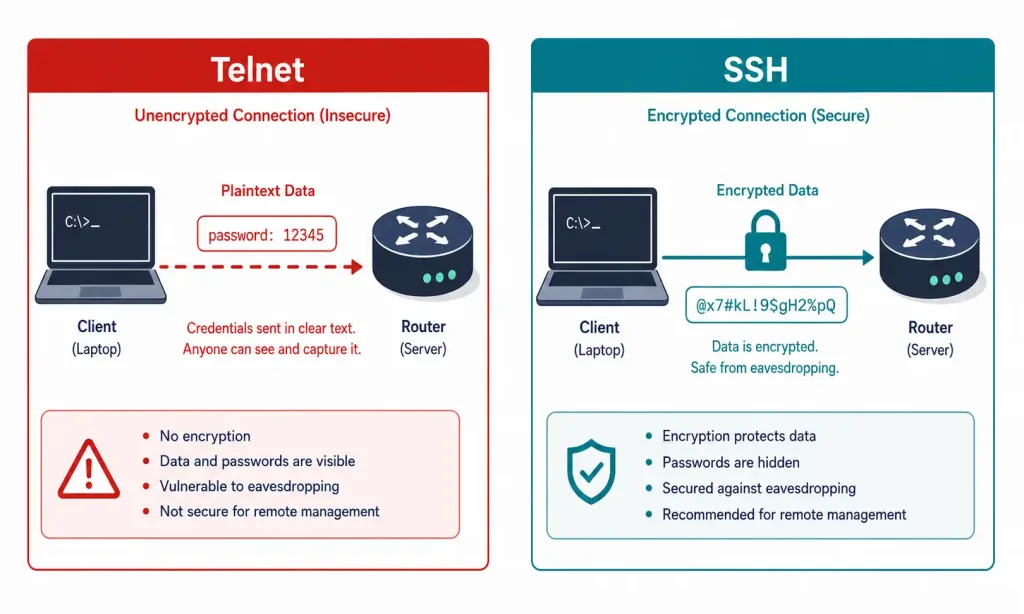
Telnet establishes a CLI session over the network through a virtual interface, similar in concept to SSH, but with a critical difference: it provides no encryption at all. Usernames, passwords, and every command typed during a Telnet session travel across the network in plain text, readable by anyone able to observe that traffic. Telnet is an in-band connection method, meaning it depends on the router’s actual network configuration being functional, unlike the out-of-band console port.
Remote Access: SSH Configuration
SSH provides the same kind of CLI access Telnet does, over a network connection rather than a physical cable, but with strong encryption and authentication built in. It’s the standard, expected method for remotely managing network devices in any environment that takes security seriously, and like Telnet, it’s an in-band method requiring an active, IP-configured interface on the router.
Step 1: Generate RSA keys
CCNA-Lab(config)# ip domain-name networkustad.com
CCNA-Lab(config)# crypto key generate rsa
The name for the keys will be: CCNA-Lab.networkustad.com
Choose the size of the key modulus [512-4096]: 2048
A domain name has to be configured before generating RSA keys, since the key name incorporates it. A 2048-bit modulus is a reasonable practical minimum for the RSA key size on current hardware.
Step 2: Configure VTY lines for SSH
CCNA-Lab(config)# line vty 0 4
CCNA-Lab(config-line)# transport input ssh
CCNA-Lab(config-line)# login local
CCNA-Lab(config-line)# exit

CCNA-Lab(config)# username admin secret C1sco789
transport input ssh restricts the VTY lines to SSH only, which also has the effect of disabling Telnet access on those same lines in one step, since Telnet is simply no longer in the permitted list. login local tells the router to authenticate incoming sessions against the local username database rather than a single shared line password.
Step 3: Verify SSH access
CCNA-Lab# show ip ssh
SSH Enabled - version 2.0
Authentication timeout: 120 secs
If SSH access fails after this configuration, check that the router actually has a reachable IP address on the interface you’re connecting to, and confirm no firewall or ACL is blocking port 22 along the way.
Security Best Practices
Confirm SSH version 2 explicitly, since version 1 has known cryptographic weaknesses:
CCNA-Lab(config)# ip ssh version 2Set a session timeout so idle sessions don’t stay open indefinitely:
CCNA-Lab(config-line)# exec-timeout 10 0This example logs out an idle session automatically after 10 minutes, reducing the window of opportunity if a session is left open unattended.
Automation with Ansible
For managing more than a handful of devices, manually connecting to each one individually stops scaling well. Ansible is a widely used automation tool for exactly this kind of repetitive network task. Here’s a simple example playbook that backs up each router’s running configuration to a local file:
yaml
---
- name: Backup Cisco Configs
  hosts: routers
  gather_facts: no
  tasks:
    - name: Run show running-config
      cisco.ios.ios_command:
        commands: show running-config
      register: config
    - name: Save config to file
      copy:
        content: "{{ config.stdout[0] }}"
        dest: "/backups/{{ inventory_hostname }}.cfg"
Run it with ansible-playbook backup.yml -i hosts. For engineers wanting to go further with network automation, Netmiko is a widely used Python library for scripting device interactions directly, useful for tasks like bulk VLAN configuration across many switches at once.
The AUX Port
Some routers include a legacy auxiliary (AUX) port, historically used for remote CLI access over a dial-up modem connection. Like the console port, AUX provides out-of-band access and doesn’t require any networking services to already be configured, though modem-based remote access has become largely obsolete as broadband and VPN-based remote management have taken over this use case.
Troubleshooting Common Issues
“Unable to Open COM Port.” Reinstall the USB-to-Serial drivers first; a driver conflict or missing driver is the most common cause. If that doesn’t resolve it, check Device Manager (on Windows) for a conflicting COM port assignment.
Locked out and need password recovery. Restart the router and interrupt the boot process (commonly Ctrl+Break, though the exact key sequence varies by terminal emulator and platform) to enter ROMMON. From there, use confreg 0x2142 to configure the router to skip loading its saved startup configuration on the next boot, then reload. Once you’ve regained access and reset the passwords, remember to return the configuration register to its normal value, typically 0x2102, so the saved configuration loads normally going forward.
SSH “Connection Refused.” Confirm SSH is actually enabled with show ip ssh, and verify the router has a valid, reachable IP address on the interface you’re connecting through. A missing RSA key pair, if crypto key generate rsa was never run, will also prevent SSH from working at all.
A Practical Lab Setup Checklist
Hardware:
- A physical Cisco router, or a Packet Tracer virtual lab if physical hardware isn’t available
- A USB-to-RJ45 console cable
Software:
- A terminal emulator: Tera Term or PuTTY
- Ansible or Python, if you want to practice automation alongside manual configuration
Configuration practice:
- Basic console and enable password setup
- Full SSH configuration, from RSA key generation through VTY restriction
- A basic configuration backup script or playbook
Conclusion
Connecting to and accessing a Cisco router is genuinely foundational: everything else in network administration builds on being able to reliably get into a device, whether through the console port for initial setup or SSH for secure ongoing management. Practicing the full sequence, console access, basic CLI navigation, password configuration, and the transition from Telnet to properly configured SSH, covers both the practical skills you’ll use constantly and the specific commands CCNA exams test directly.
Choosing the Right Access Method for the Situation
It’s worth being deliberate about which access method fits a given scenario, rather than defaulting to whichever one happens to be convenient. Console access is genuinely mandatory for a router’s very first configuration, since nothing else works until basic networking is set up, and it remains the right choice any time you’re troubleshooting a router that’s lost network connectivity entirely, since it’s the one method that doesn’t depend on the network being functional at all.
SSH is the right default for all ongoing remote management once a router has working IP connectivity, precisely because of the encryption Telnet lacks. Telnet itself shouldn’t have a place in any modern deployment; the only real reason to understand it in depth is that it still appears on CCNA exams and occasionally on legacy equipment you might inherit in a real job, not because it’s something worth actively choosing for new configurations.
Frequently Asked Questions
What cable is needed to connect to a Cisco router physically?
You need a console cable, either RJ45-to-DB9 for older computers with a serial port, or the more common USB-to-RJ45 style for modern laptops. This connects your computer’s terminal emulator directly to the router’s dedicated console port for initial, out-of-band configuration.
What are the default credentials for a Cisco router?
Most current Cisco routers ship with no default password at all, requiring initial configuration through the console port before any password protection exists. Some older models used “cisco” as a default username and password, but relying on default credentials of any kind is a real security risk and should never be left in place on a production device.
Can I access a Cisco router remotely without a console cable?
Yes, but only after the router already has basic network connectivity configured, since Telnet and SSH are both in-band methods that depend on a working IP configuration. Until that initial setup is done through the console port, remote access simply isn’t possible.
Why can’t I connect via SSH to my Cisco router?
The most common causes are a missing RSA key pair, which crypto key generate rsa creates, or the router lacking a reachable IP address on the interface you’re trying to reach. Running show ip ssh confirms whether SSH is actually enabled and gives a useful starting point for narrowing down the problem.
How do I recover access if I’m locked out of the router?
Interrupt the boot process to enter ROMMON, then use confreg 0x2142 to configure the router to skip its saved startup configuration on the next reload, allowing you to reset the passwords once it comes back up. Afterward, return the configuration register to its normal value so the router resumes loading its saved configuration as expected on future boots.
Why is SSH considered essential compared to Telnet?
Telnet transmits everything, including usernames and passwords, in plain text across the network, making it trivial for anyone monitoring that traffic to capture credentials. SSH encrypts the entire session, which is why it’s the standard expectation for any network device management today, and why disabling Telnet in favor of SSH-only access is a routine hardening step.