Figure 1 shows the reference topology for this guide: Router1 through Router4, connected via a mix of GigabitEthernet, FastEthernet, and Serial interfaces. This walkthrough configures OSPFv3 on Router1 step by step; assume Router2, Router3, and Router4 already have their global IPv6 and link-local addresses configured.
This topology is IPv6-only, no dual-stack, to keep the focus squarely on OSPFv3 configuration mechanics. A router with both IPv4 and IPv6 addresses configured is called dual-stacked, and a dual-stacked router can run OSPFv2 and OSPFv3 simultaneously as two fully independent processes — covered in the OSPFv2 vs OSPFv3 comparison guide, along with every other conceptual difference between the two versions and a worked dual-stack example. This guide assumes that background and focuses purely on the OSPFv3 configuration procedure itself.
Prerequisites for OSPFv3 Configuration
Before configuring OSPFv3, make sure you have:
- Basic IPv6 addressing knowledge at the CCNA level.
- An understanding of OSPFv2 fundamentals, since OSPFv3 builds on the same core mechanics — SPF algorithm, DR/BDR election, adjacency states — just applied to IPv6.
- Cisco IOS with IPv6 support (15.x or later covers this comfortably).
- A topology with routers connected via GigabitEthernet, FastEthernet, or Serial interfaces, matching the reference topology used throughout this guide.
Steps to Configure OSPFv3
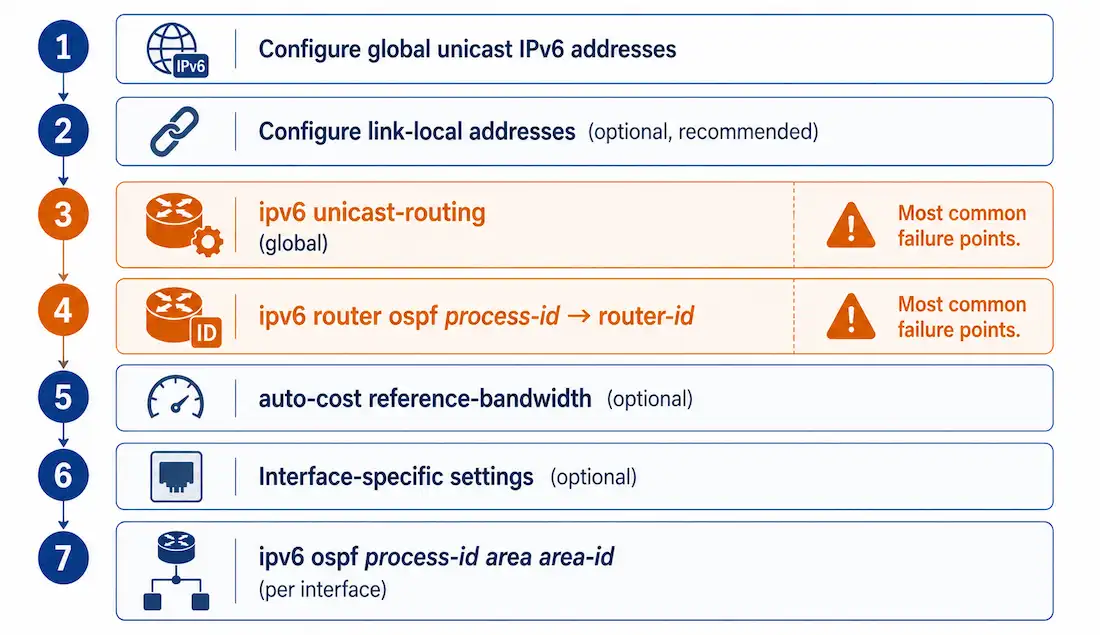
- Configure global unicast IPv6 addresses on each participating interface.
- Configure link-local addresses — optional but recommended for stability, since OSPFv3 uses them for neighbor discovery rather than global addresses. See the link-local IPv6 address guide for manual configuration, the EUI-64 auto-generation process, and why a memorable manual address is worth setting on interfaces you’ll troubleshoot often.
- Enable IPv6 unicast routing globally with
ipv6 unicast-routing. - Enter OSPFv3 router configuration mode and set a 32-bit router ID with
router-id <rid>. - Optionally adjust the reference bandwidth if the network includes Gigabit-or-faster links.
- Configure any interface-specific OSPFv3 settings needed, such as bandwidth adjustments.
- Enable OSPFv3 on each interface with
ipv6 ospf <process-id> area <area-id>.
Example Interface Configuration
Router1(config)# interface FastEthernet0/0
Router1(config-if)# ipv6 address 2001:ADA0:110B::1/64
Router1(config-if)# exit
Router1(config)# interface FastEthernet0/1
Router1(config-if)# ipv6 address 2001:ADA0:110B:0004::1/64
Router1(config-if)# exit
Router1(config)# interface Serial0/3/1
Router1(config-if)# ipv6 address 2001:ADA0:110B:0003::1/64
Router1(config-if)# ipv6 address fe80::1 link-local
Note the ::1 host portion on each global address — an address ending in :: alone represents the subnet’s own network identifier, not a usable host address, so every interface needs an explicit non-zero host ID assigned.
Enable IPv6 Unicast Routing
Cisco routers don’t route IPv6 by default. Enable it globally before configuring any IPv6 routing protocol, OSPFv3 included:
Router1(config)# ipv6 unicast-routingSkipping this step is the single most common reason OSPFv3 fails to work at all — not a partial failure, but zero routing activity across the entire router, since nothing IPv6-related can function without it.
Configuring the OSPFv3 Router ID
Configure the OSPFv3 router ID using ipv6 router ospf <process-id> in global configuration mode — this enters IPv6 router configuration mode, which has its own distinct prompt from the IPv4 router ospf mode. Use this mode to configure process-wide OSPFv3 parameters: the 32-bit router ID and the reference bandwidth.
IPv6 routing protocols are enabled at the interface level, not through a network command in router configuration mode the way OSPFv2 is. The process ID is a decimal value from 1 to 65535. OSPFv3 still requires a 32-bit router ID in dotted-decimal format, exactly like OSPFv2 — an explicitly configured router ID is preferred, falling back to the highest IPv4 address on a loopback interface, or the highest IPv4 address on any active interface if no loopback exists.
If the router has no IPv4 address anywhere to fall back on, it displays a console message asking for manual router ID configuration — this is the IPv6-only edge case covered in more depth in the link-local addressing guide, where OSPFv3’s router ID selection quirk of still depending on IPv4 addresses is explained.
Before entering OSPFv3 router configuration mode, ipv6 unicast-routing must already be enabled, or IOS returns an “IPv6 routing not enabled” error.
Router1(config)# ipv6 unicast-routing
Router1(config)# ipv6 router ospf 10
%OSPFv3-4-NORTRID: OSPFv3 process 10 could not pick a router-id, please configure manually
Router1(config-rtr)# router-id 10.10.1.1
Router1(config-rtr)# auto-cost reference-bandwidth 10000
% OSPF: Reference bandwidth is changed.
  Please ensure reference bandwidth is consistent across all routers.
Router1(config-rtr)#
Notice the distinct (config-rtr) prompt — different from the IPv4 (config-router) prompt — and the informational console message confirming no router ID was configured yet before router-id was entered. The reference bandwidth warning is the same one covered in the OSPF cost calculation guide: whatever value is set here must match across every router in the domain, or routers calculate cost on inconsistent scales.
Verify the configuration with show ipv6 protocols.
Modifying an OSPFv3 Router ID
A router ID, once established, doesn’t change on its own — not until the router reloads or the OSPF process is cleared. Clearing the process is the preferred method, since it avoids a full router reload:
Router1# configure terminal
Router1(config)# ipv6 router ospf 10
Router1(config-rtr)# router-id 10.10.1.2
Router1(config-rtr)# exit
Router1(config)# exit
Router1# clear ipv6 ospf process
Reset ALL OSPF processes? [no]: yes
Router1#
Clearing the process forces OSPFv3 to renegotiate every neighbor adjacency under the new router ID — adjacencies drop and re-form through the full state sequence, the same Down-to-Full progression covered in detail in the Hello packets guide. Verify the change afterward with show ipv6 protocols.
Enabling OSPFv3 on Interfaces
Unlike OSPFv2’s router-mode network command, OSPFv3 is enabled directly on each interface. Enter interface configuration mode and use ipv6 ospf <process-id> area <area-id>:
Router1(config)# interface FastEthernet0/0
Router1(config-if)# ipv6 ospf 10 area 0
The process ID must match the one used in the router-mode configuration, while the router ID itself is unique per router. Any area can be chosen for the area ID; area 0 is used here as the backbone area, which every other area must eventually attach to — this also keeps the door open for a later migration to multi-area OSPFv3 without renumbering.
Verify with show ipv6 ospf interface brief for a summary across every OSPFv3-enabled interface at once.
Common Configuration Mistakes
- Forgetting
ipv6 unicast-routing. Results in no IPv6 routing at all, not a partial failure. - Mismatched process IDs across routers. Prevents adjacencies from forming, even with everything else configured correctly.
- No router ID on an IPv6-only router. Produces the
%OSPFv3-4-NORTRIDerror shown above until resolved. - Incorrect area IDs. Breaks multi-area designs and prevents adjacency formation across mismatched areas.
- Skipping verification commands. Missed adjacencies and silent misconfigurations are easy to overlook without regularly checking
showoutput.
For the complete adjacency troubleshooting checklist — subnet, timer, MTU, ACL, and passive-interface mismatches, all of which apply to OSPFv3 exactly as they do to OSPFv2 — see the OSPF troubleshooting and verification guide. Use debug ipv6 ospf hello sparingly in labs when the checklist alone doesn’t pinpoint the issue, since debug output carries the same CPU cost concerns on OSPFv3 as it does on OSPFv2.
Verifying OSPFv3
The verification commands mirror OSPFv2’s, with ipv6 substituted throughout — show ipv6 ospf neighbor, show ipv6 protocols, show ipv6 ospf interface, and show ipv6 route ospf cover adjacency status, process settings, per-interface detail, and the resulting routing table respectively. The full breakdown of what each command reveals and how to read its output is in the OSPF troubleshooting and verification guide.
One field is genuinely OSPFv3-specific and worth calling out: show ipv6 ospf neighbor output includes an Interface ID column in place of OSPFv2’s IPv4 address column, since an OSPFv3 interface doesn’t have a single defining address the way an OSPFv2 interface does — link-local addresses handle that role instead, and Interface ID identifies the link itself.
Router1# show ipv6 ospf neighbor

Neighbor ID     Pri   State           Dead Time   Interface ID   Interface
10.10.2.1       1     FULL/DR         00:00:36    5              FastEthernet0/0
10.10.3.1       1     2WAY/DROTHER    00:00:39    5              FastEthernet0/0
Reading the State column follows the same logic established for OSPFv2: a neighbor that is the DR or BDR always reaches FULL, never 2WAY. 2WAY paired with DROTHER means that relationship has intentionally stopped there, since two non-DR/BDR routers on the same broadcast segment don’t need a full adjacency with each other.
Real-World Scenario: OSPFv3 in Enterprise IPv6 Migration
In a large enterprise migrating to IPv6, the typical rollout starts with area 0 configured on the core routers, then extends outward to stub areas attached for individual branch sites — the same area-design principles as OSPFv2, applied to the IPv6 process. Route summarization at the area boundaries keeps routing tables manageable as the migration scales, and testing the full configuration in a lab environment like Packet Tracer or GNS3 before touching production is worth the time, especially given how easy it is to miss a single ipv6 unicast-routing command on one router in a larger rollout and have that router silently sit outside the routing domain until someone notices.
A common pattern during migration is running OSPFv2 and OSPFv3 side by side on the same interfaces for an extended transition period, advertising IPv4 and IPv6 prefixes simultaneously while downstream systems and applications gradually cut over — exactly the dual-stack configuration covered in the OSPFv2 vs OSPFv3 comparison guide, where both processes run independently on one physical link with no shared state between them.
Illustrative Scenario: Two Missing Commands, Two Different Symptoms
Here’s a common scenario, meant to show the troubleshooting logic in action rather than describe a specific real event.
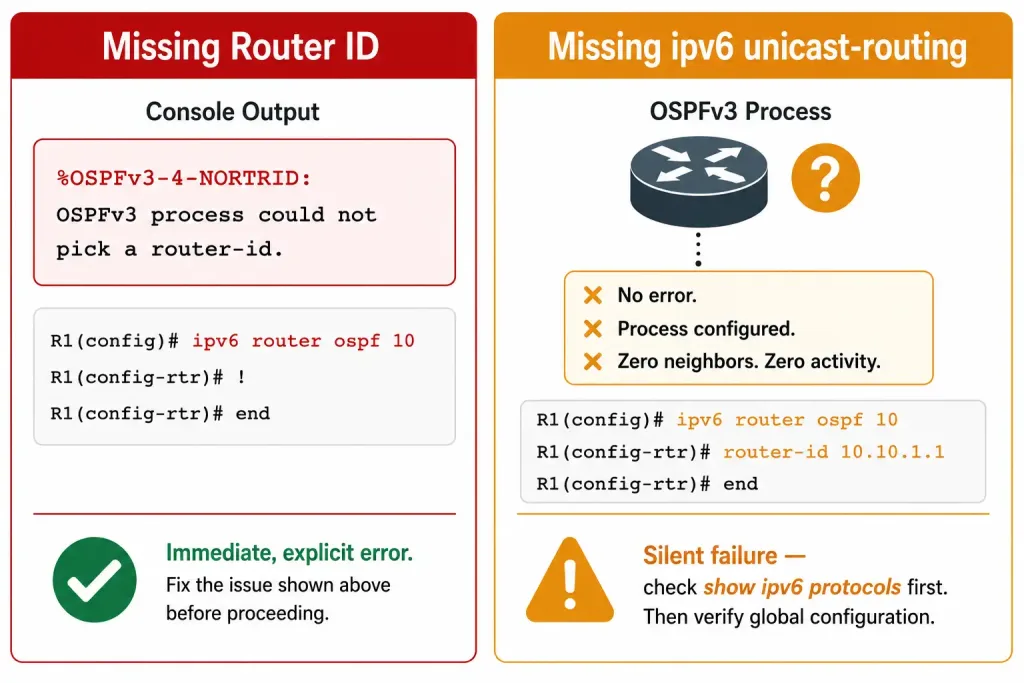
During a branch rollout, an engineer configures OSPFv3 on Router1 and Router2 identically, copying the same interface commands to both. Router1 comes up cleanly. Router2 shows zero OSPFv3 activity of any kind — no error on entering ipv6 router ospf, no neighbor, nothing in show ipv6 ospf neighbor at all, as if the process were never configured.
Checking show ipv6 protocols on Router2 confirms the OSPFv3 process is actually there and configured correctly. The missing piece turns out to be ipv6 unicast-routing — it was entered on Router1 during initial setup weeks earlier, but Router2 was provisioned from a different baseline template that never included it. Every subsequent OSPFv3 command was accepted without complaint, since IOS doesn’t require ipv6 unicast-routing to enter OSPFv3 configuration mode in every IOS version — only for the process to actually route anything.
This is a useful contrast with the router ID gotcha covered earlier: a missing router ID produces an explicit, immediate console message pointing at the exact problem, while a missing ipv6 unicast-routing command can, on some platforms, produce no error at all and simply result in a process that looks configured but never does anything. When OSPFv3 configuration accepts every command without complaint but neighbors still never appear, checking the global unicast-routing command is worth doing before anything more elaborate.
FAQs
What are the prerequisites for configuring OSPFv3?
You need CCNA-level IPv6 addressing knowledge, a working understanding of OSPFv2 fundamentals since OSPFv3 shares the same underlying mechanics, and Cisco IOS 15.x or later for full IPv6 support. A topology with routers connected via GigabitEthernet, FastEthernet, or Serial interfaces, with global and link-local IPv6 addresses already assigned, is the practical starting point before OSPFv3 configuration begins.
How do I configure a router ID for OSPFv3 on a Cisco router?
Enable ipv6 unicast-routing globally first, then enter ipv6 router ospf <process-id> to reach OSPFv3 router configuration mode, and set the ID with router-id <rid>. If the router has no IPv4 address anywhere to auto-derive a router ID from, IOS displays a console message requiring manual configuration — this is expected behavior on IPv6-only routers, not an error to work around.
What happens if I forget to enable IPv6 unicast-routing?
OSPFv3 doesn’t work at all — not partially, but entirely, since IPv6 routing itself is disabled at the router level without this command. Attempting to enter OSPFv3 router configuration mode without it first produces an “IPv6 routing not enabled” error, which is usually the fastest way to catch the missing command before troubleshooting anything more specific.
How do I enable OSPFv3 on a specific interface?
Enter interface configuration mode and use ipv6 ospf <process-id> area <area-id>, matching the process ID used in the router-mode configuration. This replaces OSPFv2’s router-mode network command entirely — there’s no wildcard mask calculation involved, since OSPFv3 enablement happens directly on the interface rather than being matched against an address range.
Why might OSPFv3 neighbors not form an adjacency?
The most common causes are mismatched process IDs, a missing router ID on an IPv6-only router, or mismatched area IDs between the two sides of a link. Beyond those OSPFv3-specific causes, the full standard adjacency checklist still applies — subnet, timer, MTU, and ACL mismatches all block OSPFv3 adjacencies the same way they block OSPFv2. Check show ipv6 ospf neighbor first, and use debug ipv6 ospf hello if the checklist alone doesn’t pinpoint the cause.