Do you know your standard network throughput volume and the types of traffic used in your network? You should require a network baseline if you don’t know the answers to the above questions. The network baseline is one of the most valuable tools for monitoring and troubleshooting network performance.
For an influential network, a baseline performance record is required over time. Measuring performance at varying times and loads will help in creating a better image of overall network performance
How to baseline a network
To baseline a network, you need to monitor the traffic for a long time because a more comprehensive time presents a more realistic picture of a traffic pattern. We can use the network baseline as listed below:
Evaluate network management policies agreement.
Understand network patterns and traffic trends.
Speed up troubleshooting network problems.
Understand network resource allocation.
Provide network up-gradation history statistics.
Provide data for decision-making as well as for network and security management.
Network administrators need the software Colasoft nChronos and Capsa to baseline a network. Both software listens to packet data from wires and generates various reports on the network. Further, the network administrator can copy, paste, and save the results from an executed ping, trace, and other related commands into a text file with time and date.
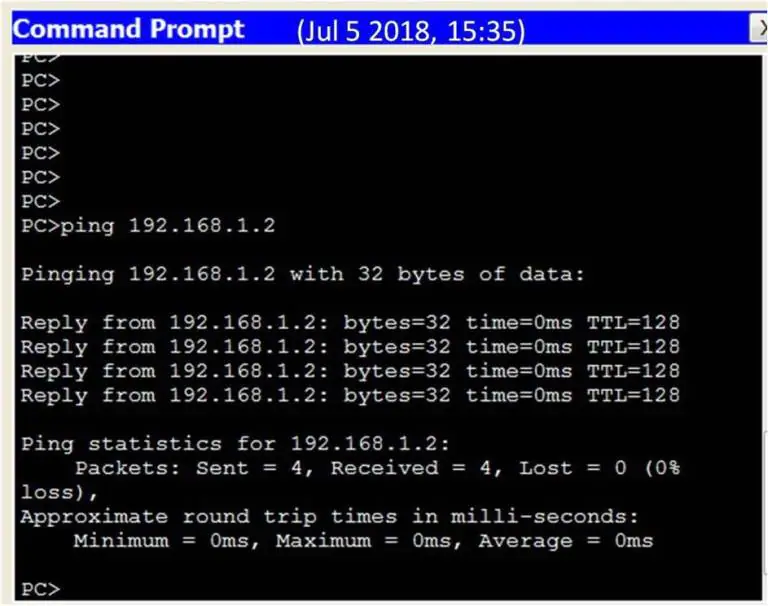
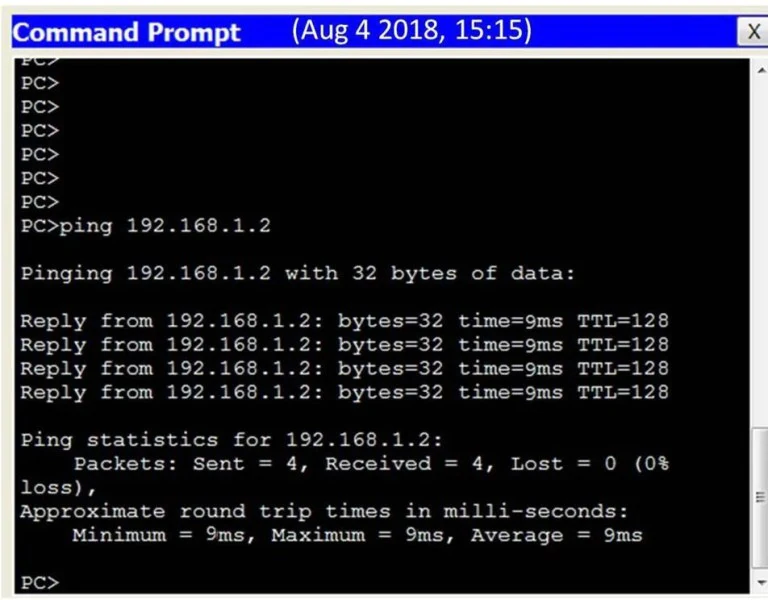
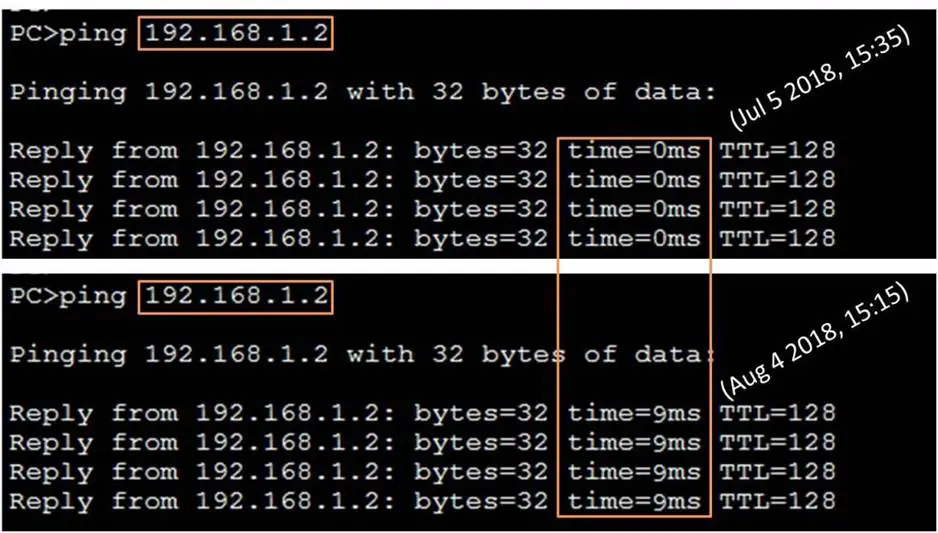
Then, the network administrator can use these text files to compare with other results, error messages, and response times from host to host. If response times massively increase, there may be a latency issue to address. The figures below illustrate the result of the ping command for the same IP address with different timings and the comparison of both.
Command Prompt Ping Test ResultsCommand Prompt Ping Results ScreenshotPing Command Results on Command-Line Interface
The output resulting from network commands can give data to the network baseline. Commercial networks should have widespread baselines. Professional-grade software tools are also available for storing and maintaining baseline information.
The ping command is a fundamental network troubleshooting tool that uses the Internet Control Message Protocol (ICMP), as defined in RFC 792, to test connectivity between devices. It is essential for CCNA (ICND1, ICND2) and CCNP (ROUTE, SWITCH, TSHOOT) exam preparation, helping students verify Layer 3 connectivity by the ping results. This utility has evolved with Cisco IOS, offering advanced features for modern networks.
Cisco IOS Ping Indicators
There are several ping results and indicators in IOS for the ICMP echo request that was sent. The common indicators for ICMP echo are the following:
. – Request timed out, indicating connectivity issues or no route (e.g., no route to 192.168.1.0/24).
U – Destination unreachable, due to no route or ping block.
& – Packet loss detected.
? – Unknown error.
Examples of IOS Ping Indicators
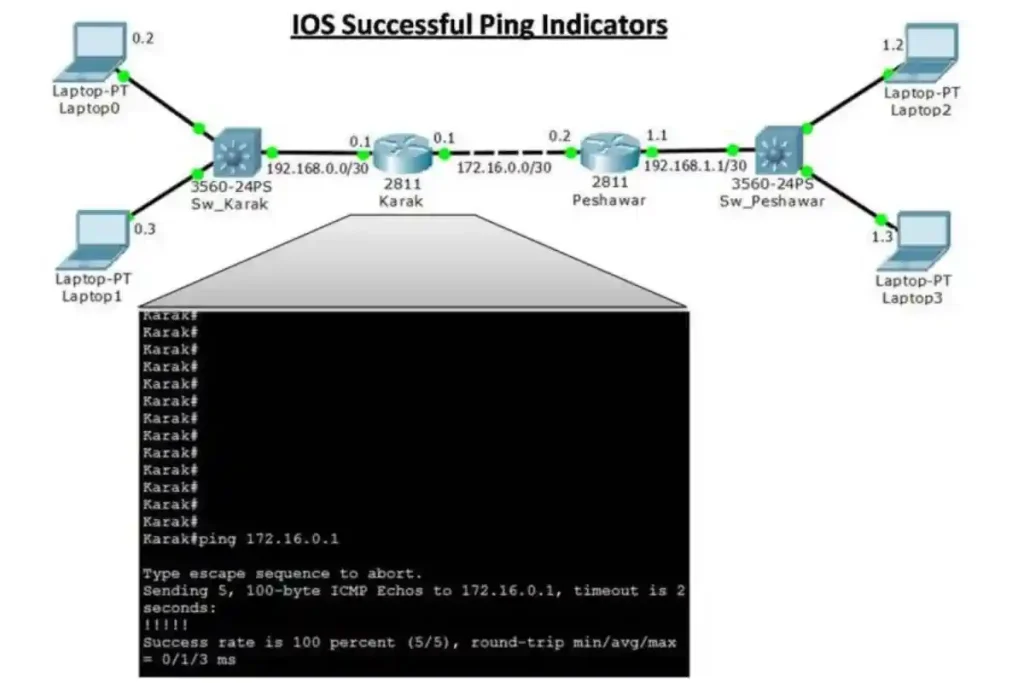
! – The mark of exclamation indicates that the ping was completed successfully and verifies Layer 3 connectivity along the network path. As shown in the Figure below, the Karak Router successfully pinged the Peshawar router, whose IP address is 172.16.0.1
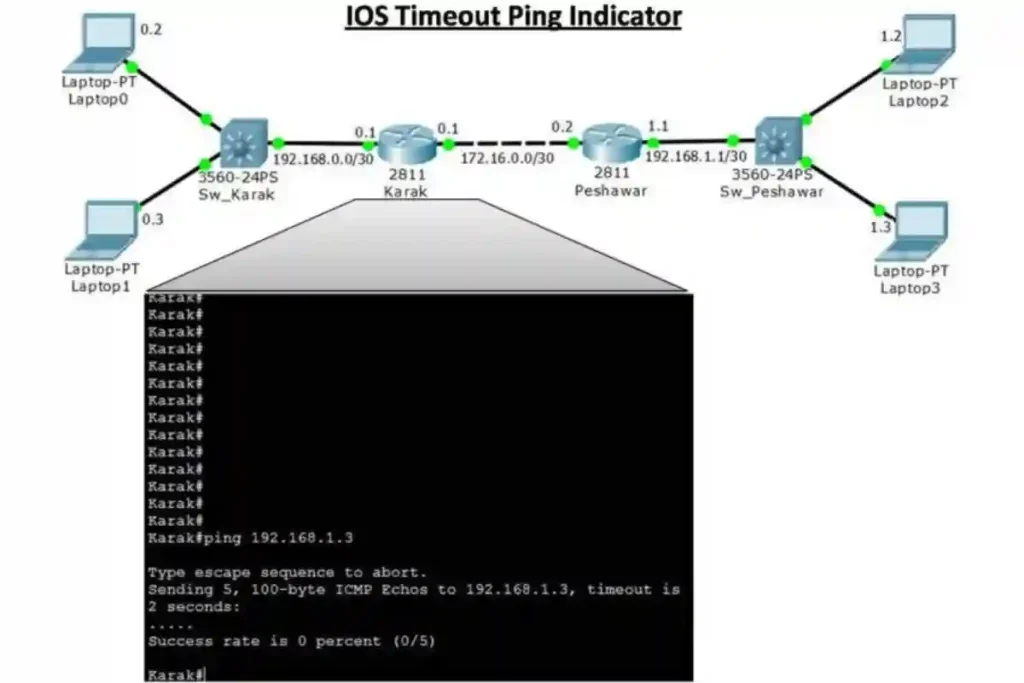
“.” The period indicates that there is some problem in connectivity somewhere along the network path. It also indicates that a router along the network path does not configure a route to the destination. If the ping is not allowed in the device it should also give a reply with “.” Indicator. The first echo request timed out is common in the network If the arp process is required.
The figure below shows the ping result from Karak router to laptop 3, where “Karak router” has no route to the network 192.168.1.0/24, so its reply with request timed out “.” Indicators.
U – This indicator shows that a router along the network path responded with an ICMP unreachable message because the router did not have a route configured to the destination address. If the destination blocked the ping request it will also reply with this mark.
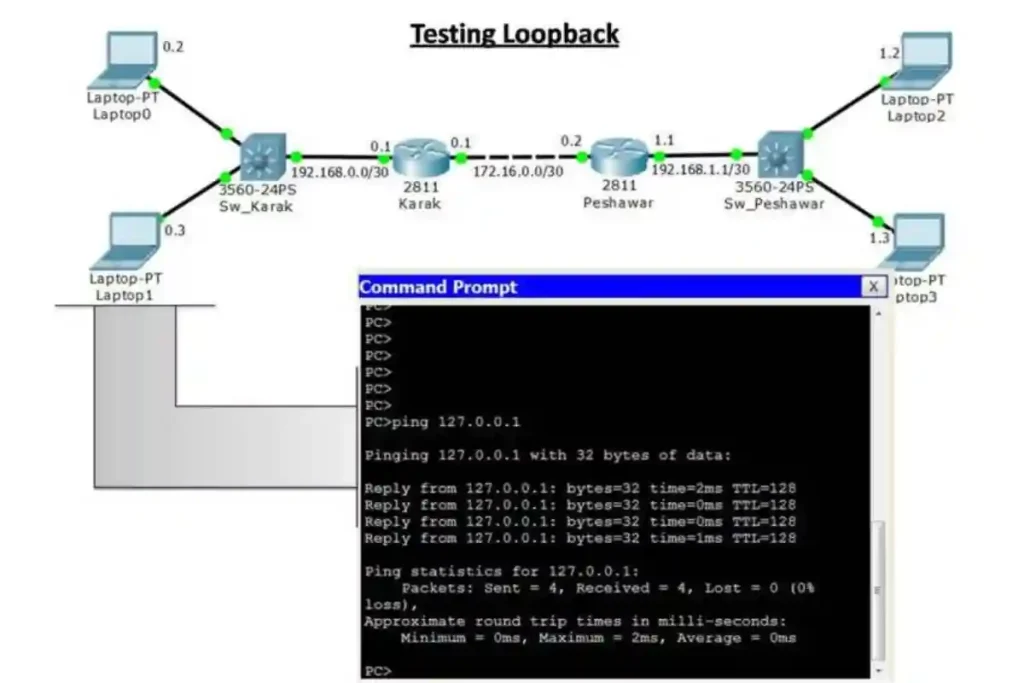
Testing the Loopback
To verify the internal IP configuration and protocol stack from the network layer to the physical layer the administrator can also use the ping command instead of putting a signal on the media. The Loopback IP addresses are 127.0.0.1 for IPv4 and ::1 for IPv6. We can examine the ping results for loop-back interfaces similar to other interfaces.
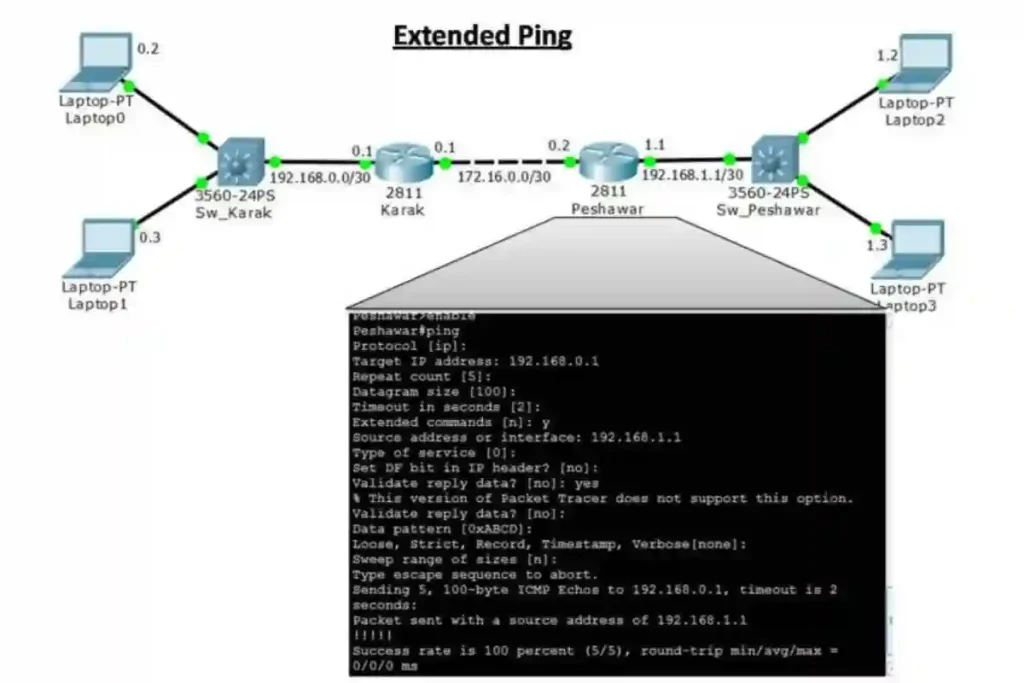
Extended Ping
The extended ping is one of the best commands offered by Cisco IOS. This is also the extended mode of the ping command. To execute and get extended ping results only enter ping command without destination address in privileged EXEC mode.
As shown in the figure below, a series of different prompts are then presented asking different parameters. Pressing Enter without writing something accepts the indicated default values.
The figure below illustrates how to force the source address for a ping to be 192.168.1.1(Router Peshawar); the source address far a standard ping would be 172.16.0.2. The network administrator can verify from the Peshawar Router that the Karak Router has a route to 192.168.1.0/24 network.
Cisco Devices Ping Simulator
Extended Ping Options
Cisco IOS Ping Simulator Ready
Type “help” for available commands
Router#
Ping Indicators Legend
! – Success (Layer 3 connectivity verified)
. – Request timed out (connectivity problem or no route)
U – Destination unreachable (no route or ping blocked)
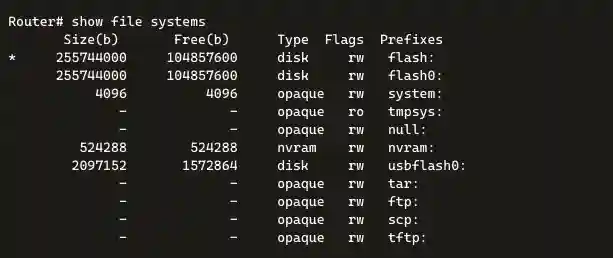
The Cisco IOS File System (IFS) has different directories, depending on the device. The IFS also allows the creation of subdirectories in flash memory or on a disk. The figure below displays the output of the show file system command, which lists all of the available file systems on the router.
📂 File System Entries Explained
Prefix
Description
Type
Access Flags
Notes
flash:
Primary flash memory (internal storage)
disk
rw
Stores IOS image, configurations, and other essential files
nvram:
Non-volatile RAM
nvram
rw
Stores the startup-config file that loads during boot
system:
System-internal virtual file system
opaque
rw
Used internally by the IOS; users typically don’t interact directly
tmpsys:
Temporary system file system
opaque
ro
Read-only virtual file system used during runtime operations
null:
Bit bucket file system
opaque
rw
Used to discard unwanted output, similar to /dev/null in Linux
usbflash0:
USB storage device (if connected)
disk
rw
Useful for backups, software updates, and config transfers
Used for TFTP file transfers, often during upgrades
xmodem:/ymodem:
Serial-based file transfer protocols (rare, mostly fallback)
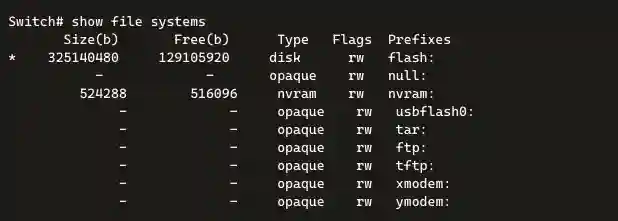
💡 You’ll notice switches, like routers, share many file system prefixes, though their internal flash size may vary depending on the model.
Backup and Restoring using Text files
Backup
Using Tera Term, we can also back up the Configuration file and restore the configuration from the text file when needed. The steps for backup and restoring using Tera Term is the following:-
On the File menu of Tera Term, click Log.
Then select the location where you want to save the file. Now Tera Term will start capturing.
Once the capture has been started, execute the show running-config or show startup-config command at the privileged EXEC prompt. The displayed text in the Tera Terminal will be directed to the chosen file.
After completing the capture, select Close in the Tera Term: Log window.
View the file at the chosen location to verify that it was not corrupted.
Restoring
When configuration is copied from a text file and pasted into a terminal window, the Inter Operating System executes each line of the text file as a command. So, the captured file will require editing to ensure that encrypted passwords are in plain text and that there is no non-command text.
Furthermore, the device must be set to the global configuration mode to receive the commands from the text file pasted into the terminal window. The following are the steps to restore the configuration using Tera Term.
On the File menu of Tera Term, click Send File.
Locate the configuration text file to be copied into the device and click Open.
Tera Term will paste the file into the device, and the text will be applied as a command.
Backup and Restoring Configurations with TFTP
Backup
Startup configuration or running configuration files can be stored on a TFTP (Trivial File Transfer Protocol) server and restored in the event of a problem. The configuration file should also be included in the network documentation.
To save the running configuration or the startup configuration file to a TFTP (Trivial File Transfer Protocol) server, use the copy running-config tftp or copy startup-config tftp command. Following are the steps to back up the running configuration to a TFTP server:
Enter the copy running-config tftp command in user exec mode and then enter the hostname or IP address where the configuration file will be stored.
Enter the name to assign to the configuration file.
Press Enter to confirm every choice.
The figure below illustrates the backup process to TFTP.
Restoring
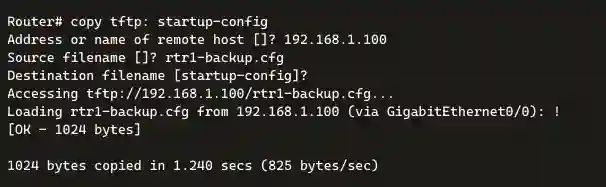
To restore the running configuration or the startup configuration from a TFTP (Trivial File Transfer Protocol) server, use copy tftp running-config or copy tftp startup-config command. Following are the steps to restore the running configuration from a TFTP server:
Enter the copy tftp running-config command in user exec mode then enter the hostname orIP address where the configuration file is stored.
Enter the name to assign to the configuration file.
The Figure below illustrates the restore process from the TFTP server.
Backing Up and Restoring Using a USB
Backup
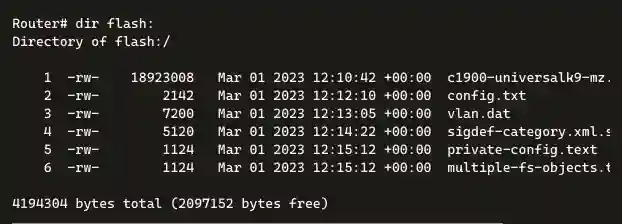
Before backing up to a USB port, it is important to verify that the USB drive is there and confirm the name of the drive using the show file systems command in the user exec mode. If the USB drive is there, use the copy run usbflash0:/ command to copy the configuration file to the USB flash drive. Be sure to use the name of the flash drive exactly, as indicated in the file system.
The slash indicates the root directory of the USB flash drive. Then the IOS will prompt for the filename. If the file is already copied and exists on the USB flash drive, the router will then prompt to overwrite. We can see files and directories in the USB using the dir command.
Restore
To copy the file back, use the command copy usbflash0:/Router-Config running-config to restore a running configuration where Router-Config is the backup file name in the USB.
Conclusion
Mastering the Cisco IOS File System is essential for CCNA and CCNP students to effectively manage router and switch configurations. This guide has explored key file systems like flash and NVRAM, provided detailed backup and restore methods using TFTP and USB, and offered troubleshooting tips. By applying these practices, network engineers can ensure system reliability and prepare for real-world challenges. Continuous learning and hands-on practice with commands like show file systems and copy running-config tftp will solidify your expertise.
")
")
")