Port forwarding is a critical networking technique that allows external devices to access services on a private network by directing traffic from a public IP address and port to a specific internal IP and port. For CCNA and CCNP students, understanding port forwarding is essential for configuring routers, securing networks, and enabling services like web servers or remote desktops. This article dives into the mechanics of port forwarding, its role in Network Address Translation (NAT), and practical configuration steps to help you master this concept for your Cisco certification exams and real-world networking tasks.
Why Use Port Forwarding? Common Use Cases
It is mostly used to isolate network traffic, optimize network speed, and to permanently assign a network path for a specific protocol or network service. Usually, well-known port numbers are used in port forwarding. It is typically implemented at a gateway router to mechanize the process of identifying and transferring network packets to a destination port.
It is a cornerstone of network configuration, enabling external access to internal services while maintaining the security of private networks. Here are key use cases relevant to CCNA and CCNP students:
- Web Servers: Hosting a website on a local server (e.g., Apache on port 80) requires forwarding HTTP traffic to the server’s private IP.
- Remote Access: Tools like Remote Desktop Protocol (RDP, port 3389) or SSH (port 22) use port forwarding for secure access from outside the LAN.
- Online Gaming: Multiplayer games often require specific ports (e.g., 3074 for Xbox Live) to be forwarded to the gaming console or PC.
- IoT Devices: Smart home devices, like security cameras, may need port forwarding to allow remote monitoring via mobile apps.
- File Sharing: FTP (port 21) or peer-to-peer applications (e.g., BitTorrent) rely on port forwarding for external connections.
Understanding these use cases helps you apply port forwarding in real-world scenarios, from small home networks to enterprise environments. Usually, peer to peer programs such as web servers and outgoing FTP, require port forwarding or open ports to allow these services to work.
How NAT Works with Port Forwarding
Network Address Translation (NAT) hides internal private IPv4 addresses (e.g., 192.168.x.x) by translating them to a public IP address assigned to the router’s WAN interface. This process, while enhancing security, prevents external devices from initiating connections to internal hosts. Port forwarding resolves this by mapping an external port to an internal IP and port, allowing specific traffic to bypass NAT’s restrictions.
Types of NAT in Port Forwarding
- Static NAT: Maps a single public IP to a single private IP, often used for dedicated servers (e.g., a web server at 192.168.10.101).
- Dynamic NAT: Temporarily assigns public IPs from a pool, less common for port forwarding due to its dynamic nature.
- NAT Overload (PAT): Maps multiple private IPs to a single public IP using different ports, commonly used in home routers for port forwarding.
Port-Forwarding in IPv6 Environments
Unlike IPv4, IPv6 assigns globally unique addresses to devices, eliminating the need for NAT in most cases. However, port-forwarding concepts still apply when using firewalls to control access to specific services. For CCNP students, understanding IPv6 port-forwarding is crucial for modern network designs.
Key Differences
- No NAT: IPv6 devices have public IPs, so port forwarding is implemented via firewall rules rather than NAT mappings.
- Firewall Configuration: Use Access Control Lists (ACLs) or firewall policies to allow external traffic to specific ports (e.g., 80 for HTTP).
- Example: To allow external access to a web server (2001:db8::100) on port 80, configure a Cisco router’s IPv6 ACL:
ipv6 access-list ALLOW_HTTP
permit tcp any host 2001:db8::100 eq 80
interface GigabitEthernet0/1
ipv6 traffic-filter ALLOW_HTTP in
Considerations
- Ensure the web server’s firewall allows incoming traffic on the specified port.
- Verify IPv6 routing (e.g., OSPF or BGP) is configured to reach the server.
- Test access using http://[2001:db8::100] from an external client.
This approach ensures secure, controlled access to internal services in IPv6 networks.
Configuring Port-Forwarding
It can be configured using a router’s web-based GUI (e.g., TP-Link) or CLI (e.g., Cisco IOS). This section provides step-by-step guides for both methods, ensuring CCNA and CCNP students can apply port forwarding in various scenarios.
Security Considerations for Port Forwarding
It exposes internal services to the Internet, increasing the risk of unauthorized access. CCNA and CCNP students should follow these best practices to secure port forwarding:
- Restrict Source IPs: Configure the router to allow only specific external IP addresses to access forwarded ports, reducing the attack surface.
- Use Strong Firewalls: Enable a firewall on the router and internal server to filter traffic and block malicious requests.
- Change Default Ports: For services like SSH, use non-standard ports (e.g., 2222 instead of 22) to avoid automated attacks.
- Enable Logging: Monitor access logs to detect suspicious activity on forwarded ports.
- Disable Unused Ports: Regularly review and disable port forwarding rules for unused services.
- Consider a DMZ: Place public-facing servers in a Demilitarized Zone (DMZ) to isolate them from the internal network.
By implementing these measures, you can balance accessibility with security in your network configurations.
Configuring Port Forwarding
Port forwarding can be configured using a router’s web-based GUI (e.g., TP-Link) or CLI (e.g., Cisco IOS). This section provides step-by-step guides for both methods, ensuring CCNA and CCNP students can apply port forwarding in various scenarios.
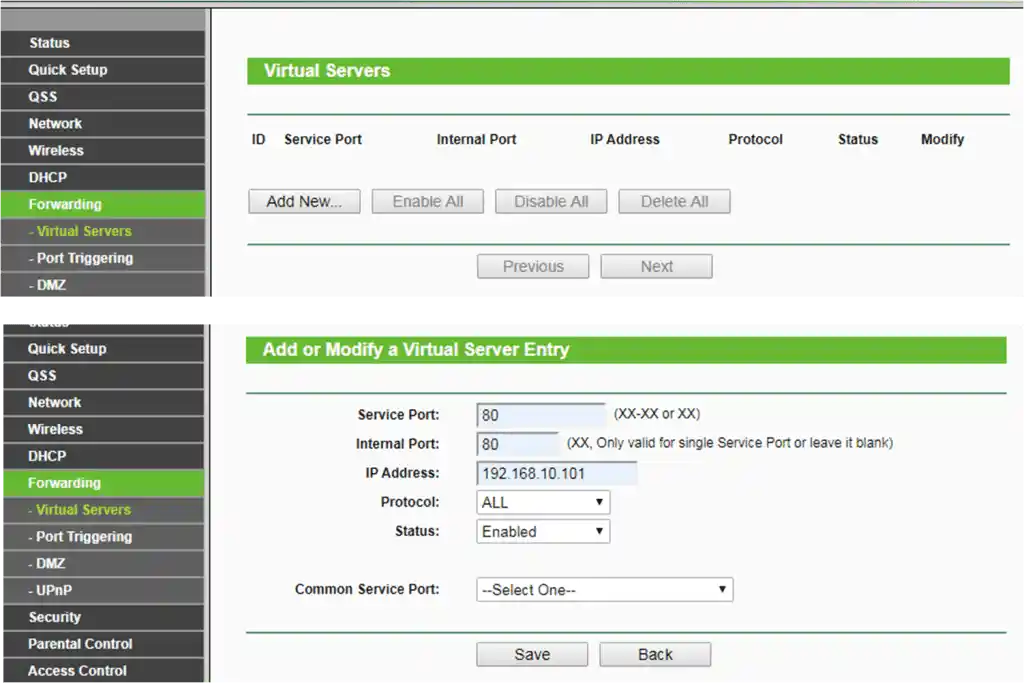
GUI-Based Configuration (TP-Link Example)
Port forwarding is typically configured in a router’s web-based admin panel. Below is an example using a TP-Link router, with notes on variations for other brands and non-standard ports.
TP-Link Router Configuration
Save and Test: Apply the rule and test by accessing the public IP (e.g., http://202.128.54.1 or http://202.128.54.1:8080 for a custom port).
Access the Admin Panel: Log in to the router (e.g., http://192.168.0.1) using a web browser.
Navigate to Port Forwarding: Find “Forwarding” > “Virtual Servers” or similar.
Add a Rule:
- Service Port: 80 (for HTTP) or a custom port like 8080.
- Internal IP: 192.168.10.101 (web server’s private IP).
- Internal Port: Match the service port (e.g., 80 or 8080).
- Protocol: TCP (for HTTP) or ALL.
- Status: Enabled.
The figure below shows the Port Forwarding configuration window for a wireless router. By default, port forwarding is not enabled on the wireless router.
Wireless Router Example
Port forwarding is typically configured in the router’s web-based admin panel. Below is an updated example using a TP-Link router, with notes on variations for other brands and non-standard ports.
TP-Link Router Configuration
- Access the Admin Panel: Log in to the router (e.g., http://192.168.0.1).
- Navigate to Port Forwarding: Find “Forwarding” > “Virtual Servers” or similar.
- Add a Rule:
- Service Port: 80 (for HTTP) or a custom port like 8080.
- Internal IP: 192.168.10.101 (web server’s private IP).
- Internal Port: Match the service port (e.g., 80 or 8080).
- Protocol: TCP (for HTTP) or ALL.
- Status: Enabled.
- Save and Test: Apply the rule and test by accessing the public IP (e.g., http://202.128.54.1 or http://202.128.54.1:8080 for a custom port).
Notes on Other Router Brands
- Netgear: Look for “Port Forwarding/Port Triggering” under “Advanced” settings.
- ASUS: Use “Virtual Server/Port Forwarding” in the “WAN” section.
- Cisco/Linksys: Find “Single Port Forwarding” or “Port Range Forwarding” under “Applications & Gaming.”
- D-Link: Check “Port Forwarding” under “Advanced.”
Using Non-Standard Ports
If the default port (e.g., 80 for HTTP) is blocked or in use, configure the server to use a non-standard port (e.g., 8080). Update the port-forwarding rule to map the external port (e.g., 8080) to the internal server’s port. External users must append the port to the URL (e.g., http://202.128.54.1:8080).
Tip: Always document the port number for external users, as non-standard ports are not assumed by applications.
CLI-Based Configuration (Cisco IOS Example)
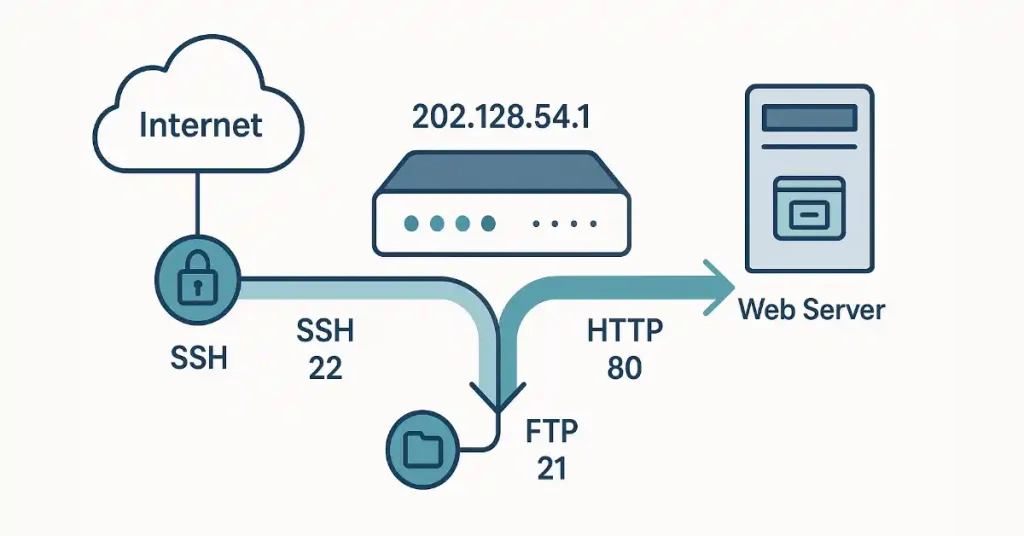
Configuring port-forwarding on a Cisco router involves using the Command Line Interface (CLI) to set up static NAT with port mapping. This example configures a web server at 192.168.11.100 (port 80) to be accessible externally via 202.128.54.1 (port 8080).
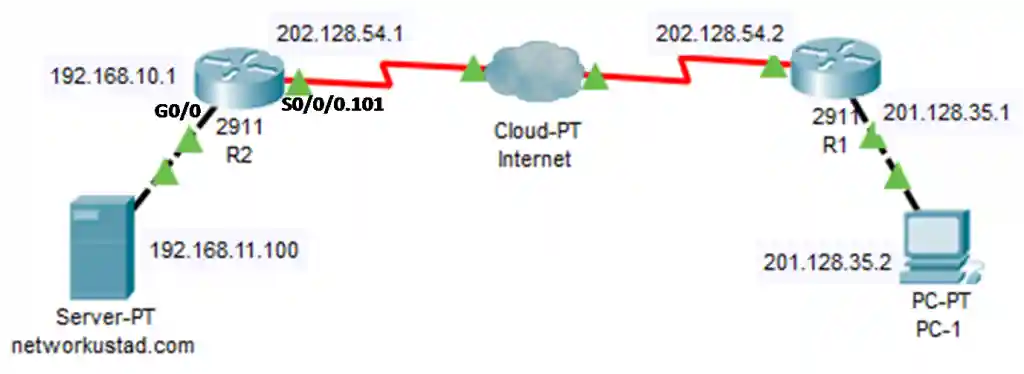
A web server with a private IPv4 address of 192.168.11.100 listens on port 80 (HTTP). The administrator wants external clients to access this server using the router’s public IPv4 address, 202.128.54.1, on port 8080. The router (R2) uses interface g0/0 for the internal LAN and s0/0/0.101 for the external WAN connection. This setup requires configuring static NAT with port forwarding to map the global IP and port to the local IP and port. Configuring port forwarding on Cisco routers is similar to configuring static NAT. It is a static NAT translation with a specific TCP or UDP port number.
Prerequisites
Cisco router (e.g., 2811) with IOS supporting NAT.
Internal web server configured at 192.168.11.100 with HTTP service enabled on port 80.
- Router interfaces configured:
- g0/0: LAN interface (e.g., 192.168.11.1/24).
- s0/0/0.101: WAN interface (e.g., 202.128.54.1/24).
- Access to the router’s CLI via SSH, Telnet, or console.
Step-by-Step Configuration
Use the following Cisco IOS commands to configure port forwarding:
Enter Global Configuration Mode:
enable
configure terminal
Configure Static NAT for Port Forwarding: Map the internal web server (192.168.11.100, port 80) to the global IP (202.128.54.1, port 8080) for TCP traffic:
ip nat inside source static tcp 192.168.11.100 80 202.128.54.1 8080Explanation:
- tcp: Specifies the protocol (use udp for services like DNS).
- 192.168.11.100 80: Local IP and port of the web server.
- 202.128.54.1 8080: Global IP and port that external clients will use.
- extendable: Automatically applied, allows multiple translations for the same global IP with different ports.
Configure NAT Interfaces:
- Set the LAN interface to inside:
interface GigabitEthernet0/0
ip nat inside
exit- Set the WAN interface as outside:
interface Serial0/0/0.101
ip nat outside
exit
Example: UDP Port Forwarding (Optional): For a DNS server at 192.168.11.100 on port 53, use:
ip nat inside source static udp 192.168.11.100 53 202.128.54.1 53This maps external UDP requests on port 53 to the internal DNS server. To confirm the port forwarding configuration, use:
show ip nat translations
Troubleshooting
If port forwarding doesn’t work, check the following:
- NAT Rule: Verify the rule with show ip nat translations. Ensure the correct IP and ports are mapped.
- Interface Configuration: Confirm ip nat inside and ip nat outside are applied to the correct interfaces (show running-config).
- Firewall/ACLs: Check for Access Control Lists (ACLs) blocking port 8080 (show access-lists).
- Server Status: Ensure the web server is running and listening on port 80 (netstat -an on the server).
- External Access: Test from an external network, as local testing may fail due to NAT loopback issues.
- Port Conflict: Ensure no other service uses port 8080 on the router’s global IP.
Security Considerations
Restrict Access: Use an ACL to allow only specific source IPs:
access-list 100 permit tcp any host 202.128.54.1 eq 8080
interface Serial0/0/0.101
ip access-group 100 in
Use Non-Standard Ports: Port 8080 reduces automated attacks compared to port 80.
Monitor Traffic: Enable logging to detect suspicious activity (logging buffered).
Practical Lab: Configuring Port Forwarding in Cisco Packet Tracer
This lab guides CCNA/CCNP students through configuring port forwarding on a Cisco router using Packet Tracer, simulating external access to a web server.
Lab Setup
Create a Topology:
- Add a Cisco router (e.g., 2811).
- Add a switch and a PC (web server) with IP 192.168.11.100/24.
- Add a second PC (external client) connected to the router’s WAN interface.
- Configure interfaces:
- Router g0/0: 192.168.11.1/24 (LAN).
- Router s0/0/0.101: 202.128.54.1/24 (WAN).
Configure the Web Server:
- Set the PC’s IP to 192.168.11.100 and enable HTTP service in Packet Tracer.
Configure Port Forwarding:
- Access the router’s CLI and enter:
enable
configure terminal
ip nat inside source static tcp 192.168.11.100 80 202.128.54.1 8080
interface GigabitEthernet0/0
ip nat inside
exit
interface Serial0/0/0.101
ip nat outside
exit
write memory
Test the Configuration
Verify NAT Rule:
- Run show ip nat translations to confirm the mapping (202.128.54.1:8080 to 192.168.11.100:80).
Simulate External Access:
- On the external client PC, open the Packet Tracer web browser.
- Enter http://202.128.54.1:8080 to access the web server.
Expected Outcome:
- The web server’s page should load, confirming successful port forwarding.
Troubleshooting Tips
- If the page doesn’t load, check NAT rules, interface configurations, and server status.
- Ensure no ACLs block port 8080 (show access-lists).
FAQs
What is port forwarding in networking?
Port forwarding maps a public IP and specific external port to a private internal IP and port on a router, bypassing NAT restrictions to allow secure external access to services like web servers or remote desktops. Essential for CCNA concepts.
How do you configure port forwarding on a Cisco router?
Use CLI commands like “ip nat inside source static tcp [internal IP] [internal port] [public IP] [external port]” then assign “ip nat inside” to LAN and “ip nat outside” to WAN interfaces. Verify with “show ip nat translations.”
What are the security risks of port forwarding?
It exposes internal services to internet threats like unauthorized access or attacks. Mitigate by using ACLs to restrict source IPs, changing default ports (e.g., SSH from 22), enabling firewalls, logging traffic, and isolating via DMZ.
What’s the difference between port forwarding and port triggering?
Port forwarding creates static, always-open mappings for inbound traffic, while port triggering dynamically opens ports for outbound sessions and closes them after inactivity, offering better security for temporary access like gaming.
How does port forwarding work in IPv6 environments?
Unlike IPv4 with NAT, IPv6 uses global addresses; implement via firewall ACLs (e.g., “ipv6 access-list permit tcp any host [IPv6] eq 80“) applied to interfaces, ensuring server firewalls allow traffic without address translation.