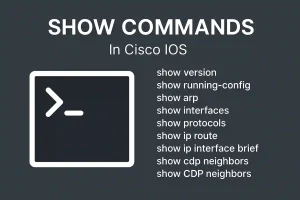
The majority of the command for multiarea OSPF verification is the same as the command we already used in the verification of single area OSPF. The command, “show ip ospf neighbor”, “show ip ospf” and show ip ospf interface are the same command. The following command specifically includes the information of multiarea OSPF.
show ip protocols
show ip ospf interface brief
show ip route ospf
show ip ospf database
The command can also be used for OSPFv3, simply substitute ip with ipv6. In this article, we will use the same topology of OSPF, which we have used in the previous article. Figure 1 illustrates the OSPF topology.
Verify General Multiarea OSPF Settings
We can verify the general multiarea OSPF setting using the “show ip protocols” command. The output of the command displays the configured routing protocols on a router including router ID, several areas in the router, and networks included within the routing protocol configuration. Figure 2 illustrates the OSPF settings of R2. Notice that the command shows that there are two areas. The Routing for Networks segment identifies the networks and their particular areas.
We can also use the “show ip ospf interface brief” command to show brief OSPF-related information of OSPF-enabled interfaces. This command provides helpful information, such as the OSPF process ID, the area that the interfaces are in, and the cost of the interface.
Verify the OSPF Routes
The “show ip route” is the most common command to verify a multiarea OSPF configuration. We can add the “ospf” parameter to display only OSPF-related information.
Figure 3 displays the routing table of R2. See the O IAentries in the routing table, which illustrates networks learned from other areas. O specificallyrepresents OSPF routes, andIArepresents interarea routes, meaning that the route is originated from another area.
To examine the contents of the LSDB we can use “show ip ospf database” command. Several options are available with this command. Figure 4 illustrates the content of the LSDB of R2.
Notice R2 has database entries for area 0 and area 10, so ABRs must maintain a separate LSDB for each area to which they belong. In the output, Router Link States identifies the number of routes for each area. The Summary Net Link States for identifies networks learned from other areas and which neighbour advertised the network for both areas.
Verify Multiarea OSPFv3
We can verify the OSPFv3 with similar verification commands with only substitute ip with ipv6. We can use all the commands discussed for OSPFv2 verification.
In this article, I am going to explain the “IP route” command and its parameter, argument, and options in detail. IP route command is used to configure the static route. Static routes are the most secure way of routing. They will also increase overall network performance. These features are extremely helpful in a small network. The syntax of the command is the following:
Router(config)# ip route network-address subnet-mask { ip-address |interface-type interface-number [ ip-address ]} [ distance ] [ name name ] [ permanent ] [ tag tag ]
The description of the parameter using the IP route command is the following:
network-address
This is the first parameter of the ip route command. It specifies the destination network address that is required to add to the routing table.
subnet-mask
The destination network subnet mask is to be added to the routing table. We can also use a summarized subnet mask for a group of networks to cut the routing table overheads and for speedy processing.
ip-address
This parameter provides a way to reach the destination network. It is the IP address of the connecting router to use to forward the packet to the remote destination network. This is also called the next hop of the router.
exit-interface
This command also does the same job just like an ip-address parameter but in different ways. It specifies the exit interface and tells the router that if it receives a packet for the destination specified by the previous parameter then exits that packet from this interface. Device connected on another end of this interface will take care of the packet.
Note:- One or both of ip-address and exit-interface must be used.
distance
Administrative distance is the trustworthiness of the route. The value of the administrative distance is from 0 to 255. The route with the lowest AD value will be chosen while forwarding the packet. By default static route has two AD values depending on the previous parameter.
If a static route uses an exit interface, the administrative distance will be 0. If the static route is configured with the next-hop IP address, the administrative distance value will be 0. Usually, this is used to create a floating static route or multiple routes to the same destination. For example, we can create a primary and backup path for the destination network.
name
we use this parameter to assign a name to the route.
permanent
If we configure the route with parameter permanent, in case a route goes down router will not remove it from the routing table. The parameter permanent will keep this route in the routing table.
It’s an optional parameter we can configure the route without this parameter. This parameter is important for packet security. If you never want packets to take another path.
Tag
By using this parameter we can specify a tag number when configuring a static route. The tag can then be matched with a route map. The route map is an access list that allows you to permit, deny, and change the parameters of routing advertisements.
The Show commands display important information about the device’s configuration and operation in Cisco IOs Command Line Interface (CLI) mode. Network administrators can use different show commands to check device status, interfaces, processes, and configuration files to confirm the device’s operational status.
The network administrator can also view the router’s process and function and verify it using show commands. The important show commands of Cisco IOS are the following:
show version
Summary: Displays hardware and software details of the Cisco device, including IOS version, uptime, and memory. Abbreviation: sh ver Usage: Provides insights into the router’s capabilities and is useful for inventory management or troubleshooting. Example Output:
Cisco IOS Software, C2900 Software (C2900-UNIVERSALK9-M), Version 15.1(4)M4, RELEASE SOFTWARE (fc2) ROM: Bootstrap program is C2900 boot loader Router uptime is 2 weeks, 3 days, 5 hours, 12 minutes System image file is "flash:c2900-universalk9-mz.SPA.151-4.M4.bin" Cisco WS-C2950-24 (RC32300) processor (revision C0) with 21039K/5223K bytes of memory. 24 FastEthernet ports 32K bytes of flash-simulated non-volatile configuration memory. Configuration register is 0xF
Troubleshooting Tip: Check the IOS version to ensure compatibility with required features.
Show running-config
We can use this command to display the configuration information running on the terminal.
Summary: Displays the active configuration running on the device. Abbreviation: sh ru Usage: Useful for verifying current settings or backing up configurations. Example Output:
hostname Router1 interface GigabitEthernet0/1 ip address 192.168.1.1 255.255.255.0 no shutdown
Troubleshooting Tip: Compare with show startup-config to identify unsaved changes.
show arp
This command displays the router’s ARP table. The ARP table contains the resolved IPv4 address to MAC address mappings. If a host can’t ping? Ensure you’re getting an arp entry of the host that you want to ping using the “show arp command“. The abbreviated command is Sh ar
show interfaces
The show interface command displays all types of interfaces with configuration and statistics. Its output provides a lot of information. The abbreviation of this command is sh int. The figure below illustrates the output of the show interface command.
show protocols
This command displays the status of the configured layer three protocols on all Cisco router interfaces. This command can be abbreviated as sh prot
show ip route
The show ip routecommand is used to show the router’s routing table. The routing table lists all networks the router can communicate, their metrics, and how to communicate with them. This command can be abbreviated with sh ip ro. The command also has parameters after route (to), likesh ip ro rip for all RIP routes. The figure below illustrates the output of the show ip route command
show ip interface brief
The show ip interface brief is one of Cisco devices’ most frequently used commands. This command provides an abbreviated output compared to the show ip interface command. It outlines the key information for all the network interfaces on a router. The figure below illustrates the output of this command.
The output displays all router interfaces, including the IP address assigned interfaces, if any, and their operational status. The show ip interface brief command can also be used to verify the status of the switch interfaces.
Show CDP neighbours
We can use this command to display information about currently connected Cisco devices. Cisco Discovery Protocol (CDP) is a proprietary protocol that will only detect Cisco products. To show detailed information about neighbouring devices discovered using CDP, use the show cdp neighbourscommand in privileged EXEC mode. The command can also be abbreviated with sh cd ne.
show vlan
Summary: Lists all VLANs configured on the switch, including VLAN ID, names, status, and associated ports. Abbreviation: sh vlan Usage: Useful for verifying VLAN configurations and troubleshooting VLAN-related issues. Example Output:
VLAN Name Status Ports ---- -------------------------------- --------- --------------------- 1 default active Gi0/1, Gi0/2 10 SALES active Gi0/3 20 ENGINEERING active Gi0/4
Troubleshooting Tip: If a device isn’t communicating, check if its port is in the correct VLAN using this command.
show spanning-tree
Summary: Displays Spanning Tree Protocol (STP) details, including root bridge, bridge ID, and port states. Abbreviation: sh span Usage: Critical for troubleshooting Layer 2 loops or verifying STP convergence. Example Output:
VLAN0001 Spanning tree enabled protocol ieee Root ID Priority 32769 Address 0001.C7B2.3A4B Bridge ID Priority 32769 Address 0019.E7A2.5B3C Port Role State Cost Gi0/1 Desg Forwarding 4
Troubleshooting Tip: Look for ports in Blocking state to identify potential loop prevention.
show mac address-table
Summary: Shows the MAC address table, mapping MAC addresses to switch ports and VLANs. Abbreviation: sh mac add Usage: Helps identify where devices are connected and troubleshoot connectivity issues. Example Output:
Vlan Mac Address Type Ports ---- ----------- -------- ----- 10 0000.0c12.3456 DYNAMIC Gi0/3 20 0000.0c78.9abc DYNAMIC Gi0/4
Troubleshooting Tip: If a device’s MAC isn’t listed, check cable connections or ARP issues.
show ip ospf neighbor
Summary: Displays OSPF neighbor relationships, including neighbor ID, state, and interface. Abbreviation: sh ip ospf nei Usage: Essential for verifying OSPF adjacency in CCNP routing labs. Example Output:
Neighbor ID Pri State Dead Time Address Interface 192.168.1.2 1 FULL/DR 00:00:38 192.168.1.2 Gi0/1
Troubleshooting with Show Commands
Show commands are powerful tools for diagnosing network issues. Below are common scenarios and how to use show commands to resolve them.
Cisco IOS show commands display real-time information about a device’s configuration, status, and performance, aiding in monitoring and troubleshooting.