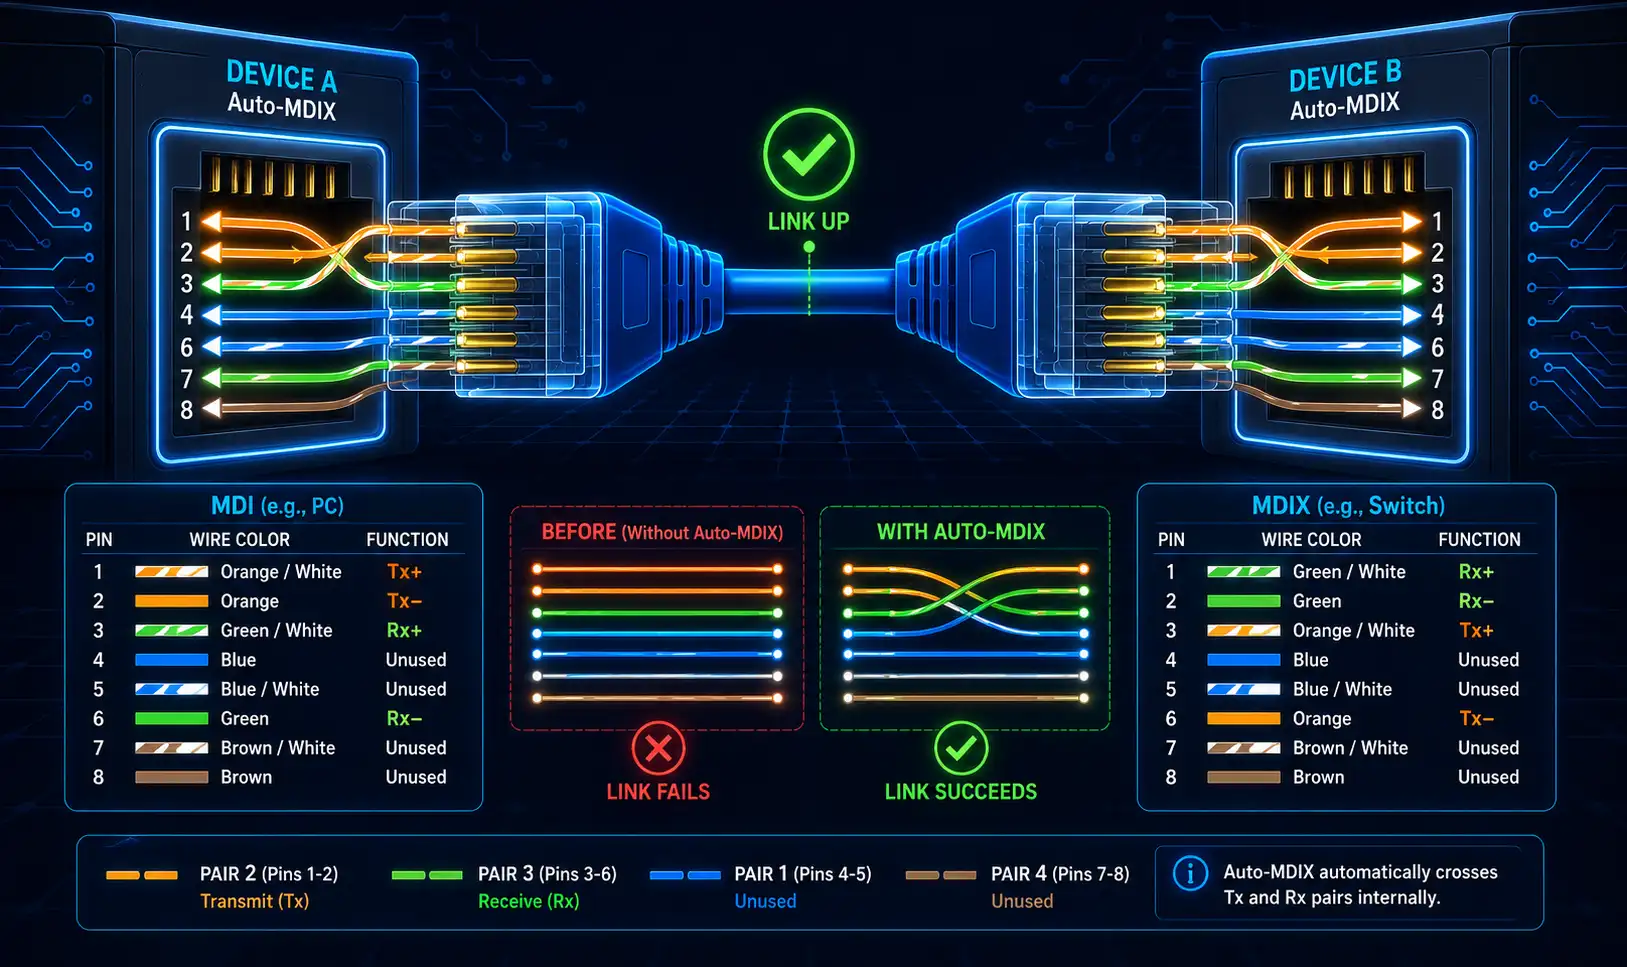
The port on a workstation, laptop, or server is called MDI (Media Dependent Interface). The port on a network switch, by contrast, is traditionally MDIX (Media Dependent Interface with Crossover). This distinction exists because someone has to “cross” the transmit and receive pairs somewhere in the connection, and historically, that job fell to whichever end used a different cable type — straight-through for device-to-switch, crossover for device-to-device or switch-to-switch. Auto-MDIX removes the need to keep track of which cable goes where.
MDI vs. MDIX: The Pin-Level Difference
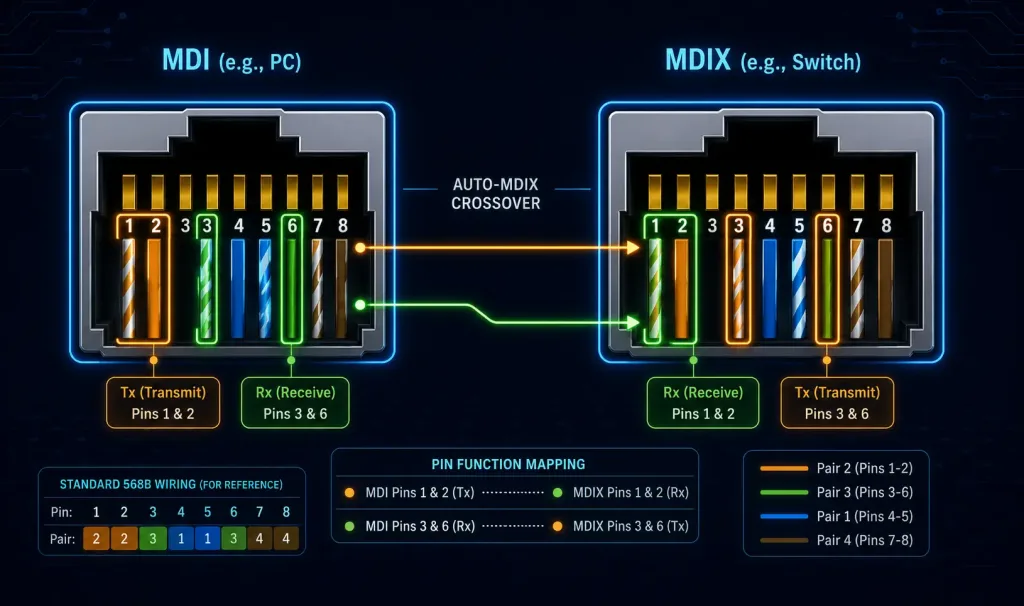
RJ45 jacks, the connectors used with copper twisted-pair cables, are crimped so that the transmit pins on one end line up with the receive pins on the other, forming a working communication channel. For 10/100 Mbps Ethernet:
Standard MDI Port (e.g., on a PC, server, or printer):
- Tx+: Pin 1 | Tx-: Pin 2
- Rx+: Pin 3 | Rx-: Pin 6
MDIX Port (e.g., on a traditional switch):
- Rx+: Pin 1 | Rx-: Pin 2
- Tx+: Pin 3 | Tx-: Pin 6
MDI ports follow the standard TIA/EIA-568-B wiring scheme, with pins 1-2 handling transmission and pins 3-6 handling reception at 10/100 Mbps. In legacy equipment, connecting two MDI ports together without a crossover cable — or two MDIX ports together — meant transmit pins faced transmit pins on both ends, and the link simply wouldn’t come up. MDIX (MDI Crossover) is the feature that internally crosses the Tx and Rx signal pairs inside a port, letting two similar interfaces (switch-to-switch, PC-to-PC) communicate without a physical crossover cable, and letting a straight-through cable work in either direction.
For Gigabit Ethernet (802.3ab / 1000BASE-T), all four pairs are active rather than just two, since all eight pins carry bidirectional traffic. Auto-MDIX dynamically negotiates the correct pair assignment during link establishment, per the auto-negotiation procedure defined in IEEE 802.3 Clause 40 — the same clause that governs 1000BASE-T’s physical layer behavior generally.
How Auto-MDIX Actually Works
Rather than requiring the network engineer to know in advance whether a straight-through or crossover cable is needed, Auto-MDIX lets the port itself detect the network devices on the other end during auto-negotiation and configure itself as MDI or MDIX accordingly. On modern hardware, this detection and remapping happens in the port’s physical layer (PHY) chip itself, and it’s compatible with both the older T568A and T568B wiring standards.
For higher-speed copper standards like Cat8 cabling used with 40GBASE-T — which supports up to 40 Gbps over a maximum channel length of about 30 meters — Auto-MDIX still applies, though at these speeds shorter cable runs and heavier shielding of the twisted pairs become far more important than they are at Gigabit speeds, since signal integrity degrades faster at the much higher frequencies involved.
Configuring Auto-MDIX on Cisco Devices
Most modern Cisco switches enable Auto-MDIX by default. To configure it manually on a specific interface:
Switch> enable
Switch# configure terminal
Enter configuration commands, one per line. End with CNTL/Z.
Switch(config)# interface GigabitEthernet0/1
Switch(config-if)# mdix auto
Switch(config-if)# exit
Switch(config)# exit
Switch# write memory
Building configuration...
[OK]
Switch#
To verify the current Auto-MDIX status on that interface:
Switch# show controllers ethernet-controller GigabitEthernet0/1 phy

GigabitEthernet0/1 PHY registers:
   Auto-MDIX          : Enabled
   Speed              : 1000 Mbps
   Duplex             : Full
   Link Status        : Up
   MDI/MDIX           : Auto
   Pair Status        : Normal
   Polarity           : Normal
   Loopback           : Disabled
   Flow Control       : Off

Switch#
Look for “Auto-MDIX: Enabled” in the output to confirm the feature is active on that port.
Auto-MDIX is not available on fiber interfaces (SFP modules) or typically relevant on Power over Ethernet (PoE) ports in the same way, since fiber connections use fixed transmit/receive fiber strands with no crossover ambiguity to resolve.
For legacy 10 Mbps devices that don’t support Auto-MDIX or auto-negotiation at all, you may need to manually set speed and duplex instead:
Switch(config-if)# speed 10
Switch(config-if)# duplex half
On Cisco routers, the equivalent configuration is applied the same way at the interface level:
Router(config)# interface GigabitEthernet0/0/0
Router(config-if)# mdix auto
When to Use Auto-MDIX
Auto-MDIX is most valuable in environments with mixed or unknown cable types, since it removes a whole category of “why won’t this link come up” troubleshooting:
- Ad-hoc networks — temporary setups like conference rooms, where whatever cable happens to be on hand should just work.
- Uplink-free switches — linking switches together without needing to track which ports are designated uplinks.
- BYOD environments — simplifying connections for a wide variety of unknown client devices without pre-sorting cable types.
- Mixed IoT deployments — where many different device types with varying port configurations need to connect to the same switching infrastructure.
- Wireless access point installs — since access points are often installed by whoever’s available on-site rather than a dedicated cabling contractor, Auto-MDIX removes one more variable that could otherwise cause an AP to fail to link up on day one.
Auto-MDIX vs. Manual Configuration
| Feature | Auto-MDIX | Manual Configuration |
|---|---|---|
| Cable Detection | Automatic | Requires knowing crossover vs. straight-through in advance |
| Typical Use Case | Modern switches and routers | Legacy equipment without auto-negotiation support |
| Flexibility | High — works with either cable type | Low — wrong cable type means no link |
| Setup Time | Effectively instant | Requires correct cable selection beforehand |
Manual crossover/straight-through configuration still shows up in some legacy or highly controlled environments where auto-negotiation itself is disabled for security or determinism reasons, but for the overwhelming majority of modern Ethernet deployments, Auto-MDIX has made manually tracking cable types unnecessary.
Real-World Example
Imagine connecting two Cisco Catalyst 2960 switches together with a straight-through cable — historically the “wrong” cable type for a switch-to-switch link. Without Auto-MDIX, that link would simply fail to come up, since both ends would be transmitting on the same pins. With Auto-MDIX enabled (the default on modern switches), each switch negotiates its own MDI/MDIX role automatically, and the connection comes up normally regardless of which cable type was used.
Troubleshooting Auto-MDIX
Link not coming up:
- Confirm the cable itself is functional and within its supported length limit (100 meters for Cat5e/Cat6, roughly 30 meters for Cat8 at 40GBASE-T speeds).
- If Auto-MDIX still isn’t resolving the connection, disable it and manually force speed and duplex to rule out a negotiation mismatch:
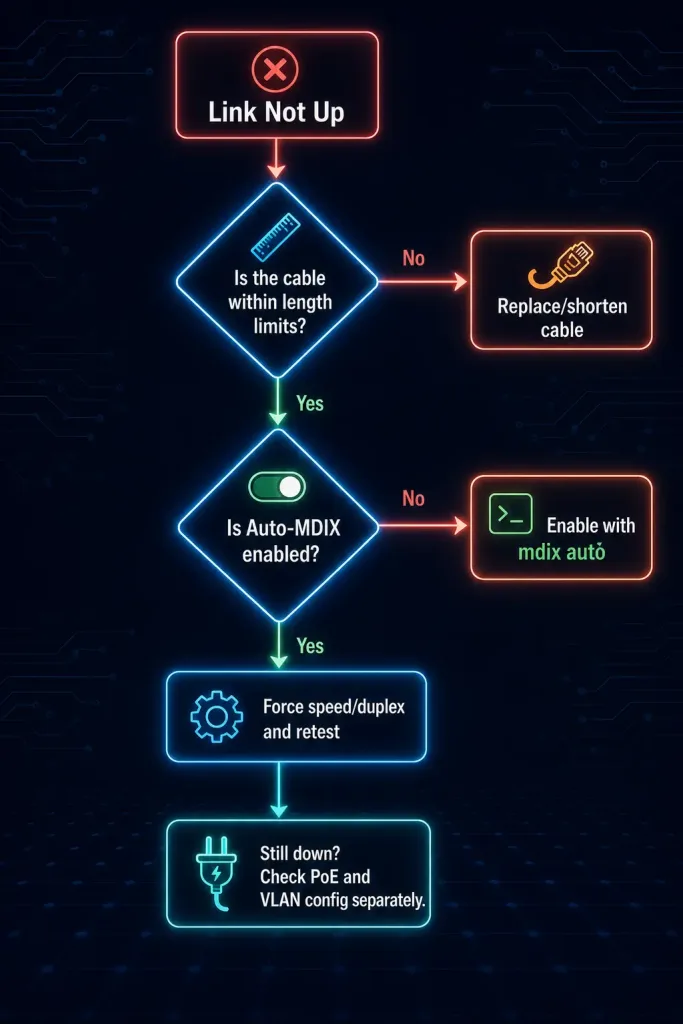
Switch(config-if)# no mdix auto
Switch(config-if)# speed 100
Switch(config-if)# duplex full
Legacy device compatibility: Very old 10 Mbps hubs may not support Auto-MDIX at all. In that case, a physical crossover cable is still the correct fix.
Other useful troubleshooting steps:
- Use
show loggingto check for MDIX mismatch or link-flap messages, which can also show up alongside unrelated issues like VLAN trunking misconfiguration — worth ruling out separately rather than assuming Auto-MDIX is always the root cause. - For intermittent link flaps, testing with a dedicated cable certifier can help isolate a marginal physical cable from an actual negotiation problem.
- If a PoE port is involved and behaving unexpectedly,
power inline nevercan temporarily disable PoE on that port to isolate whether power delivery is contributing to the issue. - For fiber handoffs, remember Auto-MDIX doesn’t apply at all — confirm SFP/transceiver compatibility separately, since crossover ambiguity is a copper-cable problem specifically.
Limitations and Best Practices
Auto-MDIX is robust for standard copper Ethernet, but it has real limits worth planning around:
- It doesn’t apply to fiber connections at all — SFP-based links use fixed transmit/receive fiber strands.
- Some non-auto-negotiating legacy devices, including certain older industrial equipment, may not support it — a hybrid approach with manual override capability is worth keeping available for those cases.
- At 25G+ speeds using direct-attach copper (DAC) cables, the crossover question doesn’t really apply the same way, since DAC assemblies are built and wired for a specific fixed configuration rather than negotiated at each end.
- Documenting which ports and interfaces rely on Auto-MDIX (versus manually forced settings) is good practice for anyone troubleshooting the network later without full context on why a given port was configured the way it was.
Conclusion
Auto-MDIX removes a once-common source of Ethernet cabling headaches by letting a port automatically detect and adjust to whichever cable type is actually connected, rather than requiring the network engineer to track straight-through versus crossover cabling in advance. It’s enabled by default on the vast majority of modern Cisco switches and routers, works transparently at both Fast Ethernet and Gigabit Ethernet speeds, and remains a foundational, exam-relevant CCNA topic precisely because it explains a real, once-common failure mode that engineers still encounter when working with older or non-negotiating equipment.
FAQs
What is Auto-MDIX in Cisco switches?
Auto-MDIX is a feature that automatically detects whether a connected Ethernet cable is straight-through or crossover, and configures the port’s transmit/receive pin assignment accordingly, without requiring the correct cable type to be selected in advance. It’s enabled by default on modern Cisco switches and operates at Layer 1, resolving what used to be a common cause of failed links in mixed-cabling environments. This makes it especially useful anywhere cable types can’t be guaranteed ahead of time, such as ad-hoc setups or BYOD environments.
How do I enable Auto-MDIX on a Cisco device?
Enter interface configuration mode for the port in question (for example, interface GigabitEthernet0/1), then apply the mdix auto command, followed by end and write memory to save the configuration. You can verify the setting took effect with show controllers ethernet-controller GigabitEthernet0/1 phy, checking for “Auto-MDIX: Enabled” in the output. Most current-generation Cisco switches and routers ship with this enabled by default, so manual configuration is typically only needed after a no mdix auto command has been applied previously or on older equipment where it isn’t the factory default.
Does Auto-MDIX work with Gigabit Ethernet?
Yes — Auto-MDIX fully supports Gigabit Ethernet (1000BASE-T, IEEE 802.3ab), remapping all four wire pairs as needed during auto-negotiation, governed by the procedure defined in IEEE 802.3 Clause 40. This is actually where Auto-MDIX becomes especially valuable, since Gigabit links use all eight pins for bidirectional traffic rather than the simpler two-pair transmit/receive split used at 10/100 Mbps.
What are common Auto-MDIX troubleshooting steps?
If a link isn’t coming up, start by confirming the physical cable itself is within its supported length limit and isn’t damaged, since a marginal cable can sometimes look like a negotiation problem. If the cable checks out, disabling Auto-MDIX with no mdix auto and manually forcing speed and duplex can help isolate whether the issue is genuinely related to MDI/MDIX negotiation or something else entirely, such as a PoE or VLAN trunking misconfiguration on the same port. show logging is also useful for surfacing any explicit mismatch or link-flap messages the switch has already logged.
Is Auto-MDIX compatible with fiber optic cables?
No — Auto-MDIX applies only to copper RJ-45 Ethernet ports. Fiber connections made through SFP or similar transceiver modules use fixed, dedicated transmit and receive fiber strands, so there’s no crossover ambiguity for Auto-MDIX to resolve in the first place. In mixed copper-and-fiber environments, confirm transceiver compatibility separately when troubleshooting a fiber handoff, since Auto-MDIX simply doesn’t factor into that part of the connection.