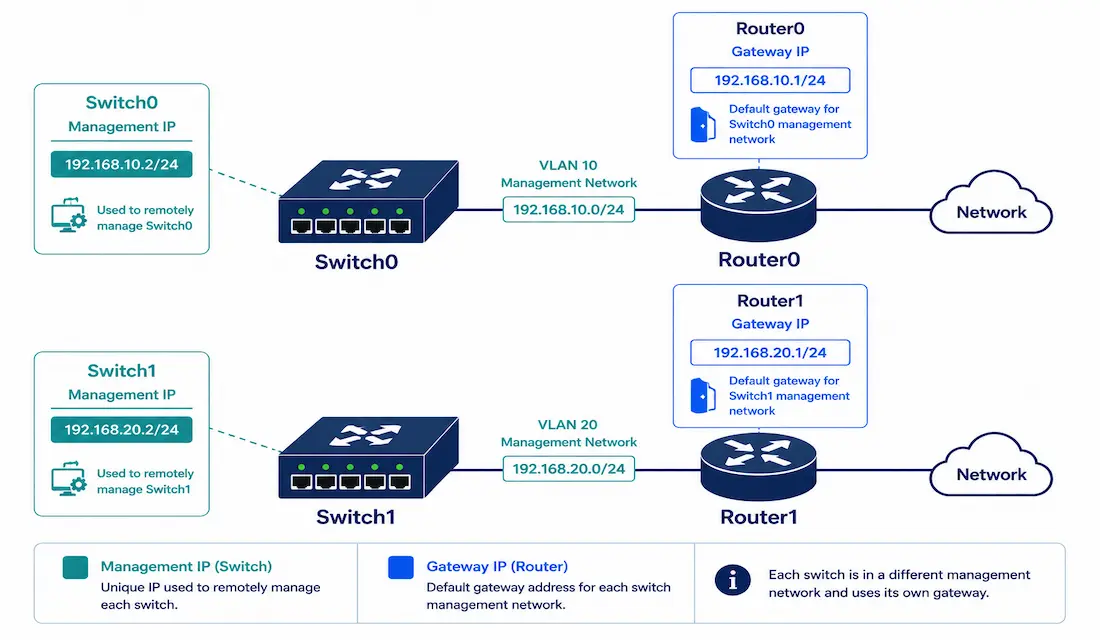
Switches operate at Layer 2 — forwarding frames based on MAC addresses, with no inherent concept of IP addressing at all. So how do you SSH into one, or manage it through a web interface? The answer is a Switched Virtual Interface (SVI): a virtual Layer 3 interface that gives an otherwise Layer 2-only device an IP address purely for management purposes.
This guide covers configuring an SVI and default gateway on Cisco switches, the important distinction between a switch’s own management address and its gateway, securing management access, and verifying everything actually works.
Why Switches Need an IP Address at All
Remote management protocols — Telnet, SSH, HTTP, HTTPS — all require an IP address to connect to. Without one configured, a network administrator has no way to reach the switch except a direct console cable connection, which doesn’t scale past a handful of devices in a server room.
Since a switch has no dedicated Layer 3 interface of its own, the IP address is instead assigned to an SVI — a virtual interface tied to a VLAN, most commonly interface Vlan1 by default, though best practice points toward a dedicated management VLAN instead, covered below.
VLANs and SVIs, Briefly
A VLAN logically segments a physical network into separate broadcast domains — VLAN 10 for employee devices, VLAN 20 for guests, and so on. An SVI is a virtual Layer 3 interface associated with one specific VLAN, and it’s what lets a switch have an IP address at all, since the VLAN itself has no physical interface.
Why not just use VLAN 1? VLAN 1 is the default VLAN on every Cisco switch, and its SVI is often preconfigured, which makes it tempting to just use as-is. But VLAN 1 carries real security risk specifically because it’s the default: every port that hasn’t been explicitly assigned elsewhere lands in VLAN 1 automatically, meaning management traffic on VLAN 1 shares a broadcast domain with whatever’s plugged into any unconfigured port. Production environments should configure a dedicated management VLAN (commonly VLAN 99 or VLAN 100) instead, restricting access to it with access control lists.
Two Different Addresses: The Switch’s Own IP vs. Its Default Gateway
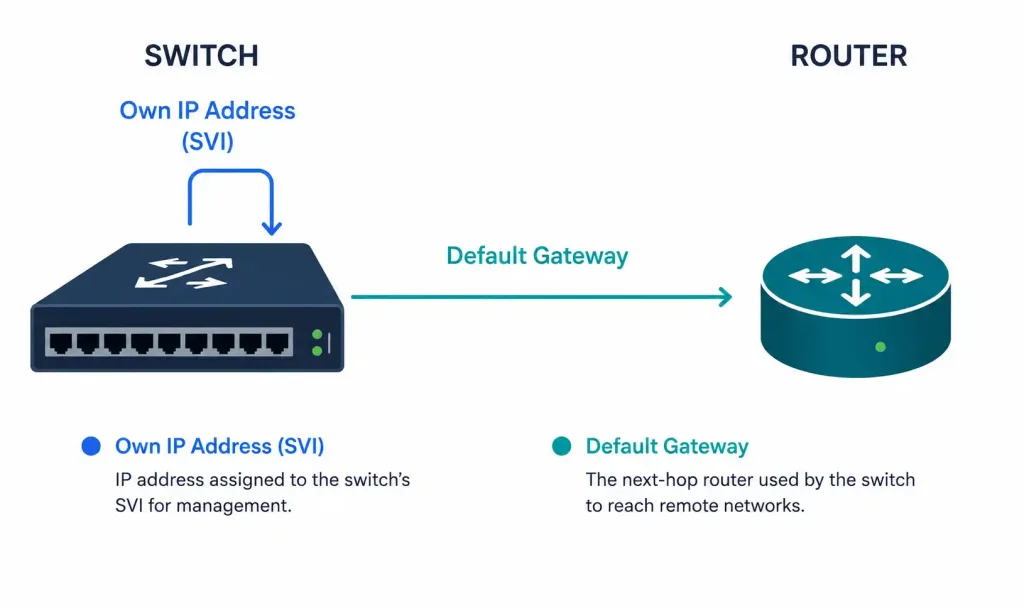
This distinction is worth being precise about, since it’s easy to blur together: a switch’s SVI address is the switch’s own management IP — the address you’d ping or SSH into directly. Its default gateway is a different address, belonging to the router, that the switch uses to reach anything outside its own local subnet, such as an administrator managing it from a different network.
A worked example: suppose a network has two subnets, 192.168.0.0/24 and 192.168.1.0/24, each with a router interface already using the first usable address (.1) in its subnet. Following the common convention of reserving the first or last usable address for the gateway (since the first is already taken by the router here), the switches take the last usable address in each subnet — 192.168.0.254 and 192.168.1.254 — as their own management IPs.
Why first or last usable address specifically? This convention exists mainly for predictability, not any technical requirement — a router interface at the first usable address in a subnet is easy to guess and document, and using the last usable address for a secondary device (like the switch’s own management IP in this example) avoids collision while remaining easy to remember. Neither position is technically special; what matters is picking a consistent convention and documenting it, so anyone reading the configuration later can predict where to look for a given device’s address without having to check every single one individually.
Configuring Switch0
Switch0> enable
Switch0# configure terminal
Enter configuration commands, one per line. End with CNTL/Z.
Switch0(config)# interface Vlan1
Switch0(config-if)# ip address 192.168.0.254 255.255.255.0
Switch0(config-if)# no shutdown
Switch0(config-if)# exit
Switch0(config)# ip default-gateway 192.168.0.1
Switch0(config)# end
Here, 192.168.0.254 is Switch0’s own address — what you’d connect to directly. 192.168.0.1 is the router’s address, configured as Switch0’s default gateway so it can be reached and can reach beyond its local subnet.
Configuring Switch1
Switch1> enable
Switch1# configure terminal
Enter configuration commands, one per line. End with CNTL/Z.
Switch1(config)# interface Vlan1
Switch1(config-if)# ip address 192.168.1.254 255.255.255.0
Switch1(config-if)# no shutdown
Switch1(config-if)# exit
Switch1(config)# ip default-gateway 192.168.1.1
Switch1(config)# end
The ip default-gateway command specifically applies to Layer 2-only switches. A Layer 3-capable switch handling actual routing uses a different mechanism (a default route via ip route 0.0.0.0 0.0.0.0), but for a switch purely being managed remotely with no routing function of its own, ip default-gateway is the correct and complete command.
Layer 2 vs. Layer 3 Switches: A Key Difference
Everything covered so far applies to a Layer 2-only switch, where the SVI exists purely for management and ip default-gateway is the correct mechanism for reaching beyond the local subnet. A Layer 3-capable switch changes this picture, and it’s worth understanding the distinction clearly rather than applying L2 assumptions to L3 hardware.
On a Layer 3 switch with ip routing enabled, SVIs aren’t limited to a single management interface — every VLAN can have its own SVI acting as that VLAN’s actual default gateway for end devices, not just a management address for the switch itself. In this scenario, ip default-gateway isn’t used at all; instead, the switch relies on a routing table, populated either through static routes (ip route 0.0.0.0 0.0.0.0 <next-hop> for a default route) or a dynamic routing protocol.
| Factor | Layer 2 Switch | Layer 3 Switch |
|---|---|---|
| SVI purpose | Management access only | Can serve as the actual gateway for VLANs |
| Reaching other subnets | ip default-gateway | Routing table (static or dynamic routes) |
| Number of active SVIs typically needed | One (management) | One per routed VLAN |
ip routing command | Not applicable | Required to enable inter-VLAN routing |
Confusing these two models is a common source of configuration errors — attempting to use ip default-gateway on a Layer 3 switch that’s actually routing traffic, for instance, simply doesn’t work the way it does on a Layer 2 device, since the switch already has its own routing table to consult instead.
Using a Dedicated Management VLAN Instead
Following the security guidance above, here’s the same configuration moved off VLAN 1 onto a dedicated management VLAN:
Switch0(config)# vlan 99
Switch0(config-vlan)# name MANAGEMENT
Switch0(config-vlan)# exit
Switch0(config)# interface Vlan99
Switch0(config-if)# ip address 192.168.99.254 255.255.255.0
Switch0(config-if)# no shutdown
Switch0(config-if)# exit
Switch0(config)# ip default-gateway 192.168.99.1
The VLAN 1 SVI can be left unconfigured (no IP address at all) once management has moved to the dedicated VLAN, removing it as a viable management access point entirely — an attacker who gains access to a random unconfigured port landing in VLAN 1 finds no management interface waiting there to attack.
Securing Management Access
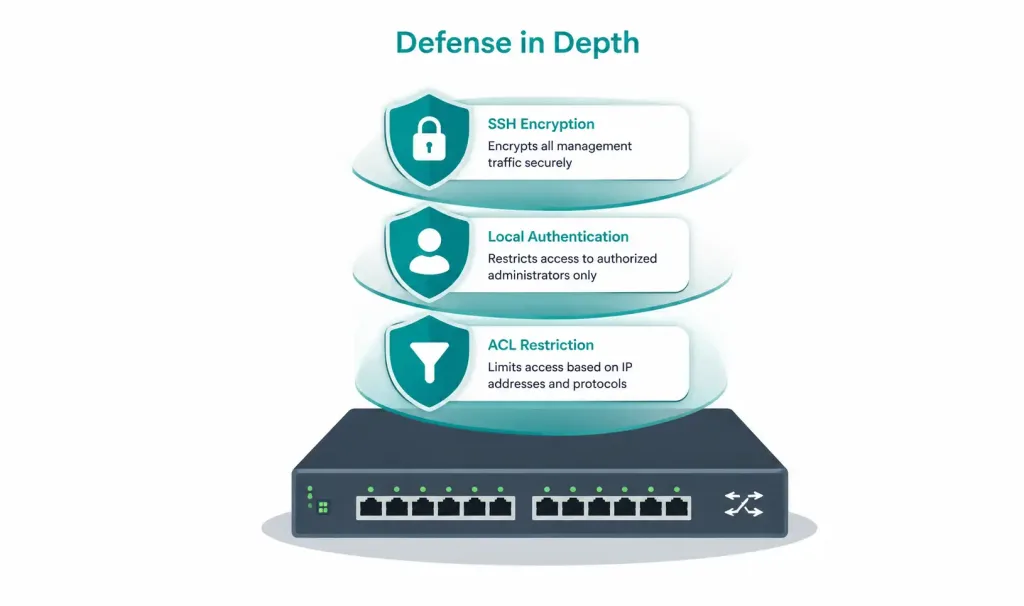
An IP address alone gets you reachable — it doesn’t get you secure. At minimum, configure SSH rather than relying on unencrypted Telnet:
Switch0(config)# hostname Switch0
Switch0(config)# ip domain-name example.com
Switch0(config)# crypto key generate rsa
% How many bits in the modulus [512]: 2048
Switch0(config)# username admin secret StrongPassword123
Switch0(config)# line vty 0 15
Switch0(config-line)# login local
Switch0(config-line)# transport input ssh
Switch0(config-line)# exit
transport input ssh specifically disables Telnet on the VTY lines, ensuring management sessions are actually encrypted rather than merely possible to encrypt.
Restrict management access to specific administrative hosts with an ACL applied to the VTY lines:
Switch0(config)# access-list 10 permit 192.168.99.10
Switch0(config)# line vty 0 15
Switch0(config-line)# access-class 10 in
This ensures that even with correct credentials, only connections originating from the specified management host (or subnet) are accepted at all — a meaningful additional layer beyond password authentication alone, since it means a stolen or guessed credential still isn’t enough to reach the switch from an unauthorized location.
Verifying the Configuration
Check the SVI’s IP address:
Switch0# show ip interface briefConfirm the relevant VLAN interface shows the expected address with both Status and Protocol columns reading “up.”
Verify the default gateway:
Switch0# show running-config | include ip default-gatewayTest connectivity to the gateway:
Switch0# ping 192.168.0.1Confirm SSH is actually enabled and Telnet is disabled:
Switch0# show ip ssh
Switch0# show running-config | section line vty
Troubleshooting
The SVI shows “administratively down”: this almost always means no shutdown was skipped — SVIs are down by default even after their IP address is correctly configured.
Switch0(config)# interface Vlan1
Switch0(config-if)# no shutdown
The switch is reachable locally but not from a different subnet: verify the default gateway is actually configured and pointing at the correct router address.
Switch0# show running-config | include ip default-gatewayA missing or incorrect default gateway is a common cause of “I can reach it from the same subnet but nowhere else” symptoms specifically, and it’s worth checking before assuming a more complex routing problem elsewhere in the network.
SSH connection refused: confirm the RSA key was actually generated (crypto key generate rsa is required before SSH will function at all) and that transport input ssh is applied to the VTY lines.
Switch0# show ip sshManagement access blocked unexpectedly after adding an ACL: double-check the ACL actually permits the host you’re connecting from — a slightly too-narrow access-class restriction is an easy way to accidentally lock legitimate administrators out along with everyone else.
FAQs
Why do switches need an IP address if they operate at Layer 2?
Switches need an IP address specifically for remote management — protocols like SSH, Telnet, and HTTPS all require one to connect to. The actual frame-forwarding function of the switch operates at Layer 2 using MAC addresses and doesn’t depend on this management IP at all — data traffic between end devices continues normally even on a switch with no IP address configured whatsoever.
What is a Switched Virtual Interface (SVI)?
An SVI is a virtual Layer 3 interface tied to a specific VLAN, and it’s what allows an otherwise Layer 2-only switch to have an IP address, since the switch has no dedicated physical Layer 3 interface of its own. Any VLAN can have an SVI, though only one is typically used for management purposes on a given switch.
What’s the difference between a switch’s own IP address and its default gateway?
The switch’s own IP address, assigned to its SVI, is what you connect to directly when managing the switch. Its default gateway is a separate address — belonging to a router — that the switch uses to reach anything outside its own local subnet, which matters whenever an administrator is managing the switch from a different network.
Why shouldn’t I use VLAN 1 for switch management?
VLAN 1 is the default VLAN every unconfigured port lands in automatically, which means management traffic on VLAN 1 shares a broadcast domain with any device plugged into an unconfigured port. A dedicated management VLAN, isolated from general user traffic and restricted with ACLs, is the standard security practice instead.
How do I secure remote management access to a switch?
Configure SSH instead of Telnet using crypto key generate rsa and transport input ssh on the VTY lines, ensuring management sessions are encrypted rather than sent in cleartext. Adding an access-class ACL to the VTY lines further restricts which specific hosts are even allowed to attempt a management connection in the first place.
How do I verify a switch’s IP configuration is working correctly?
Use show ip interface brief to confirm the SVI’s address and that both its Status and Protocol show “up,” then test reachability with ping to the configured default gateway. show running-config | include ip default-gateway confirms the gateway itself is actually configured, which is a common point of failure when a switch is reachable locally but not from other subnets.