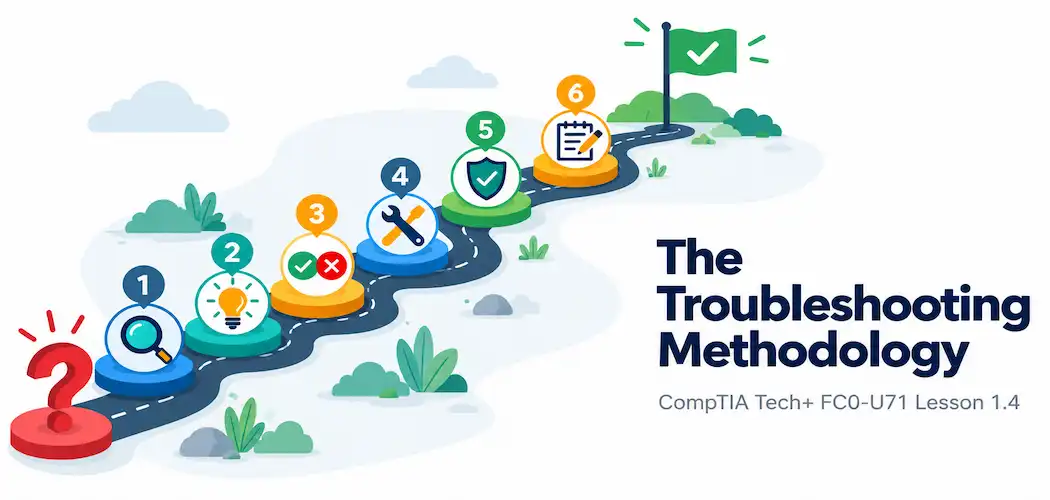
Domain 1.0 | IT Concepts and Terminology — 13% of exam
Learning Objectives
By the end of this lesson, you will be able to:
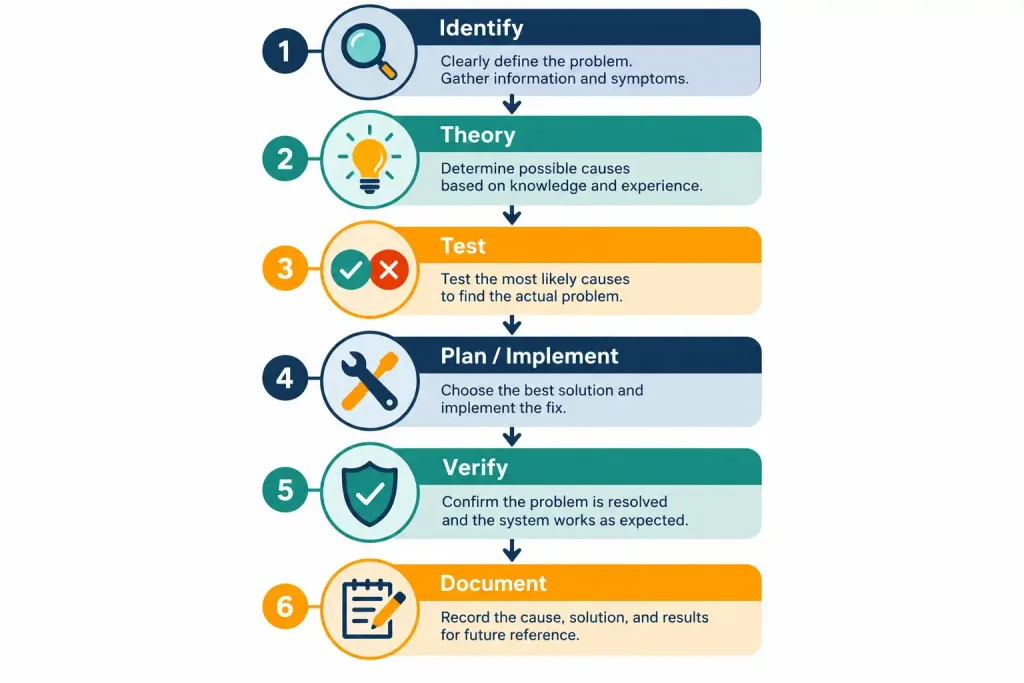
- List and explain all six steps of the troubleshooting methodology in order
- Explain why each step exists and what problem it solves if skipped
- Apply the methodology to a realistic, everyday IT complaint from start to finish
- Explain why documentation is treated as a required step rather than an optional afterthought
Key Terms
| Term | Definition |
|---|---|
| Troubleshooting Methodology | A structured, repeatable six-step process for diagnosing and resolving technical problems |
| Theory of Probable Cause | An educated guess about what’s causing a problem, based on the information gathered so far |
| Root Cause | The actual underlying reason a problem occurred, as opposed to just its visible symptom |
| Escalation | Passing a problem along to someone with more expertise, authority, or access once it’s beyond what you can resolve yourself |
| Preventive Documentation | A written record of a problem and its resolution, kept so the same issue can be recognized and solved faster in the future |
Explanation
From Measuring Computers to Fixing Them
The first three lessons of this module built a foundation for understanding computers — how they represent data, what the four basic stages of computing are, and how to measure storage, speed, and throughput. This final lesson of Module 1 shifts from understanding computers to actually fixing them when something goes wrong, using a structured process rather than random guessing.
It’s worth being upfront about something: guessing at random when something breaks sometimes works, purely by luck. But random guessing doesn’t scale, doesn’t teach you anything reusable for next time, and often wastes far more time than a structured approach would have. The troubleshooting methodology covered in this lesson is the industry-standard alternative — a repeatable six-step process used across virtually every IT role, from help desk support to senior network engineering, adjusted in scale and technical depth but never really abandoned.
Step 1: Identify the Problem
The first step sounds almost too obvious to need explaining, but it’s genuinely the step most often rushed past — and rushing past it is exactly what causes wasted effort later. Identifying the problem means gathering real information before attempting anything else: what exactly is happening, when did it start, has anything changed recently, does it affect one person or many, and can the problem be reliably reproduced.
This is exactly where the input-processing-output-storage framework from Lesson 1.2 becomes genuinely useful in practice, not just as an abstract concept. A vague complaint like “it’s not working” becomes far more actionable once you sort it: is the user saying nothing responds when they type (input), that something is frozen or thinking forever (processing), that nothing appears despite everything else seeming fine (output), or that something they saved is missing (storage)? Asking the right clarifying questions at this stage, informed by that same four-stage framework, often does more to solve a problem quickly than any specific technical fix that comes later.
A genuinely useful habit at this stage is asking about scope and timing specifically: does this affect one person or many people? Did it happen gradually or suddenly? Did anything change right before it started — a new update, a new cable, a recent move to a different desk? Each of these questions narrows the field of possible causes before you’ve even moved to step two, and skipping them is exactly what leads to wasted time chasing an unlikely cause that a thirty-second conversation would have ruled out immediately.
Step 2: Establish a Theory of Probable Cause
Once the problem is clearly identified, the next step is forming a theory of probable cause — an educated, informed guess about what’s actually causing the issue, based specifically on the information gathered in step one rather than a random first idea that comes to mind. A good theory should be the most likely explanation given the evidence, not necessarily the most interesting or the most technically impressive one.
It’s worth explicitly naming a principle that experienced technicians rely on constantly here, even if they’ve never heard it stated formally: start with the simplest, most common explanation before jumping to something rare or exotic. If a user’s monitor shows nothing, the far more probable cause is a loose cable or a monitor that’s simply powered off, not a catastrophic graphics card failure — even though the graphics card failure is a technically valid possibility too. Good theories are built by working from the most probable cause toward the least probable one, not the reverse.
Step 3: Test the Theory to Determine the Cause
A theory is worthless until it’s actually tested. Testing the theory means taking a concrete action specifically designed to confirm or rule out the guess from step two — checking whether the monitor cable is actually loose, checking whether a specific service is actually running, checking whether a specific setting is actually misconfigured.
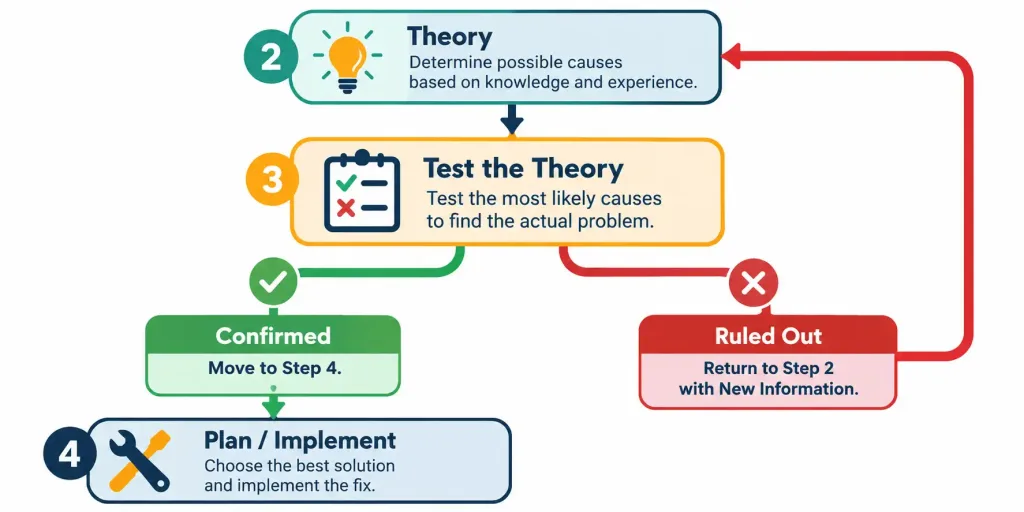
There are genuinely only two possible outcomes here, and both are useful, productive results — not just the one where you turn out to be right. If the test confirms the theory, you move forward to the next step with real confidence, knowing the actual cause rather than just suspecting it.
If the test rules the theory out, that’s not wasted effort or a failure — it’s still valuable information, because it lets you go back to step two and form a new, better-informed theory, now armed with one more piece of evidence about what isn’t the cause. Genuinely difficult problems sometimes require cycling through steps two and three several times before landing on the actual cause, and that’s a completely normal, expected part of the process rather than a sign something is going wrong.
Step 4: Establish a Plan of Action and Implement the Solution
Once the actual cause is confirmed, the next step is to establish a plan of action and then implement the solution. This step involves more judgment than it might first appear: a genuine fix sometimes has trade-offs worth considering before diving in — will fixing this require restarting a shared system during business hours, does the fix require a specific replacement part that needs to be ordered first, is there a safer, lower-risk way to apply the same fix?
This step is also exactly where escalation becomes relevant, if needed. Not every problem is within a given technician’s ability, authority, or access level to fix directly, and recognizing that limitation — rather than attempting a fix that’s genuinely beyond your scope — is itself a mature, correct application of this step, not a failure of it. Knowing when to hand a confirmed, well-documented problem off to someone better positioned to solve it is a real, valued professional skill in its own right.
Step 5: Verify Full System Functionality
It’s tempting to consider a problem solved the instant the original symptom disappears, but this step exists specifically because that assumption is often wrong. Verifying full system functionality means confirming that the original problem is genuinely resolved and that nothing else was broken as a side effect of the fix.
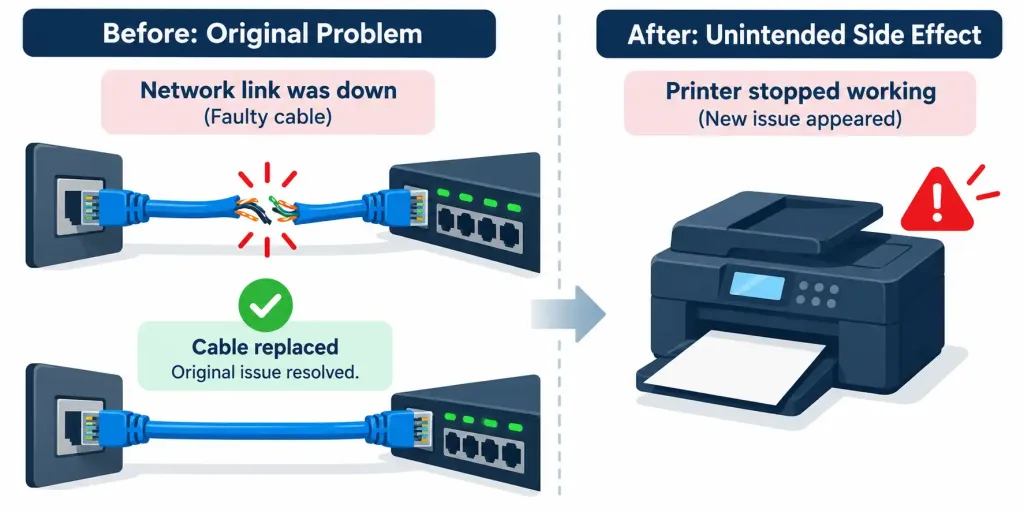
A classic example: a technician replaces a failed network cable to fix a connectivity complaint, the connection comes back up, and the technician moves on — only for the user to report an hour later that a specific printer, which happened to share that same network segment, has now stopped working, because the cable swap inadvertently changed something about how that segment was configured. Confirming full functionality, not just the absence of the original complaint, is exactly what this step is designed to catch before it becomes a second, separate support ticket.
Step 6: Document Findings, Actions, and Outcomes
The final step, documentation, is the one most frequently skipped under time pressure — and it’s arguably the step with the highest long-term payoff relative to how little time it actually takes. Good documentation captures what the problem actually was, what theory turned out to be correct, what action actually fixed it, and any relevant details about the environment where it occurred.
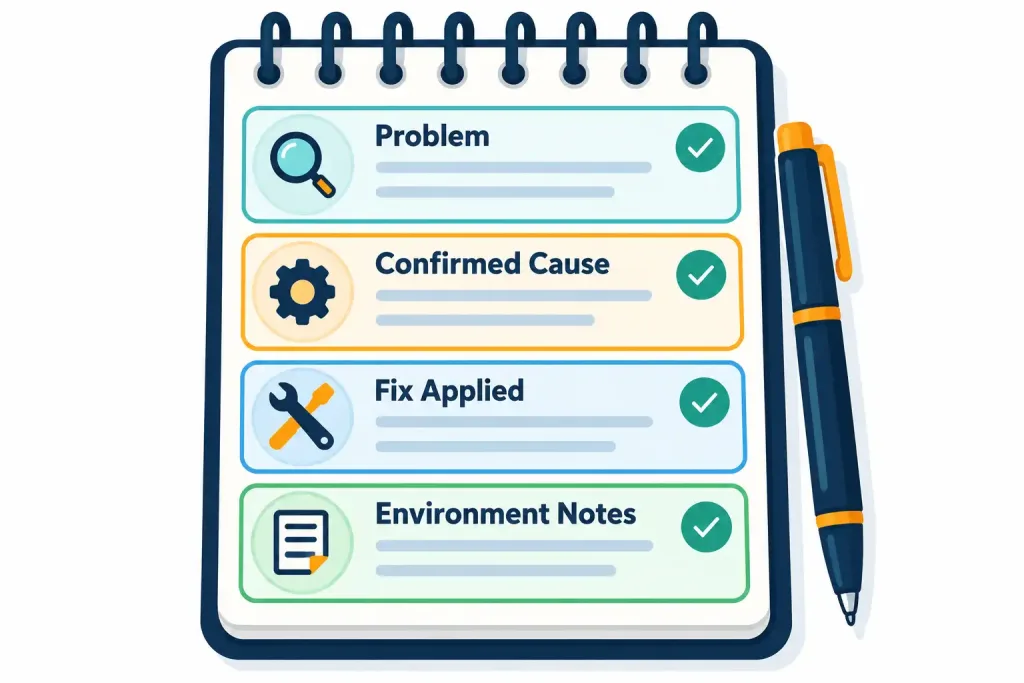
The value of this step compounds over time in a way that’s easy to underestimate in the moment. The next time the same or a very similar problem occurs — whether to the same technician six months later, or to a completely different colleague who’s never seen the issue before — good documentation turns what could be another full cycle through all six steps into a fast, confident, five-minute fix, because someone already did the hard diagnostic work and wrote it down.
A Full Worked Walkthrough: Troubleshooting a “No Internet” Complaint
Let’s apply all six steps to a genuinely realistic complaint: a user reports “the internet isn’t working.”
- Identify the problem. Ask clarifying questions: Is it just this one device, or every device in the office? Did it stop working suddenly, or has it been getting progressively worse? Can the user reach anything at all, or is absolutely nothing loading? Suppose the answer is: just this one laptop, stopped suddenly, nothing loads at all.
- Establish a theory of probable cause. Given that it’s isolated to a single device, a reasonable first theory — starting with the simplest, most common explanation — might be that the laptop’s Wi-Fi is simply turned off, or that it’s connected to the wrong wireless network.
- Test the theory. Check the laptop’s Wi-Fi settings directly. Suppose this reveals Wi-Fi is on and connected to the correct network, ruling out the first theory. A new theory forms: maybe the laptop has a valid Wi-Fi connection but an incorrect IP configuration. Testing this by checking the device’s IP settings reveals it has a self-assigned address rather than one from the network — confirming the actual cause.
- Establish a plan of action and implement the solution. The plan is to release and renew the device’s IP configuration, prompting it to properly request a new address. This is implemented directly.
- Verify full system functionality. Confirm the laptop can now load a webpage successfully, and also check that nothing else on the device seems affected — email, other network-dependent apps — to make sure the fix didn’t introduce a new problem elsewhere.
- Document findings, actions, and outcomes. Record: “User’s laptop had a self-assigned IP address, preventing all connectivity. Resolved by releasing and renewing the IP configuration. No other devices affected.” This single note could save significant time if the same laptop, or a similar one, has the same issue again later.
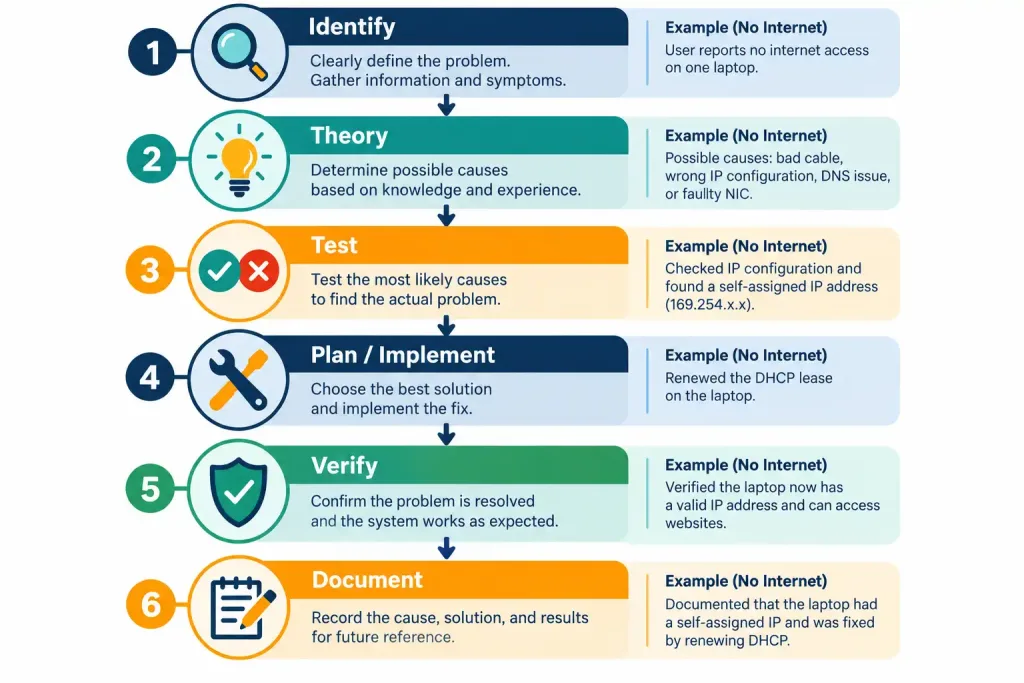
Notice how each step built directly on the one before it, and how step three genuinely required cycling through a rejected theory before landing on the correct one — exactly the normal, expected pattern described earlier in this lesson.
A Second Walkthrough: “The Printer Won’t Print”
A second example helps confirm the pattern holds up across genuinely different kinds of problems, not just networking ones. A user reports: “My document won’t print.”
- Identify the problem. Clarifying questions: Does the printer show any error lights? Has anyone else printed successfully from this same printer recently? Did this document print before, or is this the very first attempt? Suppose the answers reveal: the printer shows a solid error light, and a coworker printed successfully from it ten minutes ago.
- Establish a theory of probable cause. Since the printer worked minutes ago for someone else, the problem is likely specific to this user’s job or connection rather than the printer itself being broken outright. A reasonable first theory, starting simple: the print job may be stuck in this user’s print queue.
- Test the theory. Check the user’s print queue directly. Suppose it shows the job status as “error — paused.” This confirms the print job itself, not the printer hardware, is the actual issue.
- Establish a plan of action and implement the solution. Cancel the stuck print job and resend it from the application.
- Verify full system functionality. Confirm the document actually prints successfully this time, and check that the printer is still available and functioning normally for other users afterward, since clearing a stuck queue occasionally affects other pending jobs too.
- Document findings, actions, and outcomes. Record: “User’s print job became stuck in an error/paused state in the print queue, despite the printer itself functioning normally for other users. Resolved by canceling and resending the job. No impact on other queued jobs.” A future technician facing a similar single-user “printer won’t print” complaint now has a fast first theory to test.
This second walkthrough deliberately looks nothing like the networking example — different symptom, different cause, different fix — and yet the exact same six-step skeleton carried both of them from vague complaint to confirmed, documented resolution.
Why This Matters for a Career in IT
This methodology isn’t a purely academic checklist — it’s the actual mental model experienced IT professionals use, consciously or not, for every problem they encounter, whether it’s a five-minute fix or a multi-day investigation. Employers specifically value technicians who can demonstrate this kind of structured thinking rather than technicians who happen to get lucky with random guesses, because structured thinking scales to problems the technician has never seen before, while lucky guessing does not.
If you continue on toward networking-specific coursework, this exact same methodology reappears in more depth, applied specifically to network problems — the troubleshooting methodology lesson in the Network+ series builds on these exact same six steps (expanded slightly further there), applying the identical structured thinking to cabling faults, routing issues, and the other network-specific problem categories covered in that course.
It’s also worth noting that this methodology scales down just as well as it scales up. A five-minute help desk call about a stuck print job and a multi-hour investigation into an intermittent server outage both follow the identical six-step skeleton — the only real difference is how much time and depth each step demands. A brand-new technician and a twenty-year veteran are, in a real sense, running the exact same mental process; the veteran is simply faster at forming accurate theories in step two, because years of documented experience (step six, paying off again) have given them a much larger library of “probable causes” to draw from immediately.
Recognition-Level Verification Concepts
A few patterns are worth recognizing on sight:
- Gathering information and asking clarifying questions, before attempting any fix, is step 1 — identifying the problem.
- An educated guess about the cause, formed from evidence rather than a random first idea, is step 2 — a theory of probable cause.
- A concrete action taken specifically to confirm or rule out that guess is step 3 — testing the theory.
- Actually applying a fix, after confirming the real cause, is step 4.
- Checking that the original issue is gone and nothing new broke is step 5 — verifying full functionality.
- Writing down what happened and how it was resolved, for future reference, is step 6 — documentation.
Common Exam Traps
- Don’t skip straight from “identify the problem” to “implement a fix” without forming and testing a theory first. A fix applied without confirming the actual cause is a guess dressed up as a solution, and it frequently doesn’t work.
- A test that rules out a theory is not a wasted step — it’s genuinely useful information, and moving back to form a new theory afterward is the correct, expected response, not a sign of failure.
- “The complaint went away” is not the same thing as “full functionality is verified.” Step 5 exists specifically because a fix can resolve the original symptom while quietly breaking something else.
- Documentation is a required step in the methodology, not an optional bonus activity for when there’s spare time. Treating it as skippable defeats much of the long-term value of following a structured methodology at all.
- Theories should be built from most probable to least probable, based on available evidence — jumping straight to a rare, exotic explanation before ruling out the common, simple ones is a frequently tested mistake.
- Escalating a problem is not a failure of the methodology — it’s a correct application of step four when a fix genuinely falls outside your access, authority, or expertise. Don’t confuse “I couldn’t fix this myself” with “the methodology didn’t work.”
Lesson 1.4 Practice Quiz — The Troubleshooting Methodology
17 questions covering all six steps of the troubleshooting methodology, from identifying the problem through documentation.
Tech+ FC0-U71 · Domain 1.0 · Final Lesson Of Module 1📘 Module 1 Complete
That's Domain 1.0 (IT Concepts and Terminology) finished — 4 of 4 lessons. Next up: Domain 2.0, Infrastructure.
Summary
The troubleshooting methodology is a structured, six-step process: identify the problem, establish a theory of probable cause, test the theory, establish a plan of action and implement the solution, verify full system functionality, and document findings.
Identifying the problem thoroughly — including using a framework like input/processing/output/storage to sort a vague complaint — often does more to solve an issue quickly than any specific technical fix applied later.
A rejected theory during testing is genuinely useful information, not wasted effort, and cycling between forming and testing theories multiple times is a normal part of solving harder problems.
Verifying full system functionality catches fixes that solved the original complaint while introducing a new, separate problem elsewhere.
Documentation is a required final step, not an optional afterthought, because it directly reduces the time needed to solve the same or a similar problem the next time it occurs.
This lesson completes Domain 1.0 (IT Concepts and Terminology) at 4/4 lessons; the next lessons move into Domain 2.0, Infrastructure — the largest domain in the entire course.