Domain 5.10 | Security Fundamentals — 15% of exam
Learning Objectives
By the end of this lesson, you will be able to:
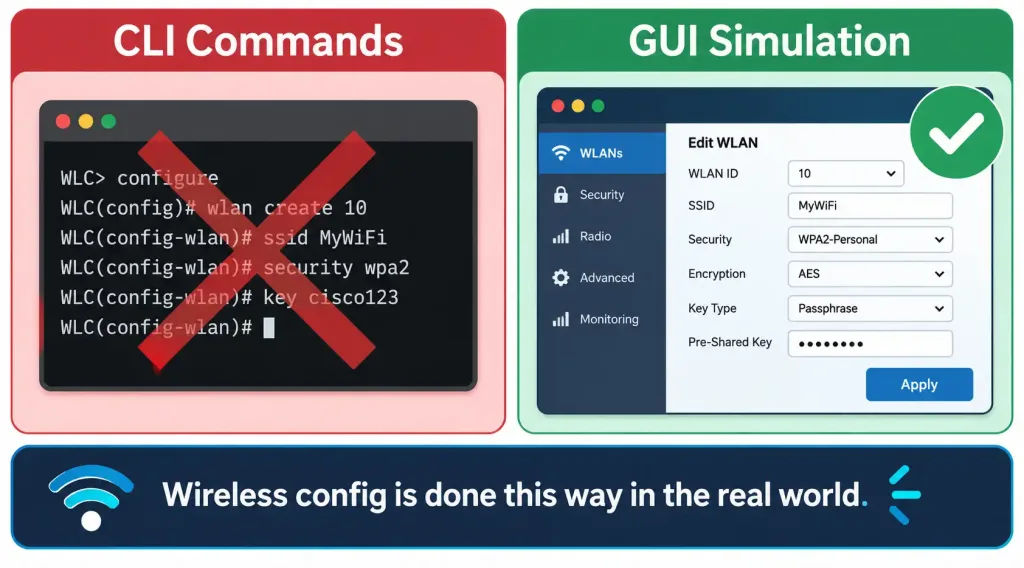
- Explain why this objective is tested through a GUI-based simulation rather than CLI command syntax.
- Describe the conceptual workflow for creating a WLAN and configuring WPA2-PSK security through a wireless GUI.
- Correctly select WPA2 as the security protocol and PSK as the authentication key management method.
- Distinguish the GUI options for PSK versus 802.1X within the same security configuration screen.
- Recognize the practical settings involved in a PSK configuration: passphrase, format, and where it’s applied.
Key Terms Glossary
| Term | Definition |
|---|---|
| WLAN (Wireless Local Area Network) | A named, configured wireless network (identified by its SSID) that clients connect to. |
| SSID (Service Set Identifier) | The broadcast name of a wireless network, visible to clients scanning for available networks. |
| Layer 2 Security | The GUI setting category where the wireless security protocol (WPA2, WPA3, WEP, or none) is selected. |
| Authentication Key Management (AKM) | The GUI setting determining how clients authenticate — PSK (shared passphrase) or 802.1X (individual credentials). |
| Passphrase | The shared credential configured for PSK authentication, entered in either ASCII or hexadecimal format. |
| WLC (Wireless LAN Controller) | A centralized device managing multiple access points and their WLAN configurations through a single GUI. |
Why This Objective Is Tested Through a GUI, Not CLI
This objective, like objective 2.9 earlier in the CCNA blueprint, is explicitly a GUI-based simulation objective. Rather than testing memorized CLI command syntax, the exam presents a simulated wireless configuration interface — typically resembling a Wireless LAN Controller (WLC) web GUI — and asks the candidate to navigate to the correct screen and select the correct options to achieve a stated configuration goal. This reflects real-world practice: wireless configuration, especially on WLC platforms, is overwhelmingly performed through a graphical interface rather than a command line, unlike the router and switch CLI configuration covered throughout most of this course. Knowing the conceptual workflow — which screen, which setting, which option to select — is what this objective actually tests, not any specific command syntax.
The Conceptual GUI Workflow
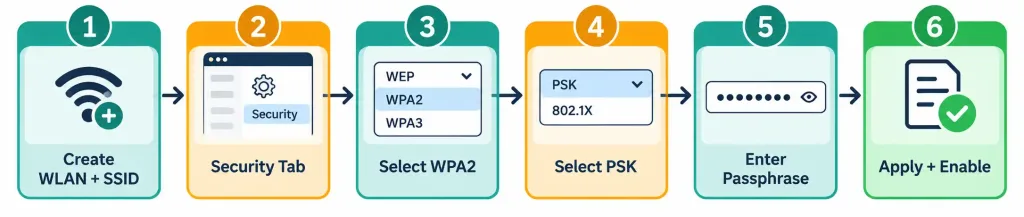
While exact menu layouts vary between platforms and software versions, the underlying workflow for configuring a WPA2-PSK WLAN follows a consistent conceptual sequence, and understanding this sequence is the actual skill being tested.
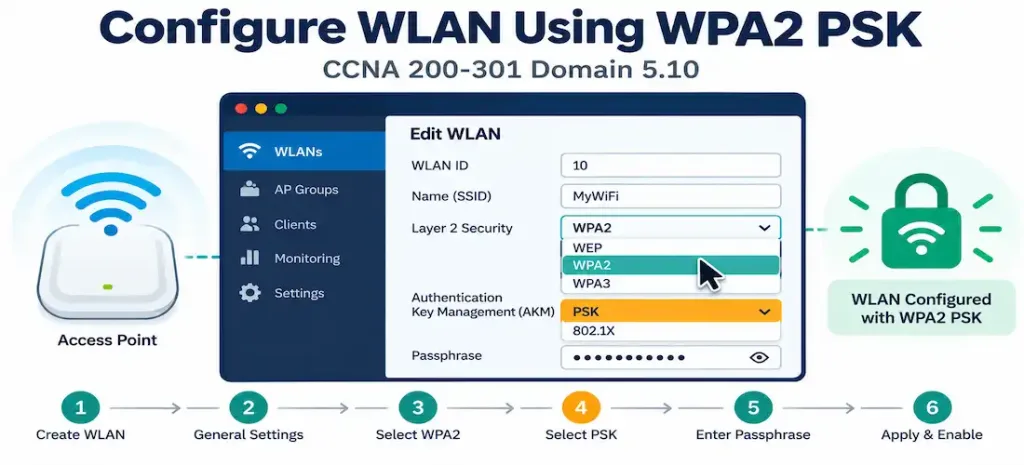
Step 1 — Create or select the WLAN. In a WLC GUI, this typically starts on a “WLANs” page, where an administrator either creates a new WLAN entry or edits an existing one. Creating a new WLAN requires assigning it an SSID — the name clients will see when scanning for available wireless networks — and a Profile Name, an internal identifier the controller uses to reference this specific WLAN configuration, which may or may not match the SSID itself.
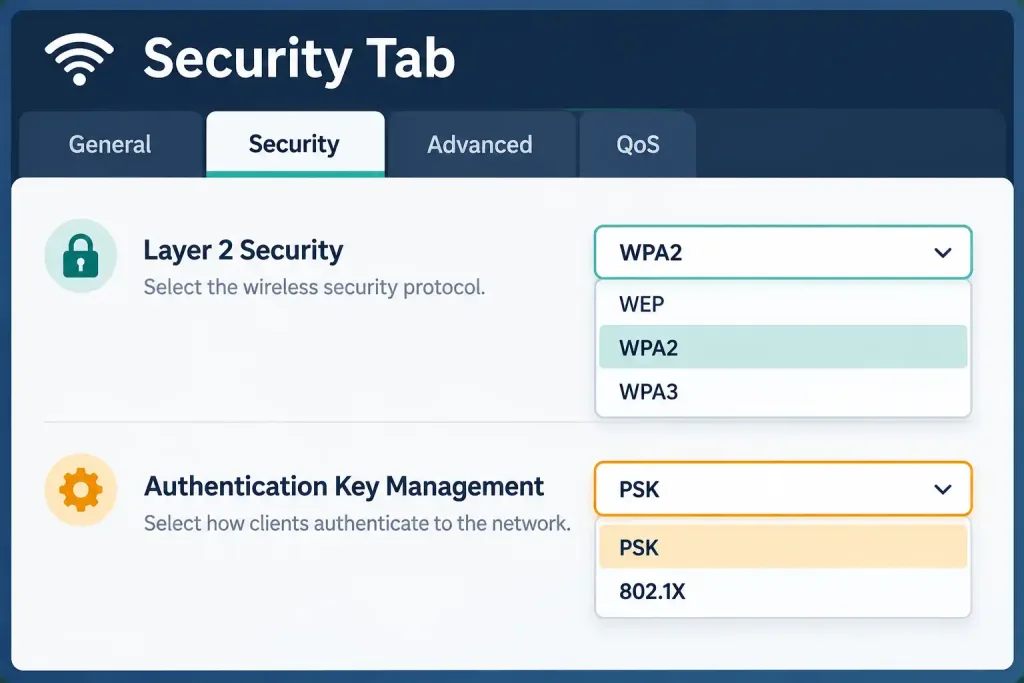
Step 2 — Navigate to the Security tab. WLAN configuration screens are typically organized into several tabs — commonly General, Security, QoS, and Advanced. The Security tab is where this objective’s actual configuration work happens, specifically within a Layer 2 Security sub-section.
Step 3 — Select WPA2 as the Layer 2 Security type. A dropdown or set of radio buttons presents the available security protocols — commonly options like None, WEP, WPA+WPA2, or WPA2+WPA3, depending on the platform and software version. Selecting WPA2 here (or a combined WPA2+WPA3 option if the platform presents it that way) establishes the encryption and handshake generation covered in objective 5.9 — this is the same conceptual choice discussed there, just made through a GUI dropdown rather than described in the abstract.
Step 4 — Select PSK as the Authentication Key Management method. Within the same Security tab, a separate setting — commonly labeled Authentication Key Management (AKM) — determines how clients authenticate against the WPA2 protection just selected. This is where the Personal versus Enterprise distinction from objective 5.9 actually gets made in practice: selecting PSK configures Personal mode, using a single shared passphrase; selecting 802.1X instead would configure Enterprise mode, requiring a RADIUS server (the exact protocol from objective 5.8) for individual per-user authentication.
Step 5 — Enter the pre-shared key. Once PSK is selected as the authentication method, a passphrase field appears, requiring the actual shared credential clients will use to connect. Most GUIs offer a choice of format — ASCII (a human-readable passphrase, typically 8–63 characters) or Hex (a 64-character hexadecimal string) — with ASCII being the far more commonly used and practical option for real deployments, since a hex key is impractical for a human to type or remember.
Passphrase Strength Still Matters, Even Behind SAE
It’s worth connecting this GUI step back to the security depth covered in objective 5.9: even on a WPA3 network benefiting from SAE’s resistance to offline dictionary attacks, or on a WPA2 network where that resistance doesn’t exist, the passphrase entered in this exact field is still the foundation the entire connection’s security rests on.
A short, common, or easily guessable passphrase remains a meaningful weakness regardless of which underlying protocol generation is protecting the handshake itself — SAE closes the offline attack vector specifically, but an attacker attempting a modest number of online, live-interaction guesses against an extremely weak or common passphrase could still eventually succeed, since SAE’s protection is about the mechanics of the exchange, not a guarantee that any passphrase whatsoever is now unconditionally safe. This is a practical reminder that configuring the correct security protocol in this GUI (as this objective tests) is necessary but not sufficient on its own — the actual passphrase chosen still matters just as much as it always has.
Step 6 — Apply the WLAN to the appropriate interface and enable it. The WLAN configuration typically needs to be mapped to a specific VLAN or interface (determining which internal network segment wireless clients on this SSID land on) and explicitly enabled/administratively turned on before it actually begins broadcasting and accepting connections.
Additional Settings Sometimes Encountered in the General Tab
Beyond the core Security tab workflow, a General tab commonly presents a few additional settings worth recognizing, even though they sit outside this objective’s specific WPA2-PSK focus. A Broadcast SSID toggle determines whether the network name is actively advertised to scanning clients or kept hidden, requiring clients to already know the exact SSID to connect — hiding an SSID is sometimes mistaken for a genuine security measure, but it provides essentially no real protection against a determined attacker capable of passively observing wireless traffic, since the SSID is still transmitted in other parts of the wireless exchange even when not actively broadcast in beacon frames.
A Radio Policy setting may restrict which wireless bands (2.4 GHz, 5 GHz, or both) this specific WLAN operates on, independent of its security configuration entirely. Recognizing that these settings exist, and that they’re separate from the actual WPA2-PSK security configuration this objective focuses on, helps avoid confusing an unrelated GUI option for something relevant to this specific task during a simulation.
Recognizing the PSK vs. 802.1X Choice in the GUI
Since this same Security tab and AKM setting is also where Enterprise mode would be configured, it’s worth being precise about what changes in the GUI depending on which option is selected — this is exactly the kind of distinction a GUI simulation question is likely to test directly.
Selecting PSK reveals a passphrase entry field, exactly as described above — a single credential configured once, directly in this WLAN’s settings, with no external server dependency at all.
Selecting 802.1X instead reveals entirely different fields — typically a requirement to specify a RADIUS server (its IP address and shared secret key), since 802.1X authentication depends entirely on that external server to actually verify individual user credentials. No passphrase field appears at all in this mode, because there is no single shared passphrase — each user authenticates with their own separate credentials, verified by the RADIUS server rather than checked against anything stored directly in the WLAN’s own configuration.
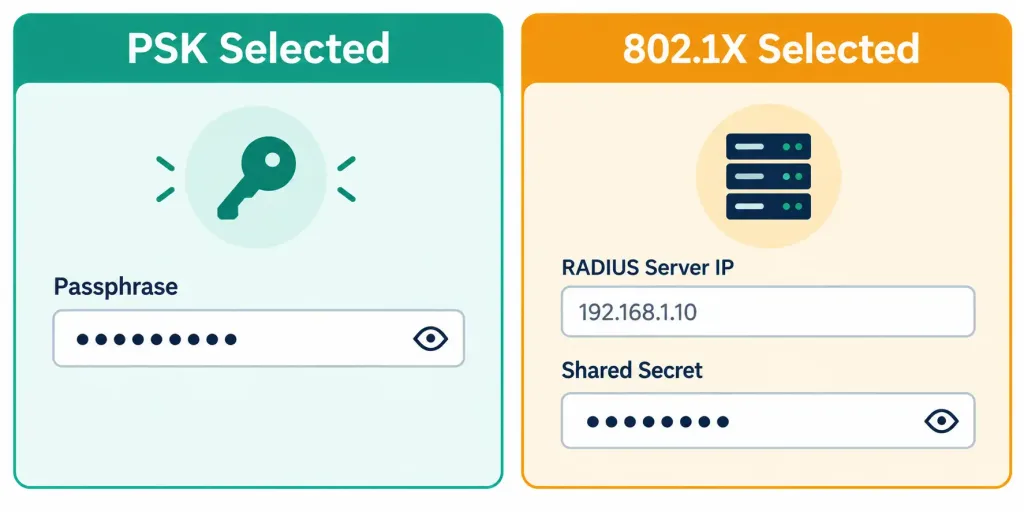
Recognizing which set of fields appears — and correctly matching that to whether the scenario calls for Personal or Enterprise mode — is precisely the practical skill this GUI-based objective is testing, building directly on the conceptual Personal/Enterprise distinction already covered in objective 5.9.
Common Misconceptions
- “This objective requires memorizing WLC CLI commands.” It’s explicitly a GUI-based simulation objective — the skill tested is navigating the correct GUI screens and selecting the correct options, not recalling command-line syntax.
- “WPA2 and PSK are selected in the same dropdown, as a single combined option.” They’re typically two separate settings within the Security tab — Layer 2 Security (WPA2, WPA3, WEP, none) determines the underlying protocol, while Authentication Key Management (PSK, 802.1X) determines how clients authenticate within that protocol.
- “A hex-format pre-shared key is the standard, preferred choice.” ASCII format is far more commonly used in practice, since a 64-character hexadecimal string is impractical for a human to type or remember, while an ASCII passphrase remains reasonably usable.
- “Creating a WLAN automatically makes it active and broadcasting.” Most platforms require an explicit enable/administrative status toggle in addition to the WLAN’s configuration being complete — a fully configured but disabled WLAN won’t broadcast or accept connections.
- “Selecting 802.1X in the GUI still requires entering a shared passphrase somewhere.” It doesn’t — 802.1X mode depends entirely on a configured RADIUS server for authentication, and no shared passphrase field exists in this mode at all, since individual per-user credentials replace that concept entirely.
- “Every wireless GUI platform uses identical menu names and layouts, so memorizing one exact screen sequence is sufficient preparation.” Menu wording and exact layout genuinely vary between vendors and software versions — a candidate who memorizes only one specific platform’s exact click sequence, rather than the underlying conceptual workflow (WLAN creation, Layer 2 Security selection, AKM selection, passphrase entry, apply/enable), risks being thrown off by a simulation using slightly different labels or tab groupings than expected. The concepts transfer; the exact pixel-level layout does not.
A Representative GUI Walkthrough
Since this objective is tested via simulation, walking through a representative (though platform-generic) sequence grounds the conceptual steps above in something closer to what an actual exam simulation might present.
Screen 1 — WLANs list. An administrator clicks “Create New” or a similar option, entering CorpGuest-PSK as the Profile Name and CorpGuest as the SSID.
Screen 2 — General tab. Basic settings appear here, including an “Enabled” checkbox (often left unchecked by default until configuration is complete) and the interface/VLAN this WLAN should be mapped to — for this example, a VLAN dedicated to guest wireless traffic.
Screen 3 — Security tab, Layer 2 Security section. The administrator selects WPA2 (or a combined WPA2/WPA3 option, if the specific platform presents that as a single choice) from the Layer 2 Security dropdown.
Screen 4 — Security tab, AKM section. Immediately below or alongside the Layer 2 Security setting, the administrator selects PSK as the Authentication Key Management method, which reveals a passphrase field.
Screen 5 — PSK configuration. The administrator selects ASCII as the format and enters a strong shared passphrase into the revealed field.
Screen 6 — Apply and enable. The administrator returns to the General tab (or clicks an equivalent status toggle), checks “Enabled,” and saves/applies the configuration, at which point the WLAN begins broadcasting CorpGuest with WPA2-PSK protection active.
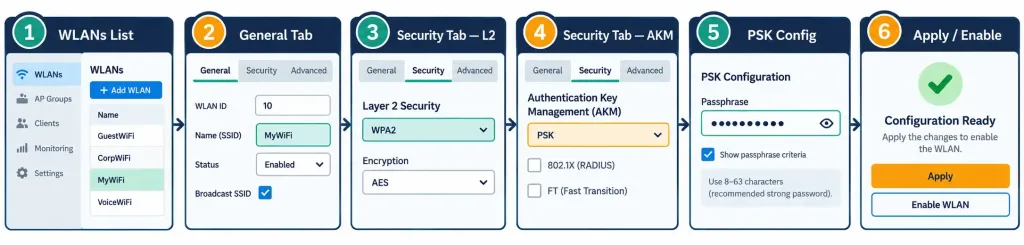
This sequence — create WLAN, configure Layer 2 Security, configure AKM, configure the passphrase, apply and enable — is the pattern worth internalizing conceptually, since the specific screen layout, button placement, and exact wording will vary across simulated platforms and software versions, but this underlying sequence of decisions remains consistent.
Common Simulation Pitfalls Worth Anticipating
A few specific mistakes are worth anticipating directly, since GUI simulation questions are often designed around exactly these kinds of easy-to-overlook steps rather than testing whether a candidate simply knows “WPA2-PSK” as a phrase. Selecting the correct Layer 2 Security and AKM values but forgetting to actually save or apply the configuration change is a common simulation trap — many GUIs require an explicit “Apply” or “Save Configuration” action distinct from simply making a selection in a dropdown, and a change left unsaved has no actual effect.
Similarly, some platforms nest the Authentication Key Management setting inside an expandable or collapsed section that isn’t visible until the Layer 2 Security dropdown is set to a value that supports it — meaning PSK and 802.1X options may not even appear on screen until WPA2 (or WPA3) has already been selected first, making step order genuinely matter within the simulation itself, not just as a matter of general workflow tidiness.
WLC-Based vs. Standalone Access Point Configuration
Most CCNA-level treatment of this objective assumes a Wireless LAN Controller (WLC) managing multiple access points centrally, but it’s worth briefly recognizing that smaller deployments — a single standalone access point in a small office, or a home router’s built-in wireless functionality — present a conceptually similar but structurally simpler GUI. A standalone device typically combines what a WLC splits across separate “WLANs” and “Access Points” sections into a single wireless settings page, since there’s only one radio to configure rather than potentially dozens of access points sharing common WLAN definitions pushed out from a central controller.
The underlying decisions remain identical regardless of scale: select a security protocol (WPA2), select an authentication method (PSK), and enter a passphrase. What changes between a WLC-managed enterprise deployment and a standalone consumer or small-business access point is primarily the surrounding administrative structure — how many devices share this configuration, whether it’s pushed centrally or configured device-by-device, and how many additional enterprise-oriented settings (RF profiles, AP groups, and similar) surround the core security configuration. For this specific objective’s purposes, recognizing that the conceptual PSK configuration task looks essentially the same regardless of which scale of platform presents it is more valuable than memorizing screenshots from any one specific product line.
Frequently Asked Questions
Does the SSID name affect the security configuration in any way? No — the SSID is purely the broadcast name clients see; it has no bearing on which security protocol or authentication method is configured, which are entirely separate settings within the Security tab.
Can a single access point or WLC broadcast multiple WLANs simultaneously with different security settings? Yes — it’s common to broadcast one WLAN with WPA2-PSK for general guest or simple access alongside a separate WLAN using WPA2/WPA3-Enterprise for corporate devices needing individual accountability, each configured independently through this same conceptual workflow.
What happens if an administrator forgets to apply the WLAN to a VLAN/interface? The specific failure mode varies by platform, but broadly, clients may be unable to obtain appropriate addressing or reach intended internal resources, since the WLAN’s traffic has nowhere correctly mapped to land on the wired network — this interface/VLAN mapping step is easy to overlook since it’s separate from the security configuration itself.
Is WPA3 configured through the same Layer 2 Security dropdown as WPA2? Generally yes on modern platforms — the same dropdown typically offers WPA2, WPA3, or a combined WPA2+WPA3 transition option, following the exact protocol distinctions covered in objective 5.9, just presented as GUI choices rather than abstract concepts.
Why does this objective specifically call out PSK rather than covering 802.1X configuration in equal depth? The exam blueprint scopes this particular objective to WPA2-PSK specifically — Enterprise/802.1X wireless configuration in similar GUI depth is not this objective’s explicit focus, though understanding the contrast (as covered in this lesson) helps correctly recognize and avoid the 802.1X option when a scenario specifically calls for PSK.
Does the Radio Policy setting mentioned in the General tab affect WPA2-PSK security in any way? No — Radio Policy controls which wireless frequency bands (2.4 GHz, 5 GHz, or both) a WLAN operates on, an entirely separate consideration from the security protocol and authentication method configured in the Security tab. A WLAN can be restricted to a single band or allowed on both while still using identical WPA2-PSK security settings either way, since these are independent configuration dimensions that happen to live in different tabs of the same WLAN configuration screen.